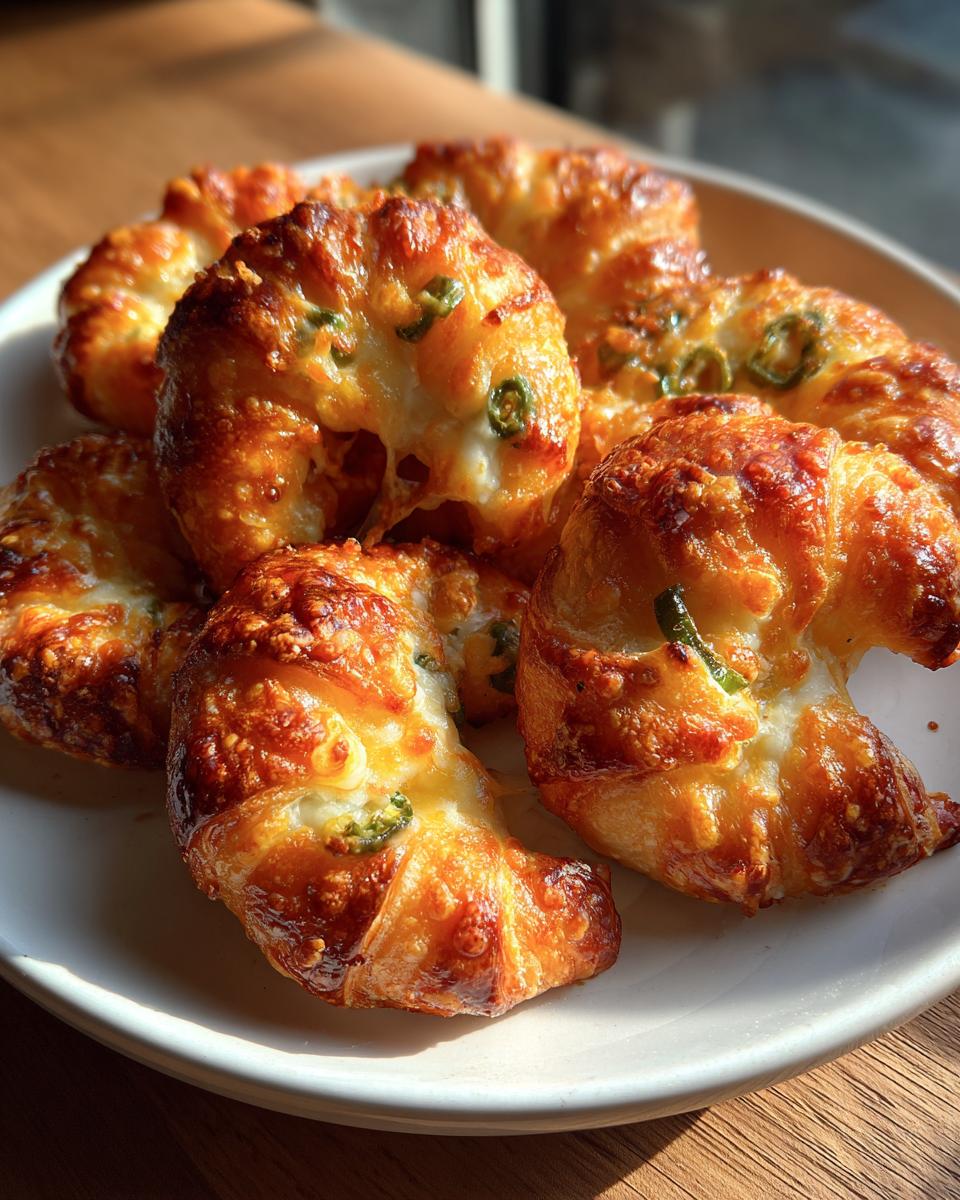
Let me tell you about my favorite party trick—these fiery little Rattlesnake Bites disappear faster than I can bake them! They pack all that bold Southwest flavor I crave into one irresistible, cheesy bite. What I love most? They come together in about 30 minutes flat. Just imagine melty cheddar and cream cheese spiked with green chilies and a sneaky kick of cayenne, all wrapped up in flaky crescent dough. (Confession: I usually add an extra pinch of cayenne because I like living dangerously, but you do you!) These are the appetizer I turn to when friends pop over unannounced or when game day hunger strikes. Trust me, that baking sheet will be empty before it even cools.

Why You’ll Fall Head Over Heels for These Rattlesnake Bites
Okay, let me count the ways these little spicy wonders will steal your heart (and probably your guests’ hearts too)!
- They’re ridiculously fast – From fridge to table in 30 minutes flat? Yes please! I’ve whipped these up during commercial breaks when unexpected guests arrive.
- That addictive kick – The blend of green chilies and cayenne gives just enough heat to make things interesting without setting your mouth on fire (unless you want to – like I usually do!).
- Perfect party food – These disappear faster than you can say “appetizer” at gatherings. I always double the recipe because someone inevitably sneaks thirds.
- Customizable spice level – Not a heat seeker? Dial back the cayenne. Want more punch? Add diced jalapeños. They’re basically impossible to mess up.
- Crescent dough magic – That flaky, buttery exterior hugging the melty cheese center? Pure bliss. I may or may not have burned my fingers more than once because I couldn’t wait to dig in.
The best part? People always think you slaved over these, when really they couldn’t be simpler. My secret weapon for looking like a kitchen rockstar!
The Simple Ingredients That Pack a Punch
What makes these Rattlesnake Bites so magical? Just a handful of basic ingredients that create big flavor. Here’s what you’ll need:
- Cream cheese (8 oz) – Must be softened! Trust me, wrestling with cold cream cheese is no fun. I leave mine out on the counter for about an hour before starting.
- Shredded cheddar (1 cup) – Pack it in that measuring cup nice and tight – we want cheesy goodness in every bite.
- Diced green chilies (1 can, 4oz) – Don’t drain them! That liquid gold adds moisture and tang.
- Spices – Garlic powder, cumin, and cayenne create that signature Southwest kick I adore.
- Crescent roll dough (1 package, 8 count) – The refrigerated kind that pops open (scares me every time!).
- 1 egg – Just for that golden egg wash shine.
See? Nothing fancy – just pantry staples that transform into something extraordinary. Now let’s make some magic!
How to Make Rattlesnake Bites
Alright, let’s get these fiery little beauties in the oven! I’ve made these enough times that I could probably do it in my sleep (though I don’t recommend that – hot ovens and sleepwalking don’t mix). Here’s how we turn those simple ingredients into pure magic:
Step 1: Prepare the Cheese Mixture
First things first – that creamy, spicy filling! Grab your softened cream cheese (see why we left it out now?), cheddar, and all those lovely spices. I like to mix by hand with a sturdy spoon – there’s something therapeutic about feeling the ingredients come together. The mixture should be completely smooth, no cream cheese lumps allowed! Pro tip: taste a tiny bit (with a clean spoon!) and adjust the cayenne if needed. This is where you make it your own.
Step 2: Assemble the Bites
Now for the fun part – that satisfying *pop* when you open the crescent dough! Separate the triangles and spoon about a tablespoon of filling onto each. Here’s my trick: spread it along the wider end, then roll up like you’re swaddling a cheesy baby. Pinch the edges really well – we don’t want any spicy cheese explosions in the oven (learned that the hard way!). Arrange them on a baking sheet like little soldiers ready for battle.

Step 3: Bake to Perfection
Give those beauties a quick egg wash (just beat an egg with a splash of water) for that gorgeous golden shine. Into the preheated oven they go! Watch for that moment around 12 minutes when they transform from pale dough to golden-brown perfection. The smell will have you hovering by the oven – resist opening it too often! They’re done when you can see that cheese peeking out just slightly, bubbling at the edges. That’s your cue to dig in (after a minute to cool – hot cheese burns are no joke!).
Tips for Perfect Rattlesnake Bites
After burning more batches than I’d like to admit (and dealing with cheese explosions – yikes!), I’ve learned a few tricks to make these Rattlesnake Bites foolproof:
- Seal those edges tight! If you think you’ve pinched enough, pinch some more. Loose edges mean molten cheese leaking out (delicious but messy). I run a damp finger along stubborn spots to help them stick.
- Watch the clock – These go from golden to scorched fast. Set a timer for 12 minutes, then check every 60 seconds. Perfect bites should be lightly tanned, not dark brown.
- Spice wisely – Start with 1/4 tsp cayenne, then taste the filling. You can always add more, but you can’t take it out! (Another lesson learned the hard way.)
- Egg wash magic – Don’t skip it! That glossy finish makes them look bakery-worthy. Brushing the tops lightly prevents dough from drying out.
These simple tweaks took my bites from “okay” to “where have these been all my life?” status!
Serving These Spicy Bites Right
Oh, you’re gonna love this part – dressing up these little firecrackers for their big debut! I always put out a trio of dipping sauces because, let’s be honest, everyone has their own perfect pairing. My must-haves:
- Cool ranch – The classic choice that tames the heat beautifully. I use homemade buttermilk ranch when I’m feeling fancy.
- Chunky salsa – Double down on those Southwest vibes with a fresh tomato salsa. The acidity cuts through the richness.
- Creamy avocado lime – My personal favorite! Just blend avocado with Greek yogurt, lime juice, and cilantro.
Game day? These disappear faster than touchdowns! I arrange them on a wooden board with the dips in little bowls – instant crowd pleaser. They’re also perfect for book club (we pretend we’re civilized while inhaling them) or cocktail parties where you want something substantial but still finger-friendly. Pro tip: keep that baking sheet warm in a low oven (about 200°F) if you’re serving them throughout the evening – nobody likes a cold Rattlesnake Bite!

Keeping Those Bites Fresh and Crispy
Okay, let’s be real – these rarely last long enough to store! But when they do (miracle of miracles), here’s how to keep them tasting fresh: pop any leftovers in an airtight container for up to 3 days. When reheating, skip the microwave – it turns them soggy. Instead, tuck them in a 350°F oven for about 5 minutes to bring back that glorious crunch. I’ve been known to “accidentally” make extra just so I can enjoy them reheated with my morning coffee (don’t judge – it’s a lifestyle choice!).
Spice It Up: Endless Ways to Twist These Rattlesnake Bites
Once you’ve mastered the basic recipe (which is dangerously good on its own), it’s time to play! Here are my favorite ways to mix things up when I’m feeling creative:
- Jalapeño power – Swap the green chilies for fresh diced jalapeños when I want serious heat (seeds in for the brave, seeds out for the cautious).
- Cheese swap – Pepper Jack melts beautifully and adds another layer of spice, while Monterey Jack keeps things mild and creamy.
- Breakfast version – I’ve added cooked crumbled sausage and subbed the cayenne for black pepper – perfect for brunch gatherings!
- Southwest upgrade – A tablespoon of taco seasoning in place of the individual spices gives them instant fiesta vibes.
The beauty of this recipe? It’s like a blank canvas for your spicy cravings. My husband still talks about the batch where I added bacon bits – pure magic!
Frequently Asked Questions
Oh honey, I’ve gotten all sorts of questions about these Rattlesnake Bites over the years! Let me tackle the ones that come up most often:
Can I freeze these before baking? Absolutely! Assemble them completely, then freeze on a baking sheet before transferring to an airtight container. When ready, bake straight from frozen—just add 3-5 extra minutes. My freezer always has a batch ready for emergencies (read: sudden snack attacks).
How do I tone down the heat? Easy peasy! Skip the cayenne entirely or just use a pinch. The green chilies alone give nice flavor without too much burn. My mother-in-law prefers them this way—she calls them “Garden Snake Bites” (adorable, right?).
Can I use homemade dough instead? Of course! My grandma’s biscuit dough works beautifully—just roll it out thin. Though between us? I keep those canned crescents on hand for when laziness strikes (which is often).
Why egg wash? It’s not just pretty! That golden crust keeps the dough from drying out. No egg? Brush with melted butter instead—still delicious.
Got more questions? Slide into my DMs—I could talk Rattlesnake Bites all day!
What’s Inside These Fiery Little Bites?
Now, I’m no nutritionist (just a cheese enthusiast with a spice addiction), but here’s the scoop on what you’re biting into. Each Rattlesnake Bite packs about 180 calories – totally worth it for that melty, spicy goodness! They’ve got 5g protein from all that glorious cheese and just 2g sugar. The cayenne might make you sweat, but at least there’s zero trans fats!
*Small print from my kitchen*: These numbers are estimates, friends. Your bites might differ based on cheese brands or if you go wild with extra fillings (no judgment here!). But honestly? When they’re this delicious, who’s counting?
Rate This Recipe
I’d love to hear how your Rattlesnake Bites turned out! Did you crank up the heat or keep it mild? Tag me in your kitchen adventures – nothing makes me happier than seeing your spicy creations!
Print
Fiery Rattlesnake Bites: Irresistible 30-Minute Cheesy Wonders
- Total Time: 30 minutes
- Yield: 8 bites 1x
- Diet: Vegetarian
Description
Spicy and cheesy appetizers with a kick, inspired by the flavors of the Southwest.
Ingredients
- 1 package (8 oz) cream cheese, softened
- 1 cup shredded cheddar cheese
- 1 can (4 oz) diced green chilies
- 1/2 teaspoon garlic powder
- 1/2 teaspoon cumin
- 1/4 teaspoon cayenne pepper
- 1 package (8 count) refrigerated crescent roll dough
- 1 egg, beaten (for egg wash)
Instructions
- Preheat oven to 375°F (190°C).
- In a bowl, mix cream cheese, cheddar cheese, green chilies, garlic powder, cumin, and cayenne pepper.
- Unroll crescent dough and separate into triangles.
- Spoon 1 tablespoon of the cheese mixture onto each triangle.
- Roll dough into crescent shapes, sealing edges.
- Place on a baking sheet and brush with egg wash.
- Bake for 12-15 minutes or until golden brown.
- Serve warm.
Notes
- Adjust cayenne pepper for more or less heat.
- Store leftovers in an airtight container for up to 3 days.
- Reheat in the oven for best texture.
- Prep Time: 15 minutes
- Cook Time: 15 minutes
- Category: Appetizer
- Method: Baked
- Cuisine: Southwestern
Nutrition
- Serving Size: 1 bite
- Calories: 180
- Sugar: 2g
- Sodium: 320mg
- Fat: 12g
- Saturated Fat: 6g
- Unsaturated Fat: 4g
- Trans Fat: 0g
- Carbohydrates: 12g
- Fiber: 0g
- Protein: 5g
- Cholesterol: 40mg

