Let me tell you about the first time I fell in love with Pata Salad – it was at my aunt’s backyard fiesta, where the summer heat made everything taste ten times better. Among all the rich dishes, this refreshing salad stood out like a cool breeze! The magic is in that perfect combo: tender slices of boiled pork leg (we call it pata) mingling with crisp veggies, all dressed in that tangy soy-vinegar dressing that Filipinos adore. What I love most? It’s ridiculously simple to make yet always feels special. Whether it’s a quick weeknight dinner or a potluck star (trust me, it disappears fast at parties!), Pata Salad brings that satisfying crunch and savory-sweet balance that keeps you coming back for more. The best part? You probably have most ingredients in your kitchen right now!
Ingredients for Pata Salad
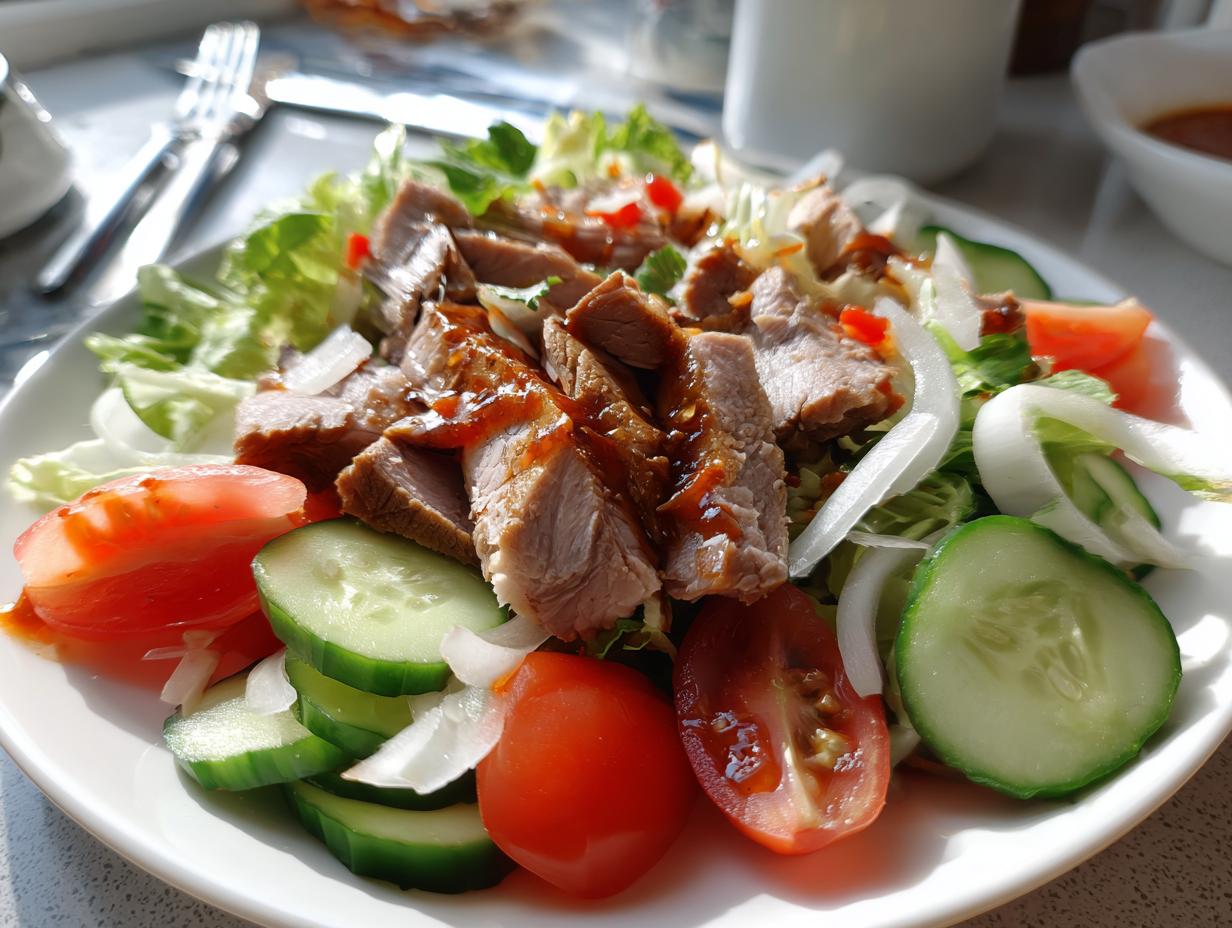
Here’s everything you’ll need to make this refreshing Filipino classic. I’ve learned through trial and error that the right prep makes all the difference – take it from someone who once served cucumber chunks so thick they could’ve been mistaken for pickle spears!
- 500g pork leg (pata) – bone-in for maximum flavor, boiled until fork-tender then sliced into bite-sized pieces (about 1/4-inch thick)
- 1 cup lettuce – shredded into ribbons (I prefer crisp romaine or iceberg for that satisfying crunch)
- 1 medium cucumber – sliced into thin half-moons (peel if the skin seems tough)
- 1 large tomato – diced (remove the seeds if you’re not a fan of extra juice in your salad)
- 1 medium red onion – thinly sliced (soak in ice water for 5 minutes if you want to tone down the sharpness)
- 2 tbsp soy sauce – use Filipino brands like Silver Swan for authentic flavor
- 1 tbsp cane vinegar – or substitute with apple cider vinegar in a pinch
- 1 tsp sugar – just enough to balance the tang
- Salt and pepper – to taste (I always do a taste test after mixing)
Pro tip from my lola: Always prepare your veggies while the pork is boiling – that way everything stays crisp and fresh when it’s time to assemble!
How to Make Pata Salad
Now comes the fun part – bringing all those fresh ingredients together into that perfect, crunchy-savory harmony! Don’t worry if you’re new to this – I’ve broken it down into simple steps. Just follow along, and you’ll be tossing up restaurant-quality Pata Salad in no time.
Preparing the Pork Leg
First, let’s tackle the star of our show – the pata! Place your pork leg in a large pot and cover with water by about 2 inches. Bring it to a rolling boil, then lower the heat to a simmer. Here’s my trick: I like to add a smashed garlic clove and a slice of ginger to the water – it gives the meat subtle fragrance without overpowering the salad. Let it bubble away for about 45 minutes to an hour, until the meat pulls away easily from the bone. Drain and let it cool just enough to handle (but don’t let it get cold – warm pork absorbs the dressing better!). Slice against the grain into thin, bite-sized pieces – this makes every morsel tender and easy to eat with the crisp veggies.
Mixing the Salad
While the pork cools slightly, grab your biggest mixing bowl – I use the same giant stainless steel one my mom gave me when I moved out. Toss in the shredded lettuce, cucumber slices, diced tomatoes, and onions. Now add those beautiful pork slices! Here’s where I get hands-on (literally) – I gently mix everything with my fingers to distribute evenly. You want every forkful to get a bit of everything – the cool crunch of veggies, the savory pork, and that tangy dressing we’re making next.

Making the Dressing
The dressing is where the magic happens! In a small bowl, whisk together the soy sauce and vinegar first. Then stir in the sugar until dissolved – this cuts the acidity beautifully. Taste as you go – you might want an extra pinch of sugar or splash of vinegar depending on your preference. My aunt Lydia always says “the dressing should make your mouth water, not pucker!” Drizzle it over the salad and toss gently – I use two big spoons in a lifting motion to coat everything without bruising the greens. Let it sit for just 5 minutes (no longer or the lettuce wilts!) before serving chilled. The wait is torture, but so worth it!
Tips for the Best Pata Salad
After making this salad more times than I can count (and eating my fair share of trial-and-error versions), I’ve picked up some foolproof tricks to take your Pata Salad from good to “Can I get this recipe?” levels of delicious. Here are my absolute can’t-skip tips:
- Chill your bowl first – I pop my mixing bowl in the freezer for 10 minutes before assembling. Cold bowl = crispier veggies that stay fresh longer!
- Slice tomatoes last – They start releasing juice the moment you cut them. Wait until right before tossing to dice them so your salad doesn’t get soggy.
- Reserve some dressing – I always save a tablespoon to drizzle right before serving. That final hit of tang wakes up all the flavors.
- Massage the onions – Sounds weird, but trust me! Rub your sliced onions with a pinch of salt for 30 seconds before adding them. It tames the sharp bite while keeping that delicious crunch.
- Pork skin bonus – If your boiled pata has that gorgeous gelatinous skin, don’t discard it! Slice it thin – it adds amazing texture and soaks up the dressing beautifully.
One last thing – don’t stress about perfection. The best Pata Salad I ever had was made by my cousin who tossed it with her hands while telling a hilarious story! The joy is in the making as much as the eating.
Ingredient Substitutions
Life happens – maybe you’re out of pork leg or someone at the table doesn’t eat meat. No worries! Pata Salad is surprisingly flexible. Over the years, I’ve tried all sorts of swaps (some more successful than others – we don’t talk about The Tofu Incident of 2018). Here are my tried-and-true substitutions that still keep that Filipino salad spirit alive:
- For the pork leg: Grilled chicken thighs work beautifully if you want something lighter. The smoky char plays well with the dressing. Leftover lechon kawali is also fantastic (if you’re lucky enough to have leftovers!). Trade-off: You’ll lose some of that rich collagen silkiness from the pata, but gain a different kind of savory depth.
- For the vinegar: Calamansi or lemon juice makes a bright, citrusy alternative – use about 1.5 tbsp since they’re less acidic than vinegar. For something funky, try sinamak (spiced coconut vinegar) if you have it. Trade-off: The flavor profile shifts from tangy to more fruity, so you might want an extra pinch of salt to balance.
- For the soy sauce: Coconut aminos are my go-to for a gluten-free version – they’re slightly sweeter, so reduce the sugar by half. Fish sauce (patis) works in a pinch too – just use 1 tbsp and omit the salt. Trade-off: You’ll get more umami but lose that distinctive soy savoriness.
- For the veggies: No lettuce? Shredded green papaya or cabbage adds great crunch. Cherry tomatoes instead of regular ones hold their shape better. Trade-off: These make the salad heartier, so it feels more like a complete meal.
- For extra texture: My neighbor swears by adding crushed chicharon on top (I don’t argue with genius). Roasted peanuts or fried garlic bits also make delicious crunchy toppers.
The beauty of this salad is how adaptable it is – my version changes depending on what’s in my fridge that week. The key is balancing the four essential elements: something meaty, something crisp, something juicy, and that addictive sweet-sour dressing. As long as you’ve got those covered, you’re golden!
Serving Suggestions
Now that you’ve made this gorgeous Pata Salad, let’s talk about how to serve it like a true Filipino home cook! This salad is versatile enough to shine in so many settings – here are my favorite ways to present it:
As a complete meal: My go-to is pairing it with warm steamed rice – the fluffy grains soak up that delicious dressing while balancing the rich pork. For busy weeknights, I’ll sometimes add a soft-boiled egg on top for extra protein. It’s the perfect balanced plate!
Potluck superstar: When bringing this to gatherings, I serve it in a clear glass bowl to show off all those colorful layers. Keep some extra dressing on the side for folks who like it tangier. Pro tip: Bring a bag of crispy fried onions to sprinkle on top right before serving – the extra crunch makes it look and taste fancy with zero effort.

Summer BBQ side: This salad cuts through rich grilled meats beautifully. Try it alongside smoky inihaw na baboy (grilled pork) or juicy chicken barbecue. The crisp veggies and bright dressing refresh your palate between bites.
With a twist: For something different, I’ll sometimes turn it into lettuce wraps! Just spoon the salad mixture onto fresh romaine or butter lettuce leaves – it makes a fun finger food for parties. If you’re feeling extra, add a dollop of banana ketchup on top.
Whatever way you choose to serve it, remember: Pata Salad tastes best shared with good company. That’s the Filipino way – the joy is in the eating together!
Storage and Reheating
Here’s the thing about Pata Salad – it’s absolutely best eaten fresh, but I’d be lying if I said I haven’t enjoyed leftovers straight from the fridge at midnight! To keep your salad tasting great for days (not that it usually lasts that long in my house), follow these simple storage tricks:
Separate is best: If you know you’ll have leftovers, store the dressing separately from the salad mix. I pour mine into a small mason jar – just shake it up when ready to use again. This keeps those crisp veggies from turning soggy overnight.
The right container matters: Use an airtight container, but leave a paper towel on top to absorb excess moisture before sealing. Glass works better than plastic – somehow everything stays crisper!
Smart reassembly: When you’re ready to eat leftovers, drain any accumulated liquid from the bottom of the container first. Refresh the salad with a handful of new lettuce or cucumber slices if needed – it makes all the difference in texture.
As for reheating? Well, there isn’t any! That’s the beauty of this chilled salad. The pork stays tender straight from the fridge, and cold actually enhances the crispness of the vegetables. Just take it out about 10 minutes before serving to take the chill off slightly.
One last warning from experience: The onions get stronger over time, so you might want to pick some out if storing beyond day two. And whatever you do, don’t freeze it – the texture turns into something… let’s just say “unpleasant.” Stick to refrigeration, and your Pata Salad will stay delicious for 2-3 days!
Pata Salad Nutrition Facts
Let me be real with you – when I first started making Pata Salad, I wasn’t thinking about nutrition facts at all (I was too busy stuffing my face with those tender pork slices!). But now that I’m sharing this recipe, I know some folks want the details. Here’s the breakdown per generous serving – keep in mind these are estimates since your actual ingredients might differ slightly from mine.
- Calories: About 320 – most coming from that delicious protein-packed pork
- Protein: 25g (hello, muscle fuel!)
- Fat: 18g – but remember, not all fats are created equal! Much of this comes from good unsaturated fats in the pork
- Carbs: 12g – mostly from the veggies and dressing
- Fiber: 3g – thank you, crunchy lettuce and cucumber!
- Sugar: 4g (and that’s mostly natural sugars from the tomato and dressing)
- Sodium: 800mg – mainly from the soy sauce, so feel free to use low-sodium if you’re watching intake
Now here’s my two cents as someone who’s eaten this salad approximately a million times: While numbers are useful, don’t forget that fresh, whole ingredients like these are always a win. You’re getting lean protein, fresh vegetables, and none of the weird preservatives or additives you’d find in store-bought salads. That said, if you’re tracking macros carefully, you might want to measure your dressing portions – that’s where most of the sugar and sodium live in this dish!
A quick disclaimer (because my nutritionist friend would kill me if I didn’t mention this): Exact nutrition can vary based on your specific ingredients – like how fatty your pork cut is or whether you add extra toppings. But overall? This is one satisfying, balanced meal that keeps you full without weighing you down. Now go enjoy that tasty, nutritious goodness!

FAQs About Pata Salad
Over the years, I’ve gotten so many questions about this recipe from friends and family (and even a few curious neighbors who smelled it cooking!). Here are the most common ones – consider this your Pata Salad cheat sheet!
Can I use pre-cooked pork?
Absolutely! Leftover lechon or even store-bought roasted pork works in a pinch. Just slice it thin and give it a quick soak in warm broth to rehydrate slightly before adding to the salad. The texture won’t be quite as tender as freshly boiled pata, but it’s still delicious.
How long does Pata Salad keep in the fridge?
Honestly? It rarely lasts more than a day in my house! But properly stored (with dressing separate), it stays fresh for 2-3 days. The veggies lose some crunch after day one though – that’s why I always make it fresh for guests.
Can I make this vegetarian?
You bet! My vegetarian sister loves it with fried tofu or mushrooms instead of pork. Just marinate your protein substitute in the dressing for 10 minutes first to help it soak up all that flavor. The texture’s different, but the spirit of the dish stays the same.
Why does my dressing taste too sharp?
Ah, the vinegar strikes again! Easy fix – just whisk in a pinch more sugar (like 1/4 tsp at a time) until it balances out. Remember, the flavors mellow as they sit, so give it 5 minutes before adjusting. My lola always said “Dressing should dance on your tongue, not stomp!”
Can I prep this salad ahead?
Here’s my party trick: Prep all components separately the night before – cooked pork in one container, chopped veggies in another, dressing in a jar. Then just toss everything together right before serving. It stays crisp and looks freshly made!
Your Turn to Make Pata Salad Magic!
Now that you’ve got all my secrets, I can’t wait to hear how your Pata Salad turns out! Did you add a special twist? Maybe a splash of calamansi juice or a handful of toasted garlic chips? Every kitchen puts its own stamp on this classic – that’s what makes sharing recipes so fun. Drop me a note in the comments below telling me about your version (or just brag about how many compliments you got – I love hearing those stories too!).
And hey, if you snapped a photo of your beautiful salad creation, I’d be over the moon if you shared it. There’s something so satisfying about seeing those crisp veggies and glistening pork slices arranged just right – food is art, after all! Whether you’re a seasoned cook or just starting out, remember what my grandma always told me: “The best recipes are made with your hands, but perfected with your heart.” Can’t wait to hear about your Pata Salad adventures!
Print
30-Minute Pata Salad Recipe: Irresistibly Crisp & Tangy Hunger Crush 3
- Total Time: 1 hour 15 mins
- Yield: 4 servings 1x
- Diet: Low Lactose
Description
A refreshing and simple salad made with pata (pork leg) and fresh vegetables.
Ingredients
- 500g pork leg (pata), boiled and sliced
- 1 cup lettuce, shredded
- 1 cucumber, sliced
- 1 tomato, diced
- 1 onion, thinly sliced
- 2 tbsp soy sauce
- 1 tbsp vinegar
- 1 tsp sugar
- Salt and pepper to taste
Instructions
- Boil the pork leg until tender, then slice into thin pieces.
- In a large bowl, combine lettuce, cucumber, tomato, and onion.
- Add the sliced pork leg to the vegetables.
- In a small bowl, mix soy sauce, vinegar, sugar, salt, and pepper.
- Pour the dressing over the salad and toss gently.
- Serve chilled.
Notes
- You can add chili flakes for extra spice.
- For a lighter version, skip the pork and use grilled chicken instead.
- Best served fresh.
- Prep Time: 15 mins
- Cook Time: 1 hour
- Category: Salad
- Method: Boiling
- Cuisine: Filipino
Nutrition
- Serving Size: 1 serving
- Calories: 320
- Sugar: 4g
- Sodium: 800mg
- Fat: 18g
- Saturated Fat: 6g
- Unsaturated Fat: 10g
- Trans Fat: 0g
- Carbohydrates: 12g
- Fiber: 3g
- Protein: 25g
- Cholesterol: 80mg