Every Halloween, I get that itch to make something festive but don’t always have hours to spend in the kitchen. That’s how I fell in love with these no-bake pumpkin shaped Oreo balls – they’re seriously the easiest, cutest treats you can whip up in under an hour! My kids go crazy for them (okay, I might sneak a few myself when they’re not looking). With just Oreos, cream cheese, and some candy melts, you can create these adorable little pumpkins that look like you spent all day decorating. Trust me, they’ll disappear faster than you can say “trick or treat!”
Why You’ll Love These No-Bake Pumpkin Shaped Oreo Balls
Oh my goodness, where do I even start? These little pumpkin balls are absolute *perfection* for so many reasons:
- No oven required – Seriously, just mix, shape, and dip! Perfect for those chaotic fall days when you’re already juggling a million things (and tiny superheroes demanding snacks).
- Minimal ingredients – Only 5 simple things you probably already have, and if not, one quick grocery run and you’re set.
- Instant Halloween vibes – They look adorable on any dessert table, and that orange color? So festive!
- Kid-approved – My little ones love helping roll the balls and add the stems (okay, and sneaking bites of the Oreo mixture).
Basically, they’re the happy little treat that makes everyone smile—including you when you see how easy they come together!
Ingredients for No-Bake Pumpkin Shaped Oreo Balls
Okay, let’s gather our simple but mighty ingredients! Here’s exactly what you’ll need to make these adorable pumpkin treats:
- 36 whole Oreo cookies (not pre-crushed – we want fresh crumbs!)
- 8 oz cream cheese, softened to room temperature (trust me, room temp blends SO much better)
- 1 cup orange candy melts (about 6 oz – I like Wilton brand for that perfect pumpkin color)
- 1/4 cup green candy melts (just for the cute little stems)
- 1 tsp vegetable oil, divided (half for orange coating, half for green)
See? Nothing fancy required! I always keep these basics stocked during fall for last-minute treat emergencies. The Oreos and cream cheese create that dreamy, fudgy center, while the candy melts give that glossy pumpkin-perfect finish. Pro tip: grab an extra pack of Oreos – someone always “tests” them while you’re prepping!
How to Make No-Bake Pumpkin Shaped Oreo Balls
Ready for the easiest pumpkin project ever? Let’s turn those simple ingredients into Halloween magic! Just follow these foolproof steps – I promise even first-timers will look like pastry pros.

Step 1: Prepare the Oreo Mixture
First, let’s make that dreamy Oreo filling! Pulse all 36 Oreos in a food processor until they resemble dark, fine sand (no big chunks!). Then, in a large bowl, mix the crumbs with softened cream cheese until completely combined – scrape the bowl well to ensure no dry pockets remain. The mixture should hold together when pressed, like a thick cookie dough. Lick the spoon – I won’t tell!
Step 2: Shape and Coat the Pumpkins
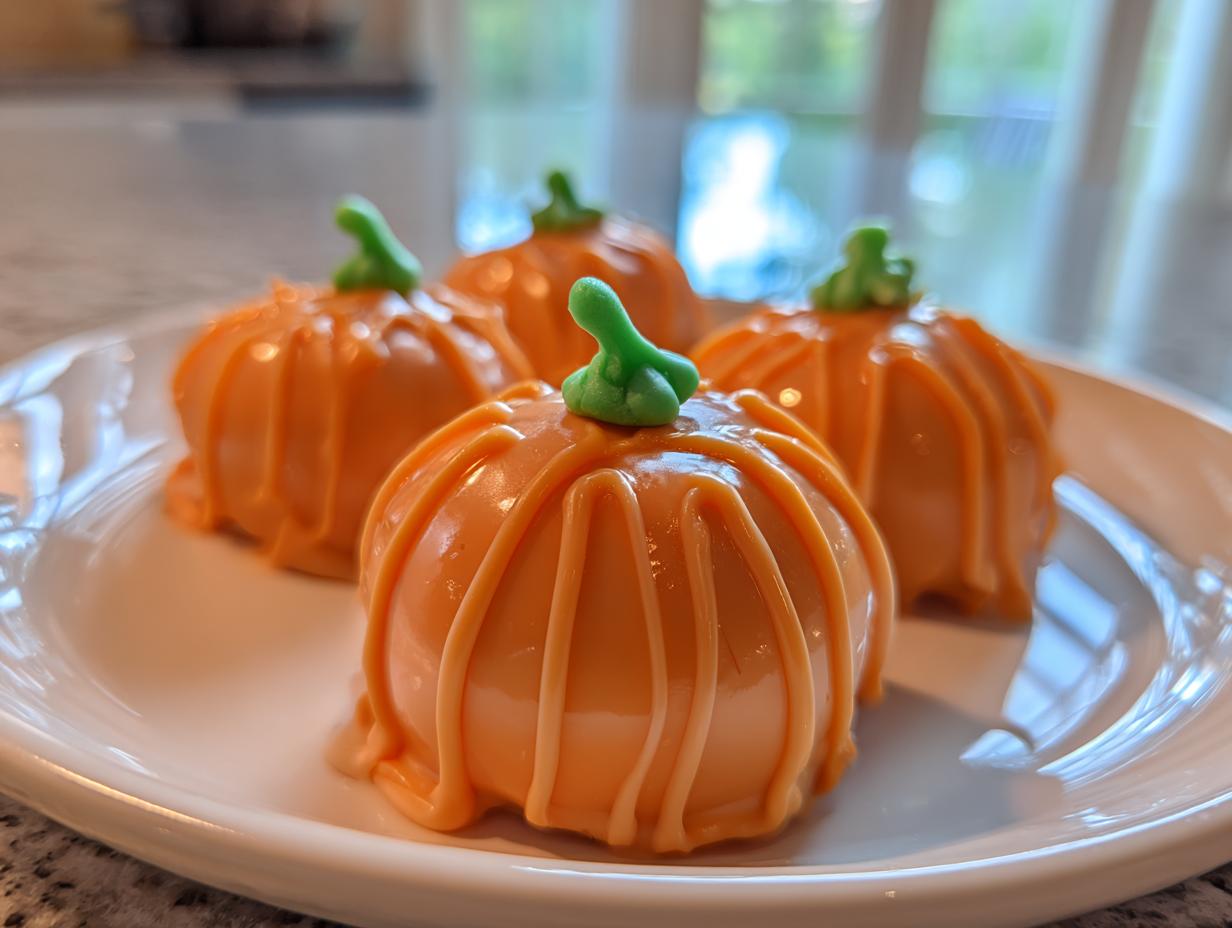
Roll tablespoon-sized portions into smooth 1-inch balls – damp hands help prevent sticking. Melt orange candy melts with ½ tsp oil until smooth (30-second microwave bursts work great!). Dip each ball completely, letting excess drip off before placing on parchment. Here’s the pumpkin magic: while still wet, gently press a toothpick vertically around the ball to create ridges. Twist as you pull out for clean lines – voilà, instant pumpkin texture!
Step 3: Add Stems and Chill
Melt green candy melts with remaining oil and transfer to a piping bag or ziplock with a tiny corner snipped. Pipe cute curled stems atop each pumpkin. Now the hardest part – pop them in the fridge for 30 minutes to set completely. Resist nibbling! The wait makes that first bite of creamy Oreo center even more heavenly.

Tips for Perfect No-Bake Pumpkin Shaped Oreo Balls
After making dozens of batches (some more successful than others!), I’ve learned all the tricks to get these pumpkin Oreo balls just right. Here are my absolute must-know tips:
- Soft cream cheese is non-negotiable – Leave it out for a good hour before mixing. Cold cream cheese = lumpy mess, room temp = smooth, dreamy perfection. I test by pressing my finger into it – should leave a dent without resistance.
- Parchment paper is your best friend – Skip wax paper (trust me, learned that the messy way). The coated balls slide right off parchment without sticking or losing their cute pumpkin shapes.
- Tap off that excess coating – After dipping, gently tap your wrist over the bowl a few times. Too thick a candy shell cracks as it sets. A thin, even layer looks prettier and tastes better!
- Chill before serving – I know it’s tempting to dig in immediately, but that 30-minute fridge time lets everything set properly. The toothpick ridges hold their shape, and the centers firm up to that perfect fudgy texture.
Bonus trick from my last batch: If your candy coating starts thickening while you work, pop it back in the microwave for 10 seconds and stir in a tiny bit more oil. Smooth dipping every time!

Ingredient Substitutions & Variations
One of my favorite things about this recipe? How easily you can tweak it based on what you have or dietary needs! Here are some foolproof swaps I’ve tested over the years:
- Gluten-free? Use GF Oreos (yes, they exist and taste amazing!). The texture works exactly the same.
- Out of candy melts? Almond bark or white chocolate chips mixed with orange food coloring work in a pinch (just add 1 tsp oil per cup to thin).
- Extra festive flavor? Stir ½ tsp cinnamon or pumpkin spice into the Oreo mixture – gives that warm autumn hug in every bite!
- Nut allergies? Double-check your Oreo package (some varieties have cross-contamination warnings).
- Healthier twist? Try reduced-fat cream cheese (though full-fat makes the creamiest centers).
See? No stress if you’re missing something – these pumpkin balls are crazy adaptable. My neighbor even made them with golden Oreos once for a “blonde pumpkin” effect – so creative!
Storing and Serving No-Bake Pumpkin Shaped Oreo Balls
Here’s the beautiful thing about these pumpkin Oreo balls – they actually taste better after chilling! That cream cheese needs time to mingle with the Oreo crumbs, creating this dreamy, almost truffle-like texture. My kids call them “Halloween candy that got fancy.”
For storing, I always use an airtight container with parchment between layers (the candy coating can get sticky otherwise). They’ll keep happily in the fridge for up to 5 days – though in my house, they never last that long! Pro tip: write the date on a sticky note so you remember when you made them (because with little hands sneaking treats, days blur together).
Now, what not to do? Freezing. I learned the hard way that the candy coating gets weirdly cloudy and the texture turns grainy. These are best fresh! If you must make ahead, prepare the uncoated balls and refrigerate up to 2 days, then dip and decorate right before serving.
For serving, arrange them on a platter with some fall sprinkles or edible glitter for extra sparkle. They’re perfect at room temperature for about 15 minutes – just enough time for the centers to soften slightly while keeping their adorable pumpkin shapes. I always make extra because between neighbors dropping by and kids’ friends coming over, they disappear like magic!

Nutritional Information
Just between us, I’m not one to obsess over numbers when it comes to holiday treats – life’s too short not to enjoy a festive Oreo ball or three! But since some folks like to know, here’s the deal: these pumpkin-shaped goodies are definitely an indulgence (hello, chocolate cookies and cream cheese!). The nutritional values change slightly depending on which Oreo variety or candy melts you use. That’s why I always remind friends that any stats you see online are just estimates.
The important thing? These bring so much joy for relatively little effort! I’d rather focus on watching my kids’ faces light up when they see the pumpkin platter than stress over exact calorie counts. Everything in moderation, right? Now go enjoy your creation – you’ve earned it!
Frequently Asked Questions
I’ve gotten so many questions about these cute pumpkin Oreo balls over the years – here are the ones that pop up most often with my tried-and-true answers!
Can I use frosting instead of cream cheese?
Oh honey, I wish! But trust me on this one – frosting makes way too soft of a center. The first time I tried it, my poor pumpkins looked like orange puddles by the time I tried to dip them. Cream cheese gives that perfect firm-yet-creamy texture that holds its shape. If you’re dairy-free, try a vegan cream cheese alternative – just make sure it’s the block style, not the tub kind.
How do I fix cracked candy coating?
Don’t panic! This happens to me sometimes when I get impatient and don’t let the coating cool enough before handling. You’ve got two easy fixes: either gently re-dip just the cracked area (hold it by the stem if you’ve already added one), or use your clean finger to smooth the cracks while the coating is still slightly soft. Pro tip: keep a little extra melted orange candy on standby for touch-ups!
Can I make these pumpkin Oreo balls ahead?
Absolutely! In fact, they’re even better after chilling overnight. You can make the undipped balls up to 2 days in advance – just store them in an airtight container in the fridge. Wait to coat them until the day you’re serving so the candy shell stays shiny and fresh-looking. The longest I’ve kept them is 3 days, but honestly? They never last that long once my family gets a whiff of them!
Share Your Creations!
Nothing makes me happier than seeing your versions of these adorable pumpkin Oreo balls! Every Halloween, my Instagram feed becomes this magical pumpkin patch of creativity – I’ve seen them decorated with little jack-o-lantern faces, dusted with edible gold, even piled into mini “pumpkin patch” displays with crushed cookies as dirt. So much cuteness!
When you make yours (and I know you will because they’re just too fun not to!), tag me @OreoPumpkinQueen – I repost my favorites all season long. Bonus points if you get the kids involved with decorating! Some of the most precious photos I’ve seen are tiny hands carefully placing those green stems. Last year, one reader sent a shot of her toddler proudly holding a slightly lopsided pumpkin ball with the biggest grin – pure joy!
Pro tip for your photos: natural morning light makes that orange coating really pop against a dark wooden board or black slate. Add some cinnamon sticks or fall leaves as props if you’re feeling fancy. But honestly? Even a quick snap on your kitchen counter makes me smile because I know the delicious memories you’re creating. Can’t wait to see your edible pumpkin patch come to life!
Print
Irresistible No-Bake Pumpkin Oreo Balls in Just 30 Minutes
- Total Time: 1 hour (including chilling)
- Yield: 24 pumpkin balls 1x
- Diet: Vegetarian
Description
Easy no-bake pumpkin-shaped Oreo balls made with just a few ingredients. Perfect for Halloween or fall treats.
Ingredients
- 36 Oreo cookies
- 8 oz cream cheese, softened
- 1 cup orange candy melts
- 1/4 cup green candy melts (for stems)
- 1 tsp vegetable oil
Instructions
- Crush Oreos into fine crumbs using a food processor.
- Mix crumbs with softened cream cheese until fully combined.
- Roll mixture into 1-inch balls and place on parchment paper.
- Melt orange candy melts with 1/2 tsp oil. Dip each ball to coat completely.
- While still wet, press a toothpick into the top to create pumpkin ridges.
- Melt green candy melts separately. Pipe small stems onto each pumpkin.
- Chill for 30 minutes before serving.
Notes
- Store refrigerated in airtight container for up to 5 days
- For nut-free version, check Oreo packaging (some varieties contain traces)
- Add food coloring to white candy melts if orange aren’t available
- Prep Time: 30 mins
- Cook Time: 0 mins
- Category: Dessert
- Method: No-Bake
- Cuisine: American
Nutrition
- Serving Size: 1 ball
- Calories: 120
- Sugar: 10g
- Sodium: 85mg
- Fat: 6g
- Saturated Fat: 3g
- Unsaturated Fat: 2g
- Trans Fat: 0g
- Carbohydrates: 15g
- Fiber: 0.5g
- Protein: 1g
- Cholesterol: 5mg