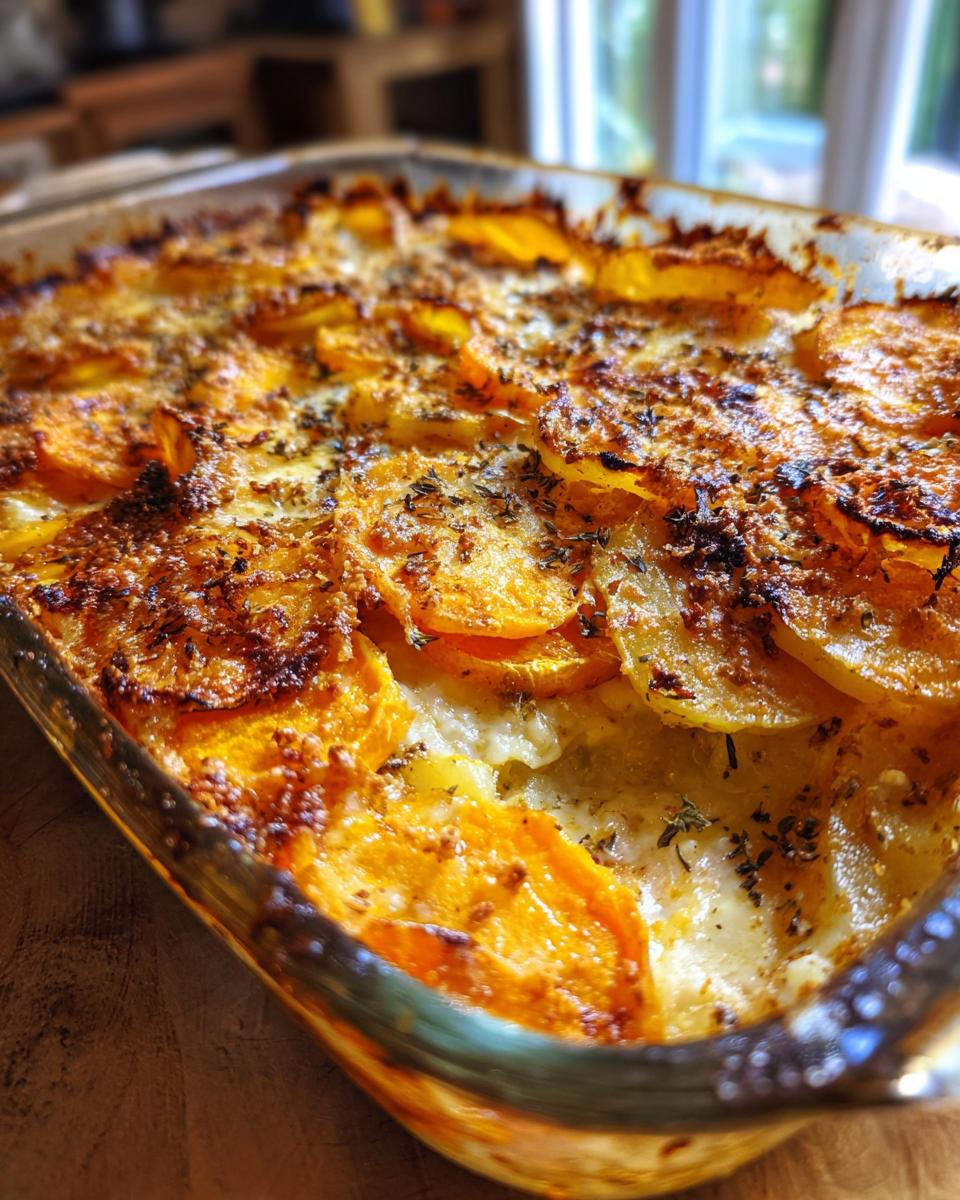
There’s something magical about a bubbling, golden-topped Cheesy Root Vegetable Gratin fresh from the oven. It’s the kind of dish that makes everyone at the table lean in closer, forks at the ready. I first fell in love with this recipe on a chilly autumn evening when I needed something warm and comforting to serve at a family gathering—sliced root vegetables swimming in creamy, garlicky goodness, topped with a blanket of melted cheddar and Parmesan. It’s become my go-to side dish ever since, especially when I want to turn simple ingredients into something truly special. Trust me, one bite and you’ll understand why this gratin is pure comfort food magic.

Why You’ll Love This Cheesy Root Vegetable Gratin
This gratin checks all the boxes for the perfect comfort food – here’s why it’s become my absolute favorite:
- Creamy dreaminess: That luscious heavy cream and cheese combo makes every bite melt-in-your-mouth delicious
- Comfort in every spoonful: Warm, bubbly, and hearty – it’s like a hug for your tastebuds
- Simple to prepare: Just slice, layer, pour, and bake – no fancy techniques needed
- Endlessly versatile: Swap in whatever root veggies you have on hand
- Crowd-pleaser: Always disappears first at potlucks and family dinners
Seriously, what’s not to love? It’s comfort food at its finest.
Ingredients for Cheesy Root Vegetable Gratin
Here’s everything you’ll need to make this cozy masterpiece (and yes, every single ingredient matters!):
- 2 large potatoes, thinly sliced (I swear by my mandoline for paper-thin, even slices – just watch those fingers!)
- 2 large sweet potatoes, sliced same thickness as regular potatoes (the color contrast is gorgeous)
- 1 fat parsnip, peeled and sliced (don’t skip this – it adds such a lovely earthy sweetness)
- 1 cup heavy cream (yes, heavy – half-and-half just won’t give you that luscious texture)
- 1 cup grated sharp cheddar (the sharper the better for flavor)
- ½ cup grated Parmesan (the real stuff, not the green can)
- 2 cloves garlic, minced (or 3 if you’re feeling bold)
- 1 tsp fresh thyme leaves (or ½ tsp dried if that’s all you’ve got)
- 1 tsp kosher salt
- ½ tsp black pepper, freshly ground
Pro tip: Measure everything before you start – it makes assembly so much smoother when you’re not hunting for ingredients mid-recipe!
How to Make Cheesy Root Vegetable Gratin
Okay, let’s get baking! This gratin comes together in simple steps, but I’ll walk you through each one so you get that perfect golden crust and creamy interior every time.
Preparing the Vegetables
First things first – let’s tackle those veggies. Uniformity is KEY here because we want everything to cook evenly. Grab your sharpest knife or (my secret weapon) a mandoline slicer set to about 1/8-inch thickness. Work carefully – I’ve learned the hard way that rushing leads to uneven slices… and occasional band-aid breaks! Alternate between the potatoes, sweet potatoes, and parsnip as you slice so they’re ready for layering.
Layering and Baking
Now the fun part! Preheat your oven to 375°F (190°C) – don’t skip this, we want a nice hot oven ready for our gratin. In a bowl, whisk together the heavy cream, minced garlic, thyme, salt, and pepper until well combined. This heavenly mixture is what makes the magic happen!
Layer your sliced vegetables somewhat haphazardly in your baking dish – don’t stress about perfect arrangement. Pour that creamy goodness evenly over everything, letting it seep down between the layers. Top generously with both cheeses – I like to use my fingers to sprinkle it so every inch gets coverage.
Cover tightly with foil and bake for 45 minutes – this steams the veggies to tenderness. Then, the grand reveal! Remove the foil and bake another 15 minutes until gloriously golden brown. Resist the urge to dig in immediately – let it rest 10 minutes so the cream sets slightly (trust me, it’s worth the wait!).

Tips for Perfect Cheesy Root Vegetable Gratin
After making this gratin more times than I can count, here are my foolproof tips for the best results every time:
- Broil that top! For extra crispy golden goodness, pop it under the broiler for just 2-3 minutes at the end – but watch like a hawk to prevent burning.
- Patience pays off – let it rest 10 minutes before serving so the cream thickens up beautifully (I know, the waiting is torture!).
- Pre-salt your veggies – toss the slices with a pinch of salt before layering to draw out excess moisture.
- Use room temp cream – cold cream straight from the fridge slows down cooking time.
Follow these little tricks and you’ll get restaurant-quality results right from your own oven!
Ingredient Substitutions & Variations
The beauty of this gratin is how easily you can make it your own! Over the years, I’ve played with all sorts of variations:
- Root veggie swaps: Try rutabaga, turnips, or even sliced beets for stunning color (though they’ll bleed a bit)
- Cheese alternatives: Gruyère makes it extra fancy, while smoked gouda adds depth – or go wild with blue cheese crumbles!
- Dairy-free? Substitute full-fat coconut milk for the cream and your favorite plant-based cheeses
- Herb variations: Rosemary works beautifully instead of thyme, or add a pinch of nutmeg for warmth
Honestly, once you master the basic technique, the possibilities are endless – have fun with it!
Serving Suggestions for Cheesy Root Vegetable Gratin
This gratin shines as the star of any meal, but here’s how I love to serve it:
- Classic pairing: Alongside roasted chicken or pork – the creamy gratin balances perfectly with simply seasoned meats
- Holiday favorite: As part of your Thanksgiving or Christmas spread (it outshines plain mashed potatoes every time!)
- Vegetarian option: With a crisp green salad for a satisfying meatless meal
- Brunch bonus: Next to poached eggs and bacon for the ultimate cozy morning
Honestly, I’ve even eaten leftovers straight from the fridge at midnight – no judgement here!
Storing and Reheating Cheesy Root Vegetable Gratin
This gratin keeps beautifully! Let it cool completely before covering tightly (those crispy bits stay crunchier this way). In the fridge, it lasts 3-4 days – just reheat slices in a 350°F oven for 15-20 minutes until bubbly again. For freezer storage, wrap individual portions and freeze up to 2 months. Thaw overnight in the fridge before reheating. Pro tip: Sprinkle a little extra cheese before reheating to revive that golden top!
Nutritional Information
Here’s the nutritional breakdown per serving (remember, these are estimates – your exact counts may vary depending on ingredients and portion sizes): Each serving packs about 320 calories with 18g fat (10g saturated), 30g carbs, 4g fiber, and 8g protein. It’s a hearty dish that delivers comfort and nutrients in every bite – just don’t ask me to feel guilty about that glorious melted cheese!
Frequently Asked Questions
Can I use frozen vegetables instead of fresh?
Honestly? I wouldn’t recommend it. Frozen veggies release too much water as they thaw, making your gratin soggy. Fresh is definitely the way to go for that perfect texture. If you’re in a pinch, thaw and pat dry frozen slices REALLY well first.
Why is my gratin still crunchy after baking?
Two likely culprits: Either your slices were too thick (aim for 1/8-inch!), or you didn’t bake it covered long enough. That steam time under foil is crucial for tender veggies. Next time, test with a fork before removing the foil – the slices should pierce easily.
Can I make this ahead of time?
Absolutely! Assemble everything (right up to adding the cheese), cover tightly, and refrigerate overnight. Just add 10-15 minutes to the baking time since it’s going in cold. Perfect for stress-free entertaining!
What’s the best baking dish to use?
I swear by my 9×13 ceramic dish – it gives the perfect surface area for maximum golden crust. But any 3-quart baking dish works. Just avoid metal pans if you can; they can over-brown the edges.
I’d Love to Hear How Your Gratin Turns Out!
Did you put your own spin on this cozy gratin? Or maybe it brought back memories of family dinners? Drop a comment below – I read every single one (and I’m always looking for new variations to try!). And if you loved it as much as I do, please share with your fellow comfort food lovers!


Ultimate Cheesy Root Vegetable Gratin – 3 Irresistible Layers
- Total Time: 80 minutes
- Yield: 6 servings 1x
- Diet: Vegetarian
Description
A hearty and cheesy gratin made with root vegetables, perfect for a comforting side dish.
Ingredients
- 2 large potatoes, thinly sliced
- 2 large sweet potatoes, thinly sliced
- 1 large parsnip, thinly sliced
- 1 cup heavy cream
- 1 cup grated cheddar cheese
- 1/2 cup grated Parmesan cheese
- 2 cloves garlic, minced
- 1 tsp thyme
- 1 tsp salt
- 1/2 tsp black pepper
Instructions
- Preheat oven to 375°F (190°C).
- Layer sliced potatoes, sweet potatoes, and parsnip in a baking dish.
- In a bowl, mix heavy cream, garlic, thyme, salt, and pepper.
- Pour the cream mixture over the vegetables.
- Sprinkle cheddar and Parmesan cheese on top.
- Cover with foil and bake for 45 minutes.
- Remove foil and bake for an additional 15 minutes until golden.
- Let cool slightly before serving.
Notes
- Use a mandoline for even slicing.
- Substitute any root vegetables you prefer.
- For a crispier top, broil for the last 2-3 minutes.
- Prep Time: 20 minutes
- Cook Time: 60 minutes
- Category: Side Dish
- Method: Baking
- Cuisine: French
Nutrition
- Serving Size: 1 serving
- Calories: 320
- Sugar: 5g
- Sodium: 450mg
- Fat: 18g
- Saturated Fat: 10g
- Unsaturated Fat: 6g
- Trans Fat: 0g
- Carbohydrates: 30g
- Fiber: 4g
- Protein: 8g
- Cholesterol: 45mg


