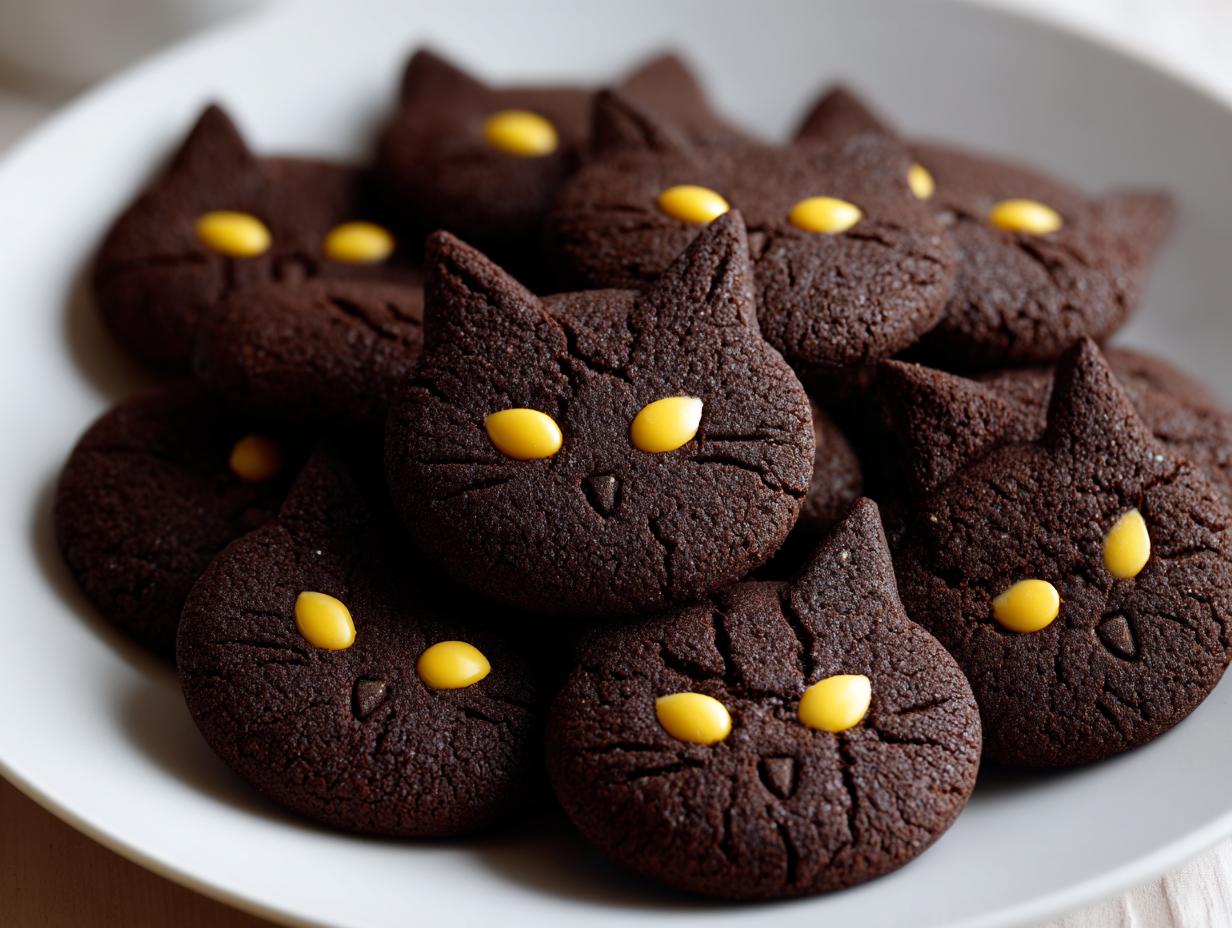
Every Halloween, my kitchen turns into a spooky bakery, and these Black Cat Cookies steal the show! They’re the perfect mix of adorable and eerie, with those little chocolate cat faces peering up from the cookie tray. I first made them years ago for my niece’s Halloween party – the kids went wild for them, and now they’re my go-to treat every October.
What I love most is how simple they are. Even if you’re not a baking pro, you can whip up a batch of these cuties in no time. The rich cocoa dough comes together quickly, and shaping the little cat faces is honestly half the fun. Plus, they’re sturdy enough for little hands to decorate – though fair warning, you might lose a few M&M eyes to snackers before they even make it onto the cookies!

Ingredients for Black Cat Cookies
Gathering the right ingredients is the first step to creating these adorable spooky treats. Trust me, you’ll want to measure everything precisely – baking is part science, after all! Here’s what you’ll need to make a batch of 12 purr-fect Black Cat Cookies:
- 1 cup all-purpose flour – Spoon it into the measuring cup and level it off for accuracy
- 1/2 cup cocoa powder – Use natural unsweetened cocoa (not Dutch-process) for that deep black color
- 1/2 cup unsalted butter, softened – This means left out for about 30 minutes until it gives slightly when pressed
- 3/4 cup sugar – Regular granulated works perfectly here
- 1 large egg – Room temperature blends better with the butter
- 1 tsp vanilla extract – The good stuff makes all the difference
- 1/4 tsp salt – Just enough to balance the sweetness
- 1/2 tsp baking powder – Gives our cookies just the right lift
- Yellow M&Ms or candy eyes – For those spooky cat peepers (about 24 pieces)
Pro tip: If you’re feeling fancy, grab some black icing too for whiskers – though I often just use a toothpick to draw them on the cooled cookies!
How to Make Black Cat Cookies
Okay, let’s get these spooky kitties baking! The process is super straightforward, but I’ll walk you through each step just like I do with my baking buddies. The key is taking your time with the butter and sugar – that’s where the magic starts.

- Preheat your oven to 350°F (175°C) and line your baking sheet with parchment paper. Trust me, you’ll thank me later when the cookies slide right off!
- Cream the butter and sugar in a mixing bowl until light and fluffy. This should take about 2-3 minutes with a hand mixer. The mixture should look pale and creamy – no gritty sugar bits!
- Add the egg and vanilla, mixing well after each addition. Scrape down the sides of the bowl to make sure everything gets incorporated evenly.
- Whisk together the dry ingredients in a separate bowl – that’s the flour, cocoa powder, baking powder, and salt. I like to sift them together to prevent any lumpy surprises.
- Gradually add the dry mix to the wet ingredients, mixing just until combined. The dough should be firm but pliable – if it sticks to your fingers, pop it in the fridge for 15 minutes.
Shaping and Decorating the Cookies
Now for the fun part! Roll tablespoon-sized dough balls between your palms, then gently shape into cat heads. Pinch two little triangles at the top for ears. Press two yellow M&Ms or candy eyes into place while the dough is still soft – they’ll bake right in. For whiskers, you can either pipe them with black icing after baking or use a toothpick to make indentations before baking.

Tips for Perfect Black Cat Cookies
- Chill sticky dough for 15-20 minutes if it’s too soft to shape – cold dough holds those cute cat ear shapes better!
- Watch baking time closely – pull them out at 10 minutes for chewy cookies, 12 for crisp edges. They’ll firm up as they cool.
- Use a light touch when placing decorations – press eyes gently so they don’t disappear into the dark dough.
- Let cookies cool completely before adding icing whiskers – warm cookies make the icing run.
- Double the recipe – these disappear fast at parties! They freeze beautifully too.
Ingredient Substitutions for Black Cat Cookies
Need to tweak the recipe for dietary needs? No problem! For vegan cookies, swap the butter for plant-based sticks and use a flax egg (1 tbsp ground flax + 3 tbsp water). Gluten-free? A 1:1 baking blend works great. But heads up – hot chocolate mix won’t give the same rich, dark color as pure cocoa powder. The texture goes all wrong too!
Storing and Freezing Black Cat Cookies
These little feline treats stay fresh for days! Just pop them in an airtight container at room temperature – they’ll keep their spooky charm for up to 5 days. Want to save some for later? Freeze the baked cookies in a single layer first, then stack them with parchment between layers. They’ll purr-fectly last a month in the freezer, ready to thaw at room temperature when the Halloween mood strikes. No reheating needed – they taste just as delicious cold!
Black Cat Cookies Nutritional Information
Now, I’m no nutritionist, but I always like to know what I’m nibbling on! Each of these adorable black cat cookies clocks in around 120 calories – not bad for a spooky treat. One cookie has about 6g fat (3.5g saturated), 15g carbs with 1g fiber, and 2g protein. The sugar content comes in at 8g per cookie – just sweet enough without being overwhelming.
Remember, these are estimates – your exact counts might vary slightly depending on how big you make your kitties or which decorations you use. But hey, it’s Halloween – sometimes you’ve just got to enjoy the magic without overthinking it!
FAQ About Black Cat Cookies
Can I use food coloring instead of cocoa powder for black cookies?
Oh honey, I tried that once – disaster! Food coloring turns cookies grayish, not that rich black we want. Stick with natural cocoa powder for authentic color and better flavor. If you must, add a tiny bit of black gel food coloring to enhance the darkness, but cocoa’s the real star here.
How do I prevent my cat cookies from spreading too much?
Chilling is your best friend! If dough feels sticky, refrigerate for 15-30 minutes before shaping. Also, make sure your butter is softened but not melted – that makes a huge difference. And don’t skip the parchment paper – it helps control spreading while baking.
What if I can’t find candy eyes?
No worries! Yellow M&Ms work great, or get creative – white chocolate chips with mini chocolate chip pupils look adorable. One Halloween I even used sliced almonds painted with food coloring when I was in a pinch!
Can kids help decorate these cookies?
Absolutely! That’s half the fun. Little hands are perfect for placing eyes (though you might lose a few to snackers!). For very young helpers, have them add sprinkles or draw whiskers with toothpicks after you’ve shaped the cookies.

12 Spooky Black Cat Cookies Kids Will Love Baking
- Total Time: 27 minutes
- Yield: 12 cookies 1x
- Diet: Vegetarian
Description
Delicious and spooky black cat cookies perfect for Halloween. These chocolate cookies are shaped like cats and easy to make.
Ingredients
- 1 cup all-purpose flour
- 1/2 cup cocoa powder
- 1/2 cup unsalted butter, softened
- 3/4 cup sugar
- 1 egg
- 1 tsp vanilla extract
- 1/4 tsp salt
- 1/2 tsp baking powder
- Yellow M&Ms or candy eyes for decoration
Instructions
- Preheat the oven to 350°F (175°C). Line a baking sheet with parchment paper.
- In a bowl, cream the butter and sugar until smooth.
- Add the egg and vanilla extract, mixing well.
- In another bowl, whisk flour, cocoa powder, baking powder, and salt.
- Gradually add the dry ingredients to the wet mixture, mixing until combined.
- Roll the dough into small balls and shape them into cat heads on the baking sheet.
- Press two yellow M&Ms or candy eyes for the eyes and shape ears with your fingers.
- Bake for 10-12 minutes. Let cool before serving.
Notes
- Chill the dough for 30 minutes if it’s too sticky.
- Use black icing for whiskers if desired.
- Store in an airtight container for up to 5 days.
- Prep Time: 15 minutes
- Cook Time: 12 minutes
- Category: Dessert
- Method: Baking
- Cuisine: American
Nutrition
- Serving Size: 1 cookie
- Calories: 120
- Sugar: 8g
- Sodium: 50mg
- Fat: 6g
- Saturated Fat: 3.5g
- Unsaturated Fat: 2g
- Trans Fat: 0g
- Carbohydrates: 15g
- Fiber: 1g
- Protein: 2g
- Cholesterol: 25mg