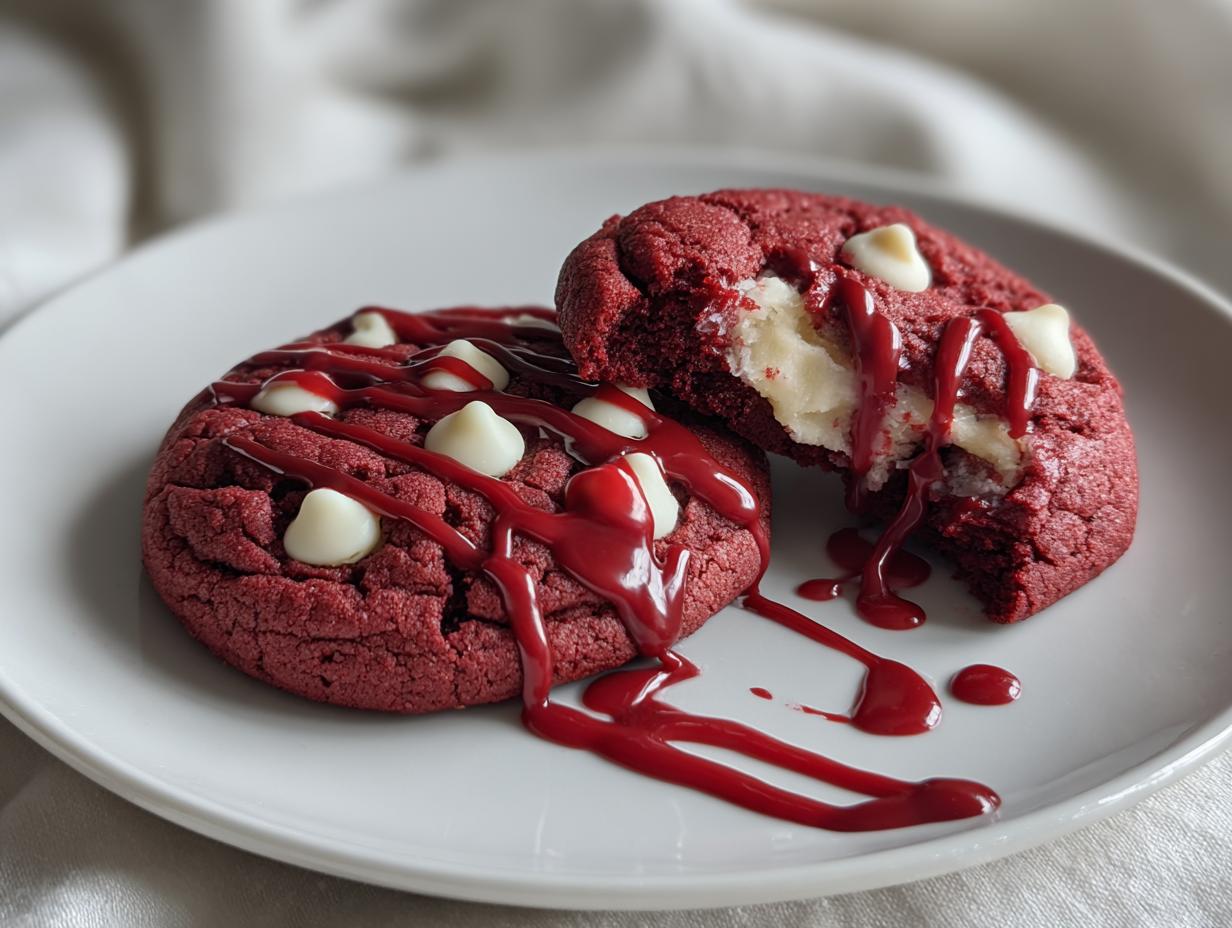
Picture this: it’s Halloween night, and your dessert table stops guests in their tracks with these spookily stunning Blood Drip Red Velvet Cookies. I still remember the first time I made them—my neighbor gasped so loud I thought she’d seen a ghost! That rich crimson color, those dramatic white chocolate “bones” peeking through, and that terrifyingly perfect blood drip effect? Pure edible magic. These cookies blend classic red velvet flavor with just the right amount of creepy, making them the ultimate treat for Halloween parties (though honestly, I bake them year-round when I need a goth baking fix). Best part? They’re way easier to make than they look—no witchcraft required!

Why You’ll Love These Blood Drip Red Velvet Cookies
Listen, I know I get way too excited about cookies—but these ones? They’re special. Here’s why you’re going to adore them as much as I do:
Eye-Catching Halloween Treat
That blood drip effect isn’t just for show—it’s ridiculously fun to make! I love watching people’s reactions when they see these cookies for the first time. The deep red color with those dramatic drips looks professionally spooky, but here’s my little secret: all it takes is melted candy melts and a steady hand (or a messy one—imperfect drips look even more realistic!).
Rich Red Velvet Flavor
Don’t let the gothic look fool you—underneath that creepy exterior lies the most delicious classic red velvet flavor. The cocoa powder gives it that slight chocolatey depth, while the vanilla and white chocolate chips balance everything out perfectly. My husband always says they taste like “Halloween in cookie form”—which I take as the highest compliment!
Ingredients for Blood Drip Red Velvet Cookies
Okay, let’s talk ingredients—because the magic of these cookies starts with getting the right stuff. I’ve made these enough times to know exactly what works (and what doesn’t). Trust me, you don’t want to skimp on the food coloring or try to substitute margarine here. Here’s what you’ll need:
- 1 1/2 cups all-purpose flour – Spoon and level it, don’t scoop! We’re not making bricks.
- 1/4 cup cocoa powder – Dutch-processed gives the richest color, but natural works too.
- 1 tsp baking powder – Not soda! This keeps them soft, not cakey.
- 1/4 tsp salt – Just a pinch to balance the sweetness.
- 1/2 cup unsalted butter, softened – Leave it out for 30 minutes—if it’s melty, your dough will spread too much.
- 3/4 cup granulated sugar – The perfect amount to let the red velvet flavor shine.
- 1 large egg – Room temp, please—cold eggs make grumpy dough.
- 1 tsp vanilla extract – The good stuff, not imitation. It matters!
- 1 tbsp red food coloring – Gel works best for that vampire-worthy red (liquid makes them pink).
- 1 cup white chocolate chips – These are the “bones” peeking through—splurge on quality.
- 1/4 cup red candy melts – For the blood drip effect (Wilton’s works great).
See? Nothing crazy—just pantry staples with a few fun twists. Now let’s make some edible horror!

How to Make Blood Drip Red Velvet Cookies
Alright, let’s get our hands dirty—figuratively speaking! Don’t worry, I’ll walk you through every step of creating these gloriously gory treats. Just follow along, and you’ll have cookies that look straight out of a vampire’s tea party.
Preparing the Dough
First things first: preheat your oven to 350°F and line your baking sheets with parchment paper. Now, grab your biggest mixing bowl—I always use my grandma’s old yellow Pyrex one for good luck. Cream together the softened butter and sugar until it’s light and fluffy (about 2 minutes with a hand mixer). This is where the magic starts! Then beat in the egg, vanilla, and that glorious red food coloring. Pro tip: wear an apron unless you want Halloween-themed clothes!
In another bowl, whisk together the flour, cocoa powder, baking powder, and salt. Slowly add this to the wet ingredients, mixing just until combined—overmixing makes tough cookies, and we want these tender. Fold in those white chocolate chips last. The dough will be shockingly red and thick enough to hold its shape when scooped. If it feels too sticky, pop it in the fridge for 15 minutes (no longer, or the chocolate chips get cranky).
Baking to Perfection
Use a cookie scoop or tablespoon to form dough balls—I make mine about 1.5 inches across for that perfect chewy-to-crispy ratio. Space them 2 inches apart on the baking sheet; these guys spread just enough to get beautiful cracks without merging into one monster cookie.
Bake for 10-12 minutes. Here’s how you know they’re done: the edges will look set, but the centers should still be slightly soft when gently pressed. They’ll firm up as they cool. Oh, and resist the urge to eat them straight from the oven—that molten chocolate is a danger I know all too well! Let them rest on the baking sheet for 5 minutes before transferring to a wire rack. This patience pays off with the perfect texture.
Creating the Blood Drip Effect
Now for the fun part! Melt your red candy melts in 15-second bursts in the microwave, stirring between each. You want it smooth but not too hot—test the consistency by lifting a spoonful; it should drizzle nicely without being runny. If it’s too thick, add a tiny bit of coconut oil (not water!).
Grab a spoon or piping bag and let your inner horror director shine. Drizzle the “blood” from the edges inward, letting some drip dramatically down the sides. For extra realism, I sometimes flick the spoon to create spatter effects—just cover your counter with paper first! Let the cookies sit until the candy sets completely (about 20 minutes). And voilà—you’ve just created edible nightmares that taste like heaven!

Expert Tips for the Best Blood Drip Red Velvet Cookies
Okay, my spooky baking apprentice, here are the secrets I’ve learned through many (many!) batches of these cookies:
Chill your dough if it feels sticky – Just 15-20 minutes in the fridge makes it easier to handle without losing that perfect chewy texture. Any longer and the chocolate chips get temperamental.
More red = more dramatic – Don’t be shy with the food coloring! Gel works best—it gives that deep crimson color without making the batter runny. I always add an extra half teaspoon because the cocoa dulls the color.
Play with your drips – Too thick? Add a tiny bit of coconut oil. Too thin? Let the melted candy cool slightly. And remember—messy drips look more realistic!
Bake on parchment – Trust me, you’ll thank me when those bloody drips don’t stick to your pans.
Variations and Substitutions
Want to put your own twisted spin on these cookies? Go wild! I’ve tried nearly every variation under the full moon. Swap white chocolate chips for dark chocolate if you prefer a richer, more gothic vibe—they look like little blood clots peeking through (in the best way possible). Gel food coloring gives that deep vampire-red color, but if you’re avoiding artificial dyes, beet powder works in a pinch (just expect a more muted hue). For an extra-creepy touch, I sometimes mix black cocoa powder with the regular cocoa—it gives them an almost charred look that’s perfect for haunted house parties. The best part? No matter how you tweak them, they’ll still be deliciously spooky!
Storing and Serving Blood Drip Red Velvet Cookies
These beauties deserve a presentation as dramatic as their looks! I always store mine in an airtight container layered with parchment—they’ll stay fresh and creepy-good for up to 3 days (if they last that long). For parties, arrange them on a black cake stand with dry ice swirling underneath—the contrast makes the blood drips pop. Pro tip: the candy melts soften at room temp, so keep them away from heat sources unless you want “fresh blood” oozing everywhere!
Nutritional Information
Here’s the breakdown per cookie (but remember—nutrition varies based on ingredients/brands). Each spooky treat clocks in at about 180 calories, with 8g fat and 14g sugar—consider it energy for your next ghost hunt! They’re vegetarian-friendly and pack just enough cocoa-powered joy to balance out the Halloween horror. Enjoy responsibly!
FAQs About Blood Drip Red Velvet Cookies
Got questions about these ghoulishly good cookies? I’ve got answers! Here are the most common things people ask me when they see (and taste) these bloody beauties:
Can I use natural food coloring instead of gel?
Absolutely! Beet powder or raspberry juice will give you a lovely red hue, though it won’t be as vibrant as gel. You’ll need about 2 tablespoons of beet powder mixed with a teaspoon of water to replace the 1 tbsp gel coloring. Just know the color may fade slightly during baking—but they’ll still taste amazing!
Why did my blood drips turn out gloopy?
Ah, the candy melts were probably overheated! Melt them slowly in 15-second bursts, stirring between each. If they get too thick, add a tiny bit of coconut oil (never water—it’ll seize up!). And let the cookies cool completely before dripping, or the “blood” will melt into the cookie instead of clinging dramatically.
Can I make these ahead of time?
You bet! The dough balls freeze beautifully for up to a month—just add 1-2 minutes to the bake time straight from the freezer. For the finished cookies, wait to add the blood drips until day-of serving so they stay crisp and photogenic.
What’s the best way to get smooth white chocolate “bones”?
Splurge on quality white chocolate chips—cheaper ones often contain stabilizers that make them stubborn to melt evenly. If your chips are being difficult, try adding 1/2 teaspoon of coconut oil when melting to help them flow smoothly for piping.


Spooky Blood Drip Red Velvet Cookies in 20 Minutes
- Total Time: 27 minutes
- Yield: 18 cookies 1x
- Diet: Vegetarian
Description
Decadent red velvet cookies with a striking blood drip effect, perfect for Halloween or themed parties.
Ingredients
- 1 1/2 cups all-purpose flour
- 1/4 cup cocoa powder
- 1 tsp baking powder
- 1/4 tsp salt
- 1/2 cup unsalted butter, softened
- 3/4 cup granulated sugar
- 1 large egg
- 1 tsp vanilla extract
- 1 tbsp red food coloring
- 1 cup white chocolate chips
- 1/4 cup red candy melts (for drip)
Instructions
- Preheat oven to 350°F. Line a baking sheet with parchment paper.
- Whisk together flour, cocoa powder, baking powder, and salt in a bowl.
- Cream butter and sugar until fluffy. Beat in egg, vanilla, and red food coloring.
- Gradually mix in dry ingredients. Fold in white chocolate chips.
- Scoop dough into balls and place on the baking sheet. Bake for 10-12 minutes.
- Let cookies cool. Melt red candy melts and drizzle over cookies to create the blood drip effect.
- Allow to set before serving.
Notes
- For a richer red, add extra food coloring.
- Chill dough for 30 minutes if too soft to handle.
- Store in an airtight container for up to 3 days.
- Prep Time: 15 minutes
- Cook Time: 12 minutes
- Category: Dessert
- Method: Baking
- Cuisine: American
Nutrition
- Serving Size: 1 cookie
- Calories: 180
- Sugar: 14g
- Sodium: 60mg
- Fat: 8g
- Saturated Fat: 5g
- Unsaturated Fat: 2g
- Trans Fat: 0g
- Carbohydrates: 24g
- Fiber: 1g
- Protein: 2g
- Cholesterol: 25mg