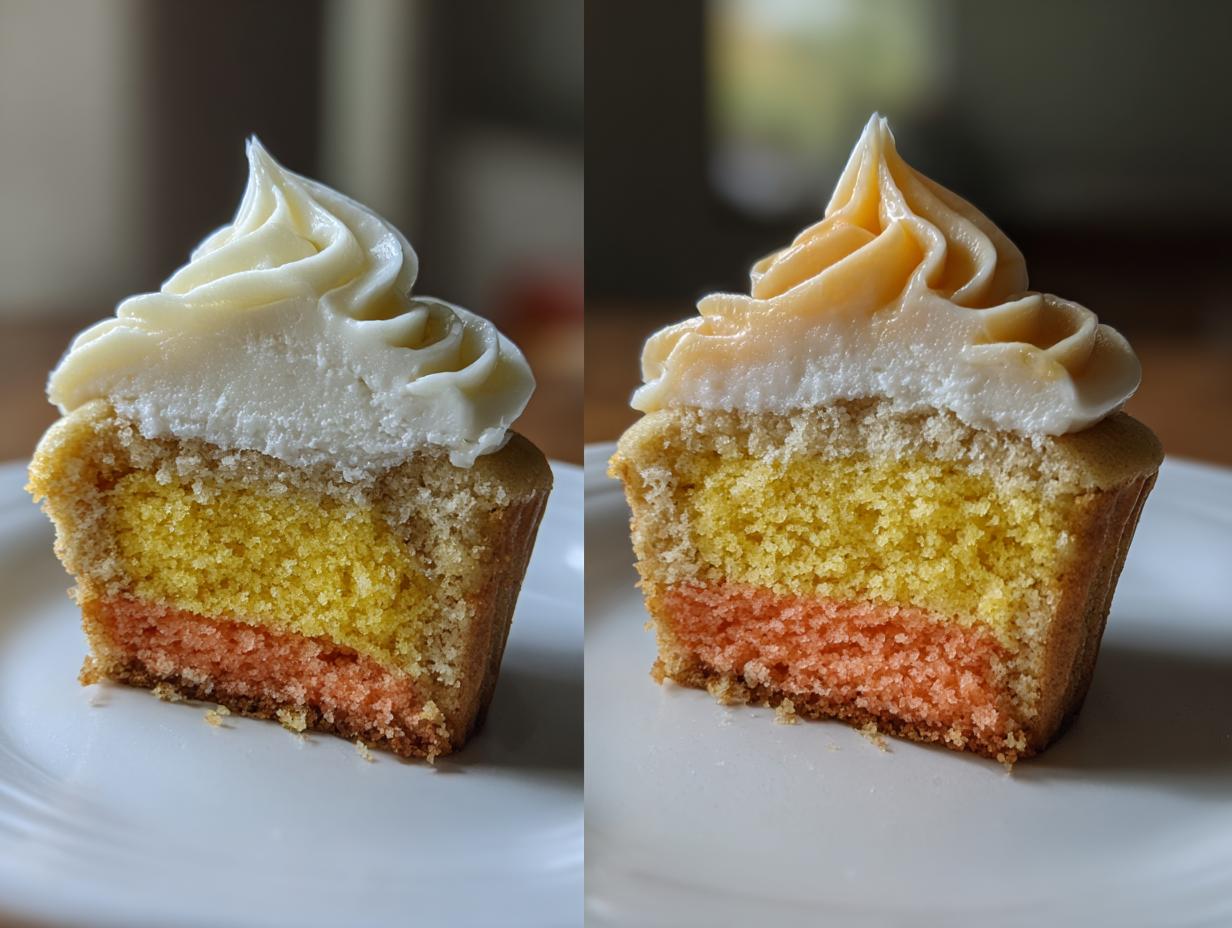
Is there anything more magical than Halloween baking? The moment October hits, my kitchen transforms into a sugar-filled wonderland, and these candy corn cupcakes are always the stars of the show. I still remember the first time I made them with my niece – her eyes lit up when we peeled back the liner to reveal those perfect yellow, orange, and white layers. They’re not just cupcakes; they’re edible celebrations of fall!
What I love most is how they capture that classic candy corn flavor in cake form – sweet vanilla with just a hint of honey-like warmth from the colored layers. The best part? They look impressive but are secretly easy to make. Whether you’re prepping for a Halloween party or just want to surprise your family with something special, these treats always disappear faster than ghosts at sunrise!

Why You’ll Love These Candy Corn Cupcakes
Oh my gosh, where do I even start? These cupcakes are my absolute go-to when I need something festive that always wows a crowd. Here’s why they’re the best:
- They’re ridiculously fun – Peeling back the liner to reveal those bright layers? Pure kitchen magic every single time.
- No fancy skills needed – If you can stir and layer, you’ve got this. Promise.
- Instant Halloween vibes – That iconic candy corn look makes them perfect for parties or classroom treats.
- Kids go nuts for them – My niece calls them “rainbow cupcakes” and always steals the orange layer first.
- Customizable colors – Swap the yellow and orange for purple and green if you’re feeling spooky!
Trust me, once you make these, they’ll become your new Halloween tradition. The hardest part? Not eating all the batter before it hits the oven!
Ingredients for Candy Corn Cupcakes
Okay, let’s talk ingredients! I’ve made these cupcakes so many times I could probably recite this list in my sleep. Here’s what you’ll need to create that perfect candy corn magic:
- 1 1/2 cups all-purpose flour – Spoon and level it, don’t scoop! This keeps the texture just right.
- 1 teaspoon baking powder – The little lift that makes them perfectly fluffy.
- 1/4 teaspoon salt – Just a pinch to balance all that sweetness.
- 1/2 cup unsalted butter, softened – Leave it out for an hour – when you can press your finger in easily, it’s ready.
- 1 cup granulated sugar – Regular white sugar works best for that classic cupcake texture.
- 2 large eggs – Room temperature blends better!
- 1 teaspoon vanilla extract – The good stuff – it makes all the difference.
- 1/2 cup milk – Whole milk gives the richest texture, but any works.
- Yellow and orange gel food coloring – Gel gives those vibrant layers without thinning the batter.
- 1 cup vanilla frosting – Store-bought is fine, but homemade is even better!
See? Nothing too crazy – just good, simple ingredients that come together to make something totally magical. Now let’s get mixing!
Equipment You’ll Need
Before we dive in, let’s round up our tools! You probably have most of these in your kitchen already, but here’s my trusty checklist:
- Muffin tin – Standard 12-cup works perfectly
- Cupcake liners – White shows off those colorful layers best
- 3 mixing bowls – One for each gorgeous color layer
- Hand mixer or stand mixer – Though a strong arm and whisk work too!
- Piping bag with star tip – For that perfect candy corn swirl
- Rubber spatula – Can’t let any batter go to waste
That’s it! No fancy gadgets needed – just your basic baking essentials ready to create some Halloween magic.
How to Make Candy Corn Cupcakes
Alright, let’s get baking! I’ve made these cupcakes enough times that I could do it with my eyes closed (though I don’t recommend that – baking safety first!). Follow these steps and you’ll have perfect candy corn cupcakes that’ll make you the star of any Halloween gathering.
Preparing the Batter
First things first – preheat that oven to 350°F and line your muffin tin with those cute white liners. Now, let’s make magic happen!
In a medium bowl, whisk together your flour, baking powder, and salt – this is your dry team. In another bowl (or your stand mixer), beat the softened butter and sugar until they’re light and fluffy – about 2 minutes should do it. Add eggs one at a time, mixing well after each, then pour in that glorious vanilla.
Here’s the secret sauce: alternate adding your dry ingredients and milk, starting and ending with the dry. Mix just until combined – we don’t want tough cupcakes! Now divide this perfect batter evenly into three bowls. Color one yellow, one orange, and leave one white. Use gel coloring for those bright, bold colors without thinning your batter.
Layering and Baking
Time for the fun part – creating those picture-perfect layers! Grab a spoon or small cookie scoop and add about 1 tablespoon of yellow batter to each liner, smoothing it out gently. Repeat with orange, then finish with white. Pro tip: tap the pan lightly on the counter after each layer to help level things out.
Pop them in the oven for 18-20 minutes. You’ll know they’re done when a toothpick comes out clean and the tops spring back when lightly touched. Let them cool in the pan for 5 minutes, then transfer to a wire rack to cool completely. No cheating – if you frost warm cupcakes, you’ll get a melty mess!

Frosting and Decorating
While you wait for the cupcakes to cool, let’s talk frosting. If you’re using store-bought, give it a quick whip with your mixer to make it extra fluffy. For homemade, vanilla buttercream works beautifully here.
Once your cupcakes are completely cool (seriously, no rushing!), load your frosting into a piping bag fitted with a star tip. Pipe a generous swirl starting from the outside edge, working your way in. The goal is to mimic that classic candy corn triangle shape. If you want extra pizzazz, sprinkle some yellow and orange sprinkles on top!
There you have it – perfect candy corn cupcakes that look like they came from a bakery but taste like home. Now try not to eat them all before your guests arrive!
Tips for Perfect Candy Corn Cupcakes
After making these cupcakes more times than I can count, I’ve picked up some tricks that guarantee perfect layers every time!
- Gel food coloring is non-negotiable – Liquid coloring will water down your batter and make the colors muddy.
- Tap, tap, tap! – After adding each colored layer, lightly tap the pan on the counter to level it out before adding the next.
- Chill before frosting – Pop the cooled cupcakes in the fridge for 15 minutes – it helps the frosting set beautifully.
- Use a cookie scoop – For perfectly even layers, measure each color with a #40 scoop (about 1 tablespoon each).
- Watch the bake time – Set a timer for 18 minutes and check – overbaking makes them dry!
My biggest tip? Have fun with it! Even if the layers aren’t picture-perfect, they’ll still taste amazing.
Variations & Substitutions
The beauty of these cupcakes? They’re totally customizable to fit any taste or dietary need! Here are my favorite twists:
- Flavor boosters: Add 1/2 tsp almond extract to the white layer or a pinch of cinnamon to the orange for extra warmth
- Vegan version: Swap butter for coconut oil, eggs for flax eggs, and milk for almond milk
- Gluten-free: Use a 1-to-1 gluten-free flour blend – works like a charm!
- Color alternatives: Try purple and black for a spooky Halloween vibe or pastels for Easter
No matter how you tweak them, these cupcakes will still have that magical layered look everyone loves!
Serving and Storage Suggestions
These cupcakes always disappear fast at my house, but here’s how to keep them fresh if you miraculously have leftovers! For serving, I love arranging them on a tiered stand – the colors really pop against a black or orange platter. They’re perfect at room temperature, but I sometimes serve them slightly chilled in summer.
Storage is easy – just pop any leftovers in an airtight container. They’ll stay fresh at room temp for 2 days, or refrigerate for up to 5 days (though the frosting might get a bit firm). To freeze, wrap unfrosted cupcakes tightly – they’ll keep for 3 months. Thaw at room temp before frosting. Pro tip: The layers actually taste better on day two as the flavors meld together!
Nutritional Information
Now, I’m no nutritionist, but here’s the scoop on what’s in these sweet treats! Each cupcake (with frosting) clocks in at about 280 calories. They’ve got all the good stuff – 22g sugar for that perfect sweetness, 3g protein to balance it out, and just 85mg sodium. Of course, your exact numbers might dance around a bit depending on the brands you use. I always say – these are special occasion cupcakes, so enjoy every festive bite without guilt!
Frequently Asked Questions
Can I use liquid food coloring instead of gel?
Oh honey, I don’t recommend it! Liquid coloring waters down your batter and makes the colors look washed out. Gel gives you those vibrant candy corn hues without changing the texture. If you’re stuck with liquid, use way less liquid than the recipe calls for – maybe just a couple drops per layer. But trust me, investing in a $5 gel set will change your baking life!
How long do these cupcakes stay fresh?
They’re best the day you make them (if they last that long!), but properly stored in an airtight container, they’ll stay delicious for 2-3 days at room temperature. The frosting might firm up a bit in the fridge, but they’ll keep for 5 days chilled. Pro tip: The flavors actually get better after a day as the layers meld together!
Can I freeze these cupcakes?
Absolutely! Just hold the frosting – freeze the plain cupcakes in a single layer first, then stack them in freezer bags once solid. They’ll keep beautifully for 3 months. When you’re ready, thaw at room temp and frost fresh. My niece calls these our “emergency happy cupcakes” because there’s always a batch in my freezer!
Share Your Creations!
I’d absolutely LOVE to see your candy corn cupcake masterpieces! Snap a pic of your colorful layers or creative decorations and share it in the comments below. Did you try any fun variations? Any kitchen disasters that turned into happy accidents? Tell me all about your baking adventure – I read every single one!
Print
Magical Candy Corn Cupcakes – 3 Layers of Sweet Delight
- Total Time: 40 minutes
- Yield: 12 cupcakes 1x
- Diet: Vegetarian
Description
Colorful and fun cupcakes that capture the festive spirit of candy corn.
Ingredients
- 1 1/2 cups all-purpose flour
- 1 tsp baking powder
- 1/4 tsp salt
- 1/2 cup unsalted butter, softened
- 1 cup granulated sugar
- 2 large eggs
- 1 tsp vanilla extract
- 1/2 cup milk
- Yellow and orange food coloring
- 1 cup vanilla frosting
Instructions
- Preheat oven to 350°F. Line a muffin tin with cupcake liners.
- Whisk flour, baking powder, and salt in a bowl.
- Cream butter and sugar until fluffy. Beat in eggs one at a time, then add vanilla.
- Alternate adding dry ingredients and milk, mixing until smooth.
- Divide batter into three bowls. Color one yellow, one orange, and leave one plain.
- Layer batter in liners: yellow first, then orange, then plain. Fill 2/3 full.
- Bake 18-20 minutes. Cool completely before frosting.
- Pipe vanilla frosting on top to resemble candy corn.
Notes
- Use gel food coloring for vibrant layers.
- Ensure each layer is level before adding the next.
- Chill cupcakes before frosting for cleaner layers.
- Prep Time: 20 minutes
- Cook Time: 20 minutes
- Category: Dessert
- Method: Baking
- Cuisine: American
Nutrition
- Serving Size: 1 cupcake
- Calories: 280
- Sugar: 22g
- Sodium: 85mg
- Fat: 12g
- Saturated Fat: 7g
- Unsaturated Fat: 4g
- Trans Fat: 0g
- Carbohydrates: 40g
- Fiber: 0.5g
- Protein: 3g
- Cholesterol: 55mg