Every September, when the first crisp mornings roll in, I get this uncontrollable urge to bake with apples. Maybe it’s that nostalgic back-to-school feeling, or maybe I just really love the smell of cinnamon and caramel filling my kitchen. Last year, during a particularly chaotic week (you know the kind – kids’ soccer practice, work deadlines, and a dog who decided my favorite sweater was his new chew toy), I stumbled upon the magic of caramel apple upside-down cake.
This glorious dessert became my saving grace – simple enough to throw together when I’m barely keeping it together, but impressive enough to make everyone at the table feel special. The way the caramel bubbles up around those apple slices while it bakes? Absolute perfection. And when you flip it over to reveal that sticky, golden topping on a cloud-soft cake…well, let’s just say my family now requests this weekly.

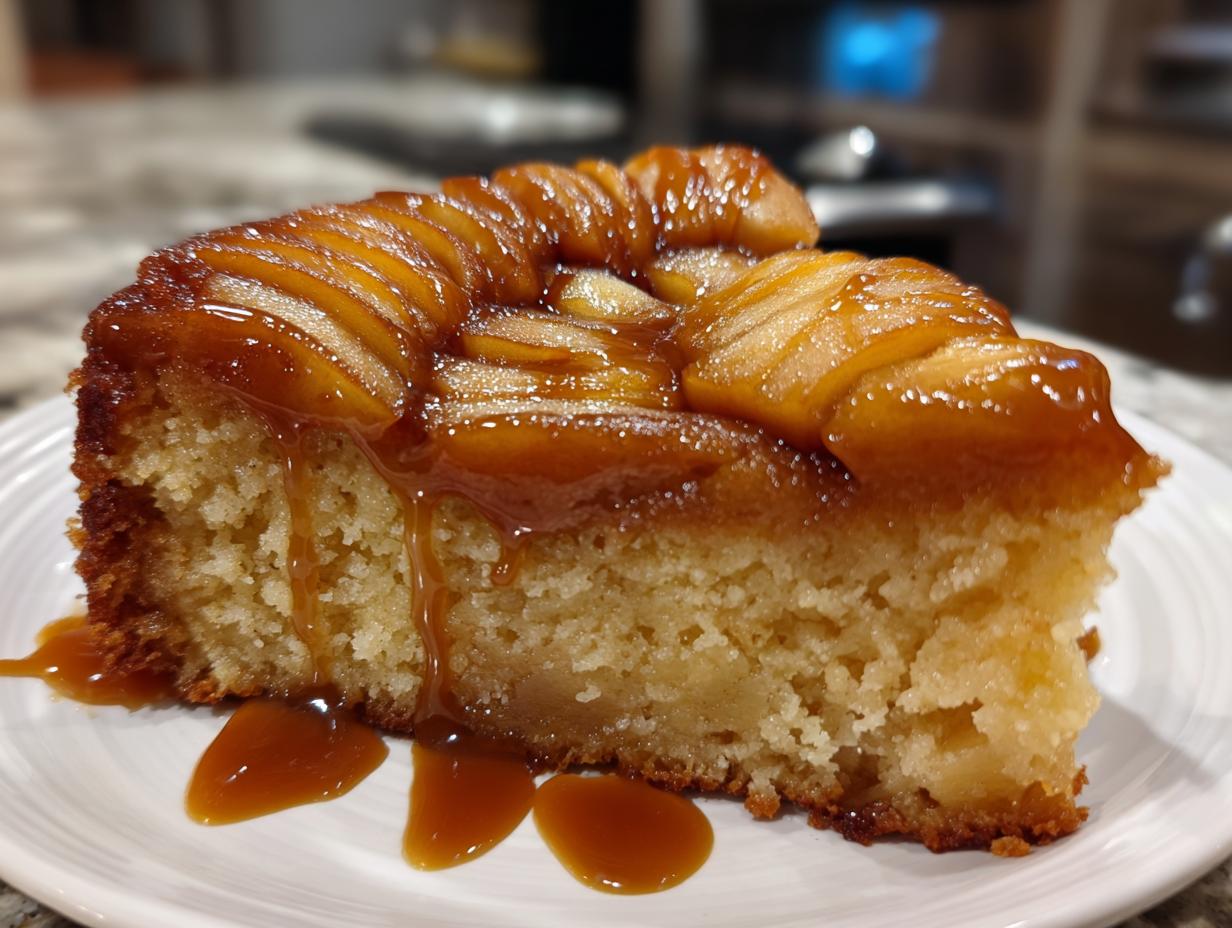
What makes this caramel apple upside-down cake stand out is how effortlessly it comes together. Unlike fussy layer cakes that require precision timing, this humble beauty embraces a little imperfection. The apples caramelize into this glorious jammy layer while the cake bakes up moist and tender underneath. It’s the kind of dessert that tastes like you spent hours in the kitchen, when really, you barely had time to finish your coffee.
Why You’ll Love This Caramel Apple Upside-Down Cake
This cake is pure magic, and here’s why:
- Foolproof & fast: No fancy techniques—just melt, mix, bake. Even on my most scatterbrained days, this cake turns out perfect.
- That caramel-apple wow factor: When you flip it, that glossy topping gets gasps every time (I may or may not do a dramatic chef’s kiss).
- Fall in every bite: Warm spices, jammy apples—it’s like wearing your coziest sweater, but edible.
- Secretly versatile: Fancy brunch? Kids’ lunchbox treat? Last-minute dessert for unexpected guests? This cake says “I meant to do that.”
Ingredients for Caramel Apple Upside-Down Cake
Gathering the right ingredients makes all the difference with this cake—just like Grandma always said, “Baking is science with delicious consequences!” Here’s exactly what you’ll need:
For the Caramel Apple Layer:
- 2 medium Granny Smith apples (about 1 1/2 cups when thinly sliced – peel them first! The tartness balances the sweet caramel)
- 1/2 cup (1 stick) unsalted butter (cut into chunks so it melts evenly – and yes, real butter only)
- 1 cup granulated sugar (trust me, don’t skimp here—this creates that magical caramel)
For the Cake Batter:
- 1 1/2 cups all-purpose flour (spooned and leveled—no packed cups!)
- 1 1/2 tsp baking powder (check it’s fresh—mine lives in the freezer to stay active)
- 1/2 tsp salt (fine sea salt blends best)
- 1/2 cup whole milk (room temp – I sometimes splash in buttermilk for extra tang)
- 1 large egg (also room temp – roll it on the counter for 30 sec to warm gently)
- 1 tsp pure vanilla extract (the good stuff—imitation vanilla makes Grandma frown)
Pro tip: Set everything out an hour before baking—room temp ingredients incorporate better, giving you that perfect tender crumb. And slice those apples evenly (about 1/4-inch thick) so they caramelize uniformly—I use my trusty mandoline when I’m feeling fancy!
Equipment You’ll Need
Don’t worry—this cake doesn’t need any fancy gadgets! Here’s what I grab from my kitchen:
- 9-inch cast-iron skillet or cake pan (the skillet makes killer caramel, but a regular pan works too)
- 2 mixing bowls (one for dry ingredients, one for wet—no cross-contamination!)
- Wooden spoon & whisk (for stirring caramel and gently combining batter)
- Measuring cups & spoons (eyeballing measurements? Not with caramel involved.)
That’s it! Now let’s make some magic.
How to Make Caramel Apple Upside-Down Cake
Okay, let’s get down to the good stuff! This cake comes together in three simple steps, but each one has its own little magic trick. Follow along, and you’ll have that gorgeous caramel-apple masterpiece in no time.
Step 1: Prep the Caramel Apple Layer
First, grab that trusty skillet or cake pan and melt your butter over medium heat. As soon as it’s melted, sprinkle in the sugar and give it a good stir with your wooden spoon. Now, here’s where patience pays off – let this mixture bubble away for about 3-4 minutes, stirring occasionally. You’re looking for a light golden color – any darker, and you’ll risk bitter caramel. (Been there, cried over that!)
Remove from heat and quickly arrange your apple slices in neat circles over the caramel. Work from the outside in, slightly overlapping them like shingles – this makes that beautiful pattern when you flip the cake later. The caramel will still be crazy hot, so use tongs if you’re nervous!

Step 2: Mix the Cake Batter
While your apples are getting cozy in their caramel bath, whisk together the flour, baking powder, and salt in one bowl. In another, lightly beat the egg, then whisk in the milk and vanilla until just combined. Now, pour the wet ingredients into the dry ingredients and stir gently – I mean it, no vigorous mixing here! A few lumps are totally fine; overmixing makes tough cakes, and we want this baby fluffy.
The batter should look thick but pourable – if it seems stiff, add a teaspoon more milk. Remember, we’re going for “just combined,” not “Olympic weightlifting workout.”
Step 3: Bake and Invert
Carefully pour the batter over your arranged apples, spreading it gently to the edges with a spatula. Pop it in the oven at 350°F (175°C) and set your timer for 35 minutes. When the edges pull away from the pan and a toothpick comes out with just a few moist crumbs (not wet batter), it’s done!
Here’s the critical part: let it cool in the pan for exactly 10 minutes – no more, no less. Then run a knife around the edge, place your serving plate upside-down over the pan, and flip with confidence (I always say a little prayer here). Lift the pan slowly… and prepare for the oohs and aahs when that caramel-glazed beauty is revealed!

Tips for the Perfect Caramel Apple Upside-Down Cake
After making this cake more times than I can count (and yes, a few hilarious fails), here are my golden rules:
- Apple choices matter: Granny Smith or Honeycrisp hold their shape best. Avoid mushy varieties—they turn to sauce!
- Watch that caramel: Medium heat only—too high burns the sugar. Gold = good, amber = “oops.”
- Oven thermometer check: My oven lies by 15°F. Yours might too—verify with a $5 thermometer.
- The flip timing: 10 minutes cooling sets the caramel enough to release cleanly but stays gloriously gooey.
- Slice warm: Use a serrated knife and wipe it between cuts for picture-perfect slices.
Bonus trick: Sprinkle apples with cinnamon before adding batter—adds extra cozy flavor without changing texture!
Ingredient Substitutions and Notes
No Granny Smiths? No problem! Here’s how to adapt this cake when life (or the grocery store) throws curveballs:
- Apples: Honeycrisp or Pink Lady work beautifully. Just avoid Red Delicious—they’re too mealy when baked. For extra flair, mix two varieties!
- Gluten-free: Swap in a 1:1 gluten-free flour blend (I like King Arthur). The texture stays perfect—promise!
- Dairy-free: Coconut oil replaces butter in the caramel, and almond milk works fine for the batter (though the cake will be slightly denser).
- Caramel hack: Out of sugar? Swap 1/2 cup pure maple syrup—reduce heat to medium-low and cook just until bubbly (about 2 minutes).
Note: Brown sugar makes a deeper caramel but can overpower the apples—save it for caramel apple crisp!
Serving and Storing Caramel Apple Upside-Down Cake
Oh, the best part—eating this glorious creation! Here’s how I serve and keep my caramel apple upside-down cake tasting fresh (not that it lasts long in my house).
For serving, warm slices with vanilla ice cream is my family’s non-negotiable ritual. The way the cold ice cream melts into the warm caramel? Heaven. For brunch, I’ll dollop on lightly sweetened whipped cream instead—lighter but still dreamy. And if we’re feeling fancy, a drizzle of extra caramel sauce never hurt anybody (I keep a jar of my quick microwave caramel for emergencies).
Now, storage is easy-peasy. Just cover the cake tightly with foil at room temperature—no fridge! Refrigeration dries out the cake and makes the caramel hard. It’ll keep perfectly for 3 days this way, though ours never makes it past day two. To reheat, pop individual slices in the microwave for 10-15 seconds to bring back that just-baked warmth.
Pro tip: If you somehow have leftovers (miraculous!), layer slices between parchment paper in an airtight container. This prevents the caramel from sticking everything together—learned that the hard way after creating “caramel apple cake pops” unintentionally!
Nutrition Information
Okay, let’s talk numbers—but don’t worry, I won’t bog you down with endless stats! Here’s the scoop on what’s in each glorious slice of this caramel apple upside-down cake (because yes, I’ve totally done the math while nibbling my fourth piece).
Important note: These are estimates based on my exact ingredients—your numbers might dance around a bit depending on apple size or butter brand. That’s the beauty of homemade baking!
Per serving (that’s 1/8th of the cake, not that anyone’s counting):
- 280 calories (worth every single one)
- 12g fat (7g saturated – thank you, glorious butter)
- 42g carbs (25g from sugars – apples and caramel teaming up)
- 2g fiber (those apple skins I made you peel? Yeah…)
- 3g protein (it’s dessert, not a steak dinner!)
Now, I know some folks need precise numbers for meal planning, so if you’re tracking macros, definitely plug your exact brands into a calculator. But me? I’m too busy enjoying that perfect bite where caramel meets cloud-soft cake to worry about decimal points!
FAQ About Caramel Apple Upside-Down Cake
Q: Can I use pears instead of apples?
Absolutely! Bosc pears work wonderfully—just slice them slightly thicker since they soften faster. The caramel pairs beautifully with their honeyed sweetness. I sometimes do a half-apple, half-pear mix when I can’t decide!
Q: Why did my cake stick to the pan?
Oh no! Two likely culprits: either the caramel got too dark (making it stick like glue) or you didn’t let it cool the full 10 minutes before flipping. Next time, grease the pan sides lightly with butter before adding batter, and set a timer for that cooling step!
Q: Can I make this ahead for a party?
You bet! Bake it the morning of your event and keep it covered at room temp. Warm the whole cake at 300°F for 10 minutes before serving—that caramel will get gloriously gooey again.
Q: My caramel crystallized—help!
Been there! That means the sugar got agitated too much while melting. Next time, gently swirl the pan instead of stirring once the sugar dissolves. And if you see crystals forming, add a teaspoon of lemon juice to break them up.
Q: Why is my cake dense instead of fluffy?
Overmixing is usually the villain here! Stir the batter just until the flour disappears—those little lumps will bake out. Also, check your baking powder’s expiration date; old powder won’t give you that perfect rise.

Irresistible Caramel Apple Upside-Down Cake in 3 Easy Steps
- Total Time: 55 minutes
- Yield: 8 servings 1x
- Diet: Vegetarian
Description
A delicious dessert featuring caramel-glazed apples atop a moist cake.
Ingredients
- 1 cup granulated sugar
- 1/2 cup unsalted butter, melted
- 2 medium apples, peeled and sliced
- 1 1/2 cups all-purpose flour
- 1 1/2 tsp baking powder
- 1/2 tsp salt
- 1/2 cup milk
- 1 tsp vanilla extract
- 1 large egg
Instructions
- Preheat oven to 350°F (175°C).
- Melt butter and sugar in a skillet, then arrange apple slices on top.
- Mix flour, baking powder, and salt in a bowl.
- Whisk milk, vanilla, and egg together, then combine with dry ingredients.
- Pour batter over apples and bake for 35-40 minutes.
- Let cool for 10 minutes before inverting onto a plate.
Notes
- Use firm apples like Granny Smith for best results.
- Check cake doneness with a toothpick before removing from oven.
- Prep Time: 15 minutes
- Cook Time: 40 minutes
- Category: Dessert
- Method: Baking
- Cuisine: American
Nutrition
- Serving Size: 1 slice
- Calories: 280
- Sugar: 25g
- Sodium: 180mg
- Fat: 12g
- Saturated Fat: 7g
- Unsaturated Fat: 4g
- Trans Fat: 0g
- Carbohydrates: 42g
- Fiber: 2g
- Protein: 3g
- Cholesterol: 45mg