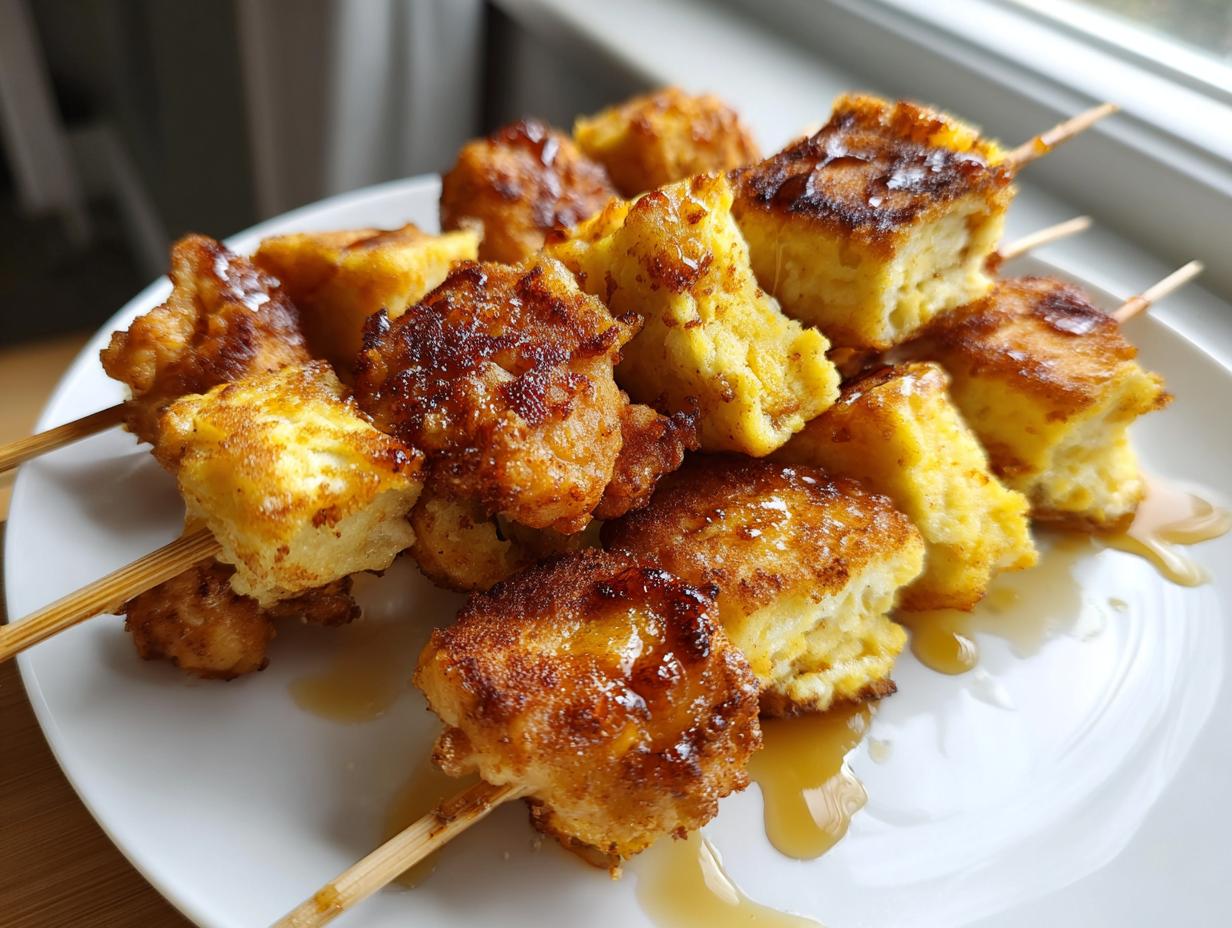
Let me tell you about the moment chicken and waffles became the life of my last family reunion – when I turned them into irresistible Chicken and Waffle Skewers! Picture this: golden fried chicken cubes and fluffy waffle squares stacked on sticks, dripping with maple syrup. The kids went wild, the adults couldn’t stop grabbing seconds, and my normally quiet uncle actually complimented my cooking (that’s a first!).
These skewers are my go-to when I need a guaranteed crowd-pleaser that’s way more fun than the usual party food. They combine everything we love about classic chicken and waffles – the crispy, the sweet, the savory – in perfect bite-sized portions. No plates needed, just grab and go! I’ve served them at game nights, baby showers, even as appetizers at my sister’s wedding brunch. Every time, they disappear faster than I can make them.
The best part? They’re surprisingly simple to whip up. You probably have most ingredients already – chicken, waffles, a few pantry staples. In about 30 minutes, you’ve got a platter full of these golden beauties ready to wow your guests. Trust me, once you try serving chicken and waffles this way, you’ll never go back to the traditional plate version!
Why You’ll Love These Chicken and Waffle Skewers
Listen, I’ve made a lot of party food in my day, but there’s something about these skewers that just makes people lose their minds in the best possible way. Here’s why they’re my secret weapon for any gathering:
- Total crowd-pleasers: I’ve never seen anyone – kids, picky eaters, food snobs – say no to these. The combo of crispy chicken and sweet waffles with that maple syrup drizzle? Pure magic.
- No-fuss finger food: No plates, no forks, no mess. Just grab a skewer and go. Perfect for mingling at parties or when you’ve got a game on in the background.
- Sweet and savory perfection: That beautiful balance between the salty fried chicken and fluffy waffles with syrup is what brunch dreams are made of.
- Way more fun than regular chicken and waffles: Something about food on sticks just makes everything taste better. Plus, they look adorable on any table!
Seriously, make these once and you’ll start getting requests for them at every family event. My cousin actually texts me now to “bring the skewers” to every potluck!
Ingredients for Chicken and Waffle Skewers
Here’s everything you’ll need to make these addictive skewers – I promise it’s all simple stuff you probably have already (except maybe the buttermilk, but don’t worry, I’ve got a hack for that too!):
- 1 lb boneless chicken breast, cut into 1-inch cubes (trust me, this size cooks evenly and fits perfectly on the skewers)
- 1 cup packed buttermilk (the secret to ultra-tender chicken – we’ll get to substitutes in a sec)
- 1 cup all-purpose flour (for that crispy golden coating we all crave)
- 1 tsp salt (I use kosher salt because it distributes better)
- 1 tsp black pepper (freshly ground makes all the difference)
- 1 tsp paprika (smoked paprika adds amazing depth if you have it)
- 4 standard-sized waffles, cooked and cut into 1-inch squares (homemade or store-bought both work great)
- Maple syrup for serving (the real stuff, please – no pancake syrup imposters!)
- Wooden skewers (soak these babies first or you’ll have flaming skewers – more on that below)
Ingredient Notes & Substitutions
Okay, let’s talk substitutions because I know we’ve all been in that “missing one ingredient” panic:
Buttermilk alternatives: No buttermilk? No problem! Mix 1 cup milk with 1 tablespoon lemon juice or vinegar and let it sit for 5 minutes. Or use plain yogurt thinned with a bit of milk. Both work nearly as well for tenderizing the chicken.
Flour options: Need gluten-free? Swap in your favorite GF flour blend (I like ones with a bit of xanthan gum). For extra crunch, try half flour, half cornstarch.
Waffle wisdom: Homemade waffles are amazing if you’ve got time, but frozen waffles toasted until crisp work shockingly well! Just avoid the super-sweet varieties – you want that maple syrup to be the star.
SKEWER WARNING: Don’t skip soaking those wooden skewers! I learned this the hard way when my first batch caught fire in the oven. Soak them in water for at least 30 minutes – I usually do it while prepping everything else. Pro tip: If you’re really in a pinch, metal skewers work too, but they’re not as fun for serving.
Equipment Needed for Chicken and Waffle Skewers
Now let’s talk tools! You don’t need anything fancy to make these skewers, but a few key items will make your life so much easier. Here’s what I always pull out of my cabinets:
- Wooden skewers (6-inch works best) – These are the stars of the show! But please, please soak them first (I’ll keep nagging about this because I’ve had too many kitchen fires not to).
- Deep fryer or heavy-bottomed pot – My trusty Dutch oven works perfectly for frying. Just make sure whatever you use is deep enough to prevent oil splatters – my stovetop still bears the scars from being careless!
- Candy/oil thermometer – This little gadget is worth its weight in gold. Maintaining that perfect 350°F oil temperature means crispy, not greasy, chicken every time.
- Two mixing bowls – One for the buttermilk bath, one for the flour coating. I like to use wide, shallow bowls so I can really coat those chicken pieces well.
- Tongs or slotted spoon – For safely flipping chicken in the hot oil and transferring it to paper towels.
- Paper towel-lined plate – Essential for draining excess oil from your golden chicken cubes.
Quick safety tip from someone who’s learned the hard way: keep a box of baking soda nearby when frying, just in case. And never leave hot oil unattended – I may or may not have set off my smoke detector more times than I’d like to admit!
How to Make Chicken and Waffle Skewers
Alright, let’s get down to business! Making these skewers is easier than you think, but there are a few tricks I’ve learned through trial and error (mostly error) that’ll guarantee perfect results every time.
Step 1: Marinate the Chicken
First things first – that chicken needs some love! Toss your 1-inch chicken cubes into a bowl and pour the buttermilk over them. Make sure every piece gets coated – I like to mix it with my hands (washed first, of course!). This is where the magic starts – the buttermilk will tenderize the chicken while adding flavor. Don’t rush this step! A minimum 30-minute soak is non-negotiable – I sometimes let it go an hour if I’m prepping ahead. You’ll notice the chicken gets plumper and more tender as it soaks.
Step 2: Prepare the Coating
While the chicken’s bathing, let’s make the crispy coating. In another bowl, whisk together the flour, salt, black pepper, and paprika. Here’s my secret: I always taste a pinch of the dry mix to check the seasoning – you should get a nice balance of salty and slightly spicy. Feel free to adjust to your taste! Want more kick? Add a pinch of cayenne. Like it herby? Throw in some dried thyme. When your chicken’s done marinating, use tongs to transfer pieces to the flour mixture. Shake off excess buttermilk first – too wet and you’ll get clumpy coating. Toss to coat thoroughly, pressing gently so the flour sticks well.
Step 3: Fry to Perfection
Now the fun (but slightly scary) part – frying! Heat about 2 inches of oil in your heavy pot to 350°F. This temperature is CRUCIAL – too low and your chicken will be greasy, too high and it’ll burn before cooking through. Use that thermometer! Working in batches (don’t crowd the pan!), gently lower chicken pieces in with tongs. They should sizzle immediately. Fry for 3-4 minutes until deep golden brown, flipping once halfway. My test? When they float and the bubbles around them slow down, they’re done. Drain on paper towels – this keeps them crispy. Safety first: never leave hot oil unattended, and keep kids/pets away!

Step 4: Assemble Skewers
The grand finale! Take your soaked skewers and alternate chicken cubes with waffle squares – I do 3 chicken and 2 waffles per skewer for perfect balance. Work quickly while everything’s still warm – the residual heat helps the flavors meld. Drizzle with maple syrup right before serving (doing it too early makes the waffles soggy). Pro tip: serve with extra syrup on the side for dipping – my guests always want more! Now stand back and watch them disappear faster than you can say “seconds please!”

Pro Tips for the Best Chicken and Waffle Skewers
After making countless batches of these skewers (and learning from plenty of mistakes), I’ve nailed down the absolute must-know tricks for perfect results every time. These are the little things that take them from good to “Oh my god, can I have the recipe?” good:
- Keep that oil temperature steady: I can’t stress this enough – a candy thermometer is your best friend here. The second that oil dips below 350°F, your chicken starts soaking it up like a sponge. If it gets too hot? Burnt coating, raw inside. I keep my stove slightly higher than medium and adjust constantly. When adding chicken, the temp will drop – let it come back up between batches!
- Pat that chicken dry before coating: Here’s the mistake I made for years – going straight from buttermilk to flour. The excess liquid makes the coating gummy instead of crispy. Now I drain the chicken, then give each piece a quick pat with paper towels. Just enough to remove the drips while keeping the meat moist. Game. Changer.
- Serve immediately – no exceptions: These skewers are at their absolute prime when served piping hot. The chicken’s crisp, the waffles are warm, the syrup’s dripping… pure heaven. If they sit, everything gets soggy. My solution? I fry the chicken last, assemble quickly, and have guests gather ’round so we can eat them straight off the serving tray. Trust me, no one complains about eating right away!
Bonus tip from my last brunch disaster: Make extra. I always think “this will be plenty” and then end up with sad, empty platters and disappointed friends. Double the batch – you can always snack on leftovers (if there are any)!
Serving Suggestions for Chicken and Waffle Skewers
Oh, the places these skewers can go! I’ve served them at everything from fancy brunches to backyard BBQs, and here’s what I’ve learned makes them shine even brighter:
- Dipping sauce bar: Set out little bowls of different sauces next to your skewers – it’s a total game changer! My favorites? Spicy maple mayo (just mix mayo with a bit of maple syrup and hot sauce), honey mustard for the traditionalists, and a bourbon caramel sauce when I’m feeling fancy. Last time I did this, my guests started mixing sauces like mad scientists!
- Fresh fruit platter: The sweet juiciness of berries, grapes, and melon balances the richness perfectly. I love arranging a colorful mix around the skewers – it makes the whole spread look like something from a magazine. Bonus: the kids actually eat their fruit when it’s served this way!
- Light salad pairing: A simple arugula salad with lemon vinaigrette cuts through the richness beautifully. I’ll never forget when my health-conscious sister-in-law saw these at a party and hesitated… until I pointed out the salad. She ended up having three skewers!

For brunch buffets, I arrange the skewers on a big maple syrup-drizzled platter with mini pitchers of extra syrup. Add some crispy bacon curls and scrambled eggs on the side, and you’ve got a spread that’ll have people raving for weeks. Pro tip: if you’re serving these at a standing party, stick the skewers into a halved watermelon or floral foam covered in greens – makes for the cutest (and most practical) display!
Storing and Reheating Chicken and Waffle Skewers
Okay, let’s be real – these skewers are best fresh, but I know life happens! Here’s how to handle leftovers (if you’re lucky enough to have any) without sacrificing that perfect crispness:
Storage secret: Never store them assembled! The waffles turn into sad, soggy sponges overnight. Instead, keep chicken and waffle pieces separate in airtight containers in the fridge for up to 2 days. I learned this the hard way after ruining a whole batch by leaving them skewered overnight – tragic!
Reheating magic: To bring back that fresh-fried crispness, spread chicken pieces on a baking sheet and pop them in a 375°F oven for 5-7 minutes. For the waffles? Your toaster is your best friend! Just toast until warm and slightly crisp again. Then reassemble with fresh skewers and drizzle with syrup right before serving.
Pro tip: If you’re meal prepping, you can freeze the fried chicken cubes (before skewering) for up to a month! Just thaw overnight in the fridge and reheat in the oven. The waffles don’t freeze as well though – they get weirdly chewy. Trust me, I’ve tried every freezer hack imaginable!
One last warning: microwaving is the enemy here! It makes everything rubbery and sad. I know it’s tempting when you’re hungry, but resist! That extra 10 minutes in the oven makes all the difference between “meh” and “wow, this tastes fresh!”
Chicken and Waffle Skewers Nutrition Facts
Okay, let’s be real – we’re not eating fried chicken on waffle sticks because we’re counting calories! But I know some folks like to know what they’re biting into (and hey, maybe you want to budget your cheat day wisely). These numbers are estimates based on my recipe, but your exact counts might vary depending on your ingredients and how generous you are with that maple syrup drizzle!
- Calories: About 320 per skewer
- Protein: 22g (that chicken packs a punch!)
- Carbs: 35g (mostly from those delicious waffles)
- Sugar: 8g (goes up if you’re heavy-handed with syrup like I am)
- Fat: 12g
- Sodium: Around 450mg
A little nutrition pro tip from someone who’s made these way too many times: Pairing them with fresh fruit or a green salad helps balance things out. And if you’re watching certain macros, you can absolutely tweak the recipe – try whole wheat waffles or baking instead of frying (though I’ll always swear by the fried version for maximum yum).
Remember, these are treats meant to be enjoyed – not stressed over! My philosophy? Eat one less skewer and savor every bite rather than stressing about every gram. Life’s too short not to enjoy your food!
Frequently Asked Questions
After making these skewers for every party under the sun, I’ve heard all the questions! Here are the ones that come up most often (along with my hard-earned answers):
Can I bake instead of fry?
Oh honey, I feel you – frying can be messy! You can bake at 400°F for about 15 minutes, flipping halfway. They won’t get quite as crispy, but spraying the chicken lightly with oil helps. My compromise? I’ll sometimes fry just the chicken and bake the waffles – best of both worlds!
How long do leftovers last?
If you store components separately (key tip!), the chicken stays good refrigerated for 2 days. Waffles are best eaten within 24 hours. Assembled skewers? Maybe 4 hours max before they turn sad and soggy. Honestly though, in my house they never last that long!
What’s the best waffle type?
Through extensive “research” (read: eating way too many waffles), I’ve found plain buttermilk waffles work best. They’re sturdy enough to skewer but not too sweet. Avoid chocolate chip or fruity ones – they clash with the chicken. Pro tip: slightly undercooked waffles hold up better when skewered!
Any make-ahead tips?
Absolutely! I often prep the chicken the night before – marinate it overnight (extra tender!) and mix the dry coating. Morning-of, just coat and fry. Waffles can be made ahead too – just toast them lightly before assembling. The key is keeping everything separate until the last minute!
Skewer alternatives?
Ran out of skewers? No worries! Try toothpicks for mini versions (great for appetizers), or serve deconstructed on a platter with syrup for dipping. Once in a pinch, I used rosemary sprigs as “fancy” skewers – smelled amazing and looked gorgeous!
Still got questions? Hit me up – I could talk about these skewers all day! Just don’t blame me when they become your new signature party dish.


55 Irresistible Chicken and Waffle Skewers Everyone Will Crave
- Total Time: 35 minutes
- Yield: 4 servings 1x
- Diet: Halal
Description
Chicken and waffle skewers combine crispy fried chicken with fluffy waffles for a fun twist on a classic dish.
Ingredients
- 1 lb boneless chicken breast, cut into cubes
- 1 cup buttermilk
- 1 cup all-purpose flour
- 1 tsp salt
- 1 tsp black pepper
- 1 tsp paprika
- 4 waffles, cooked and cut into squares
- Maple syrup for serving
- Wooden skewers
Instructions
- Marinate chicken cubes in buttermilk for 30 minutes.
- Mix flour, salt, pepper, and paprika in a bowl.
- Coat chicken pieces in flour mixture.
- Fry chicken in oil at 350°F until golden brown.
- Thread cooked chicken and waffle squares alternately onto skewers.
- Serve warm with maple syrup.
Notes
- Soak wooden skewers in water for 30 minutes before using.
- Use pre-made waffles to save time.
- Adjust seasoning to your taste.
- Prep Time: 15 minutes
- Cook Time: 20 minutes
- Category: Appetizer
- Method: Frying
- Cuisine: American
Nutrition
- Serving Size: 1 skewer
- Calories: 320
- Sugar: 8g
- Sodium: 450mg
- Fat: 12g
- Saturated Fat: 3g
- Unsaturated Fat: 7g
- Trans Fat: 0g
- Carbohydrates: 35g
- Fiber: 2g
- Protein: 22g
- Cholesterol: 65mg