Oh my goodness, let me tell you about my latest kitchen obsession – the Chicken Caesar Crunchwrap! It’s everything you love about a classic Caesar salad, but wrapped up in a crispy, buttery tortilla that’s just begging to be devoured. I stumbled upon this genius idea one busy weeknight when I needed dinner fast, and now it’s my go-to lunch at least twice a week. The best part? It comes together in just 15 minutes and that amazing crunch makes it feel way fancier than it really is. Trust me, once you try this handheld version, you’ll never look at salad the same way again!
Ingredients for Chicken Caesar Crunchwrap
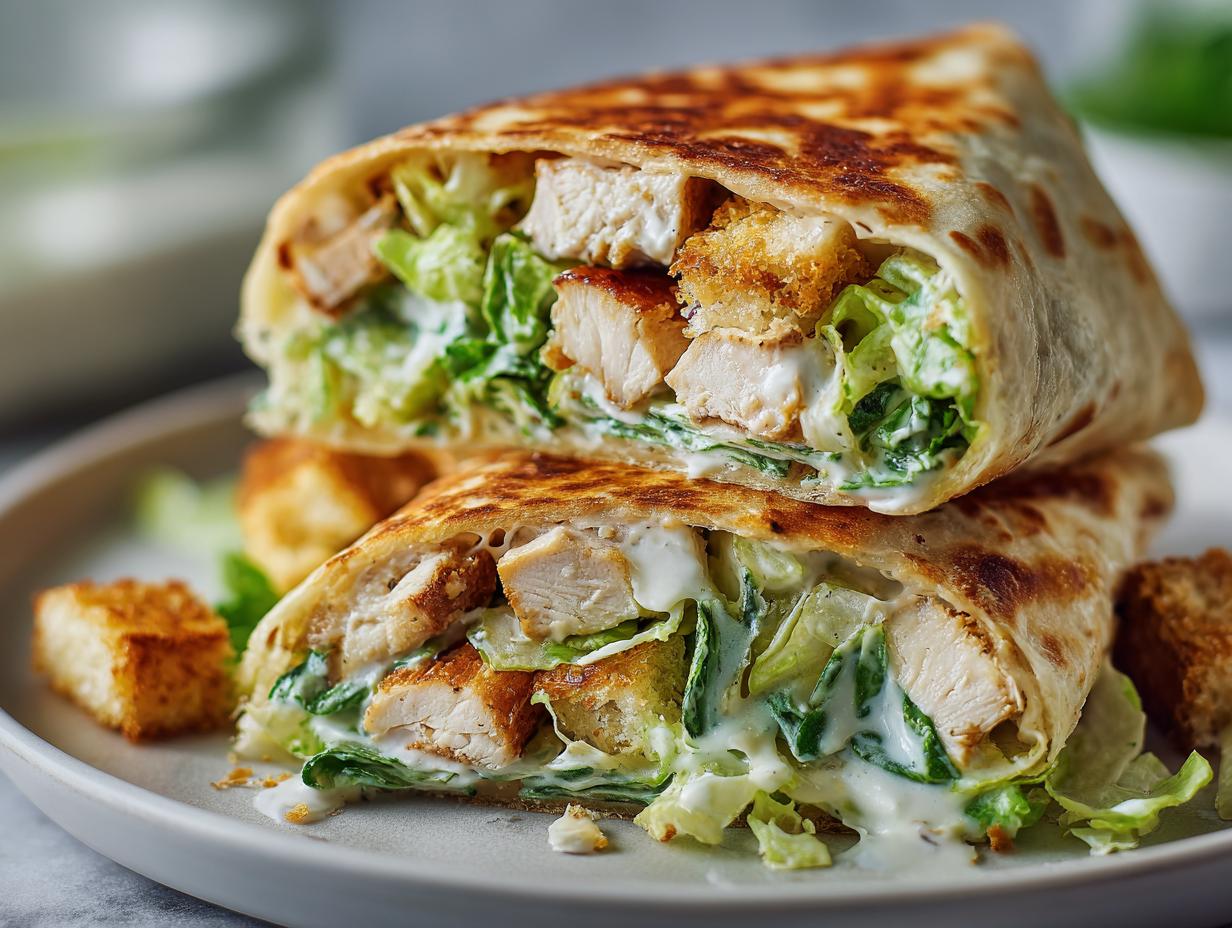
Gathering the right ingredients is key to nailing that perfect Chicken Caesar Crunchwrap texture and flavor. Here’s everything you’ll need – I’ve learned through trial and error that these specific measurements make all the difference:
- 1 large flour tortilla (the burrito-sized ones work best – they give you room to fold!)
- 1 cup cooked chicken breast, diced (I like to use leftovers from last night’s roast chicken)
- 1/2 cup romaine lettuce, chopped (chop it slightly finer than you would for salad)
- 1/4 cup Caesar dressing (my secret – use the creamy bottled kind for maximum cling)
- 1/4 cup shredded Parmesan cheese (the powdery kind sprinkles evenly)
- 1/4 cup croutons, crushed (I smash them lightly in a bag with a rolling pin)
- 2 tbsp butter, melted (salted butter gives that irresistible golden crust)
Pro tip: Have everything prepped and lined up before you start assembling – it makes the folding process so much easier when you’re not scrambling for ingredients!
How to Make Chicken Caesar Crunchwrap
Alright, let’s get to the fun part – turning these simple ingredients into that magical crispy, creamy, crunchy package! I’ve made this so many times I could do it in my sleep, but I’ll walk you through each step to make sure your first try comes out perfect.
Step 1: Prep the Tortilla
First things first – lay that big beautiful tortilla flat on your clean counter. I like to warm it for about 10 seconds in the microwave first (just enough to make it flexible without cooking it). Now, grab your Caesar dressing and spread it in a circle right in the center – think of making a little “bed” about the size of your palm. This is where all your toppings will live, so leave about 3 inches of tortilla bare around the edges.
Next comes the layering – chicken first (those juicy bites!), then the romaine (listen for that satisfying crunch as you pile it on), followed by the Parmesan (watch how it sticks to the dressing – that’s flavor magic happening). Finally, sprinkle those crushed croutons like they’re edible confetti. The layers might look tall now, but trust me, they’ll settle when you fold!
Step 2: Fold and Seal
Okay, here’s where people sometimes panic, but don’t worry – it’s easier than folding a fitted sheet, I promise! Start by picking up one edge of the tortilla and folding it inward toward the center. Now move clockwise to the next section and fold that in, slightly overlapping the first fold. Keep going until you’ve made about 5-6 folds – it should look like a little hexagon by now.
The trick? Use those first few ingredients as “glue” – press gently so the dressing helps seal everything together. If you’ve got a particularly rebellious flap, a tiny dab of extra dressing underneath works wonders. Flip your creation over carefully – the weight of the ingredients will help keep everything in place while you cook.
Step 3: Cook to Crispy Perfection
Time for that golden crunch! Heat a dry skillet over medium heat – no oil needed yet. While it warms up, brush melted butter all over the top of your wrap (yes, even the folded parts – this is where the magic happens). When the pan’s hot enough that a drop of water sizzles, carefully place your wrap in buttered-side down.

Now, here’s my pro tip – resist the urge to press it down with a spatula right away! Let it cook undisturbed for about 2 minutes to set that first side. While it cooks, butter the other side. When you see golden edges peeking underneath, flip it with confidence (I use two spatulas for this part). Cook another 2-3 minutes until both sides are evenly golden brown and crispy.
You’ll know it’s done when you tap the top and hear that satisfying hollow sound – that means all that cheesy, chickeny goodness inside is perfectly heated through. Let it rest for just a minute before slicing (I know, the anticipation is killer!), then dig in while it’s gloriously warm and crunchy!
Why You’ll Love This Chicken Caesar Crunchwrap
Listen, I don’t just make this Chicken Caesar Crunchwrap because it’s easy (though that’s a huge plus). I make it because it’s honestly one of the most satisfying lunches I’ve ever thrown together. Here’s why it’s about to become your new favorite too:
- Crazy quick to make – From fridge to plate in under 15 minutes? Yes, please! It’s faster than waiting in line at a sandwich shop.
- Perfectly portable – Wrap it in foil and toss it in your bag. No sad, soggy salads here – just crispy goodness that travels like a dream.
- Endlessly customizable – Swap chicken for shrimp, add bacon, throw in some cherry tomatoes… make it yours! The basic formula works with whatever you’ve got.
- That addictive crunch factor – The buttery tortilla crisps up beautifully, while the croutons inside stay perfectly crunchy. Every bite has texture.
- All the Caesar flavor you crave – That tangy dressing, salty Parmesan, crisp romaine – it’s everything you love about the salad, just way more fun to eat.
- Leftover superhero – Turns last night’s grilled chicken into today’s amazing lunch. Waste not, want not!
Seriously, once you’ve had salad in crispy wrap form, there’s no going back. It’s like someone took all the best parts of a Caesar salad and gave them a delicious handheld makeover. My kids even eat their greens this way – that’s how good it is!
Tips for the Best Chicken Caesar Crunchwrap
After making these wraps more times than I can count (okay, maybe I have a problem), I’ve picked up some foolproof tricks to guarantee perfection every single time. These little hacks make all the difference between a good crunchwrap and an “oh-my-gosh-I-need-another-one” crunchwrap!
- Warm those tortillas first – Just 10 seconds in the microwave makes them flexible enough to fold without cracking. Cold tortillas = torn tortillas = sad lunch.
- Go light on the dressing – I know it’s tempting to drown everything, but too much makes the wrap soggy. Stick to that 1/4 cup – it’s the perfect amount to coat without drowning.
- Press lightly when folding – Gentle pressure helps the layers stick together, but smash too hard and you’ll squeeze out all the good stuff. Think “hug”, not “wrestle”.
- Butter both sides generously – Don’t be shy with that butter brush! Every inch of tortilla deserves that golden crispiness.
- Medium heat is key – Too hot and the outside burns before the inside warms; too low and you lose that crunch. Look for a steady sizzle when the wrap hits the pan.
- Let it rest before cutting – I know it’s hard, but giving it just 60 seconds to set means cleaner slices and less filling spillage.
- Double (or triple!) the recipe – These keep beautifully in the fridge for next-day lunches. Just reheat in the toaster oven for that fresh-off-the-stove crisp.
- Crouton hack – If your croutons are extra hard, give them a quick whiz in the food processor. Tiny bits distribute the crunch evenly in every bite.
The biggest tip of all? Make one for you and one for a friend – because nobody should have to share these beauties!
Ingredient Substitutions & Variations
One of my favorite things about this Chicken Caesar Crunchwrap is how easily you can switch things up based on what’s in your fridge or dietary needs. I’ve tried so many variations – some planned, some desperate pantry raids – and these are the ones that work like a charm:
- Protein swaps:
- Grilled shrimp (just 2-3 minutes per side – they cook fast!)
- Thinly sliced steak (leftover flank steak is perfect)
- Chickpeas for a vegetarian version (roast them first for extra crunch)
- Even canned tuna in a pinch (drain it well and pat dry)
- Crunch alternatives:
- Gluten-free croutons (they crisp up just as nicely)
- Toasted slivered almonds or sunflower seeds
- Crushed pork rinds for a keto option (sounds weird, tastes amazing)
- Even crispy fried onions from that green bean casserole can
- Dressing variations:
- Mix Caesar with a bit of ranch for creaminess
- Spicy mayo if you like heat (just add sriracha to taste)
- Greek yogurt + lemon + garlic for a lighter version
- Cheese options:
- Pecorino Romano for sharper flavor
- Shredded mozzarella if you want that stretchy pull
- Feta crumbles for a salty tang
- Extra add-ins:
- Chopped cooked bacon (because bacon makes everything better)
- Sliced avocado (add after cooking to prevent browning)
- Sun-dried tomatoes for a sweet-tart punch
- Thinly sliced red onion for bite
My husband’s current favorite is the “everything but the kitchen sink” version – leftover rotisserie chicken, bacon, avocado, and extra Parmesan. The beauty is that as long as you keep the basic tortilla + dressing + crunch formula, you really can’t mess it up. So raid that fridge and get creative – your perfect crunchwrap combo is waiting to be discovered!
Serving Suggestions
Now that you’ve mastered the Chicken Caesar Crunchwrap, let’s talk about how to serve it up in style! Sure, you could just eat it straight off the cutting board (no judgment – I’ve done it), but with a few simple touches, you can turn this quick meal into something that feels restaurant-worthy. Here are my favorite ways to enjoy it:
- Classic Caesar duo: Serve with a small side of extra Caesar salad for maximum romaine enjoyment – it’s like having your salad and eating your wrap too!
- Soup’s on: Tomato soup makes the perfect cozy companion, especially on chilly days. Dunk that crunchy wrap right in – the flavors pair beautifully.
- Veggie boost: Add carrot sticks, cucumber slices, or cherry tomatoes for freshness. The cool crunch complements the warm wrap nicely.
- Chips & dips: A handful of crispy pita chips with hummus or tzatziki makes a satisfying Mediterranean-inspired meal.
- Presentation pro tip: Slice diagonally and fan out on the plate with a drizzle of extra dressing and Parmesan shavings on top. Instantly fancy!
For parties or brunch, I’ll often make mini versions using 6-inch tortillas – they’re adorable finger foods that disappear fast! Just cut them into quarters and arrange on a platter with dipping sauces. And if you’re packing lunch? Wrap tightly in parchment paper first, then foil – it keeps the crispiness while looking super cute when unwrapped. However you serve it, that first glorious crunch will have everyone asking for your secret!
Storage & Reheating Instructions
Here’s the good news – these Chicken Caesar Crunchwraps actually hold up beautifully for next-day meals if you store them right! I’ve tested every possible method (because let’s face it, I’m always making extras), and here’s exactly how to keep that magic crunch intact:
- Room temp: If you’re eating within 2 hours, just wrap loosely in foil – the residual heat keeps it pleasantly warm without steaming the tortilla.
- Refrigerator: Let the wrap cool completely (about 15-20 minutes), then wrap tightly in plastic wrap or foil. Stored this way, they’ll stay fresh for up to 2 days. Pro tip: Skip the lettuce if meal prepping – add it fresh when reheating.
- Freezer: Surprisingly, these freeze great! Wrap individually in parchment paper first, then foil, and freeze flat for up to 1 month. Thaw overnight in the fridge before reheating.
Reheating Like a Pro
Now, the real secret to next-day crunchwrap bliss is the reheating method. Microwave lovers, I’m sorry – that’s a one-way ticket to Soggy Town. Here’s how to bring back that just-made crispiness:
- Oven method: Preheat to 375°F (190°C). Unwrap and place directly on the oven rack for 8-10 minutes. The circulating air crisps it evenly – no flipping needed!
- Air fryer magic: 350°F (175°C) for 4-5 minutes is perfect. The rapid hot air works wonders on that tortilla crust.
- Stovetop refresh: Just like initial cooking – medium heat in a dry skillet for 2-3 minutes per side. Spritz lightly with water if the tortilla seems dry.
One last lifesaver tip: If adding fresh lettuce after reheating, tuck it in through a small opening in the side – that way it stays crisp while the rest gets piping hot. Because really, what’s the point of a crunchwrap without the crunch?
Nutritional Information
Okay, let’s talk numbers – but remember, I’m a home cook, not a dietitian! Here’s the approximate nutrition breakdown for one glorious Chicken Caesar Crunchwrap (because hey, knowledge is power, even when you’re devouring something this delicious):
- Calories: About 450
- Protein: 30g (that chicken packs a punch!)
- Carbs: 35g
- Fiber: 2g
- Sugar: 3g
- Fat: 22g
- Saturated Fat: 8g
- Sodium: 850mg (Caesar dressing does its thing here)
Important note: These nutritional values are estimates based on the specific ingredients I use, and yours may vary slightly depending on brands or substitutions. If you’re tracking closely, I’d recommend plugging your exact ingredients into a nutrition calculator – but honestly, when something tastes this good, sometimes it’s better not to know!
That said, compared to a restaurant Caesar salad (which can easily hit 700+ calories with all that dressing and cheese), this wrap version gives you all the flavor with slightly better portion control. And hey, all that protein keeps you full for hours – no 3pm snack attacks here!
Frequently Asked Questions
Over my many crunchwrap adventures, I’ve gotten the same great questions from friends and family (and okay, from myself when I first started making these!). Here are all the answers you need to become a Chicken Caesar Crunchwrap pro:
Can I make these ahead of time?
Absolutely! Assemble them completely (minus the lettuce if storing overnight), wrap tightly in plastic, and refrigerate for up to 12 hours. When ready, cook as directed – they’ll taste just as fresh! For longer storage, freeze before cooking (see my freezer tips above).
Help! My wrap keeps falling apart when I flip it. What am I doing wrong?
Oh honey, I’ve been there! Two tricks: 1) Make sure your pan is hot before adding the wrap – this sets the tortilla quickly, and 2) Use two spatulas to flip (one to lift, one to support). If all else fails, a quick 30-second toast in the pan before filling helps stiffen the tortilla.
How do I prevent sogginess?
The soggy struggle is real, but fixable! First, pat your chicken and lettuce completely dry. Second, layer ingredients with the cheese touching the dressing – it acts as a moisture barrier. And third (this is crucial), don’t overload the dressing – measure that 1/4 cup!
Can I use corn tortillas instead of flour?
You can, but they won’t fold as neatly and tend to crack. If you’re gluten-free, look for those extra-large GF flour tortillas – they work beautifully. Corn tortilla fans might prefer making two smaller crispy tacos instead of one big wrap.
What’s the best way to reheat leftovers?
Skip the microwave! The oven or air fryer methods I mentioned earlier are your best bets. Pro tip: If the edges seem dry when reheating, brush lightly with water or butter before warming – it brings back that fresh-off-the-stove texture.
Got more questions? Try this recipe and share your twist (and any head-scratchers you encounter) in the comments – I love swapping crunchwrap hacks with fellow food lovers!
Print
15-Min Chicken Caesar Crunchwrap – Irresistible Crispy Magic
- Total Time: 16 mins
- Yield: 1 serving 1x
- Diet: Low Calorie
Description
A delicious and crunchy twist on the classic Caesar salad, wrapped in a tortilla for easy eating.
Ingredients
- 1 large flour tortilla
- 1 cup cooked chicken breast, diced
- 1/2 cup romaine lettuce, chopped
- 1/4 cup Caesar dressing
- 1/4 cup shredded Parmesan cheese
- 1/4 cup croutons, crushed
- 2 tbsp butter, melted
Instructions
- Heat a skillet over medium heat.
- Lay the tortilla flat and spread Caesar dressing in the center.
- Layer chicken, lettuce, Parmesan cheese, and crushed croutons.
- Fold the edges of the tortilla inward to form a square.
- Brush melted butter on the outside of the wrap.
- Place the wrap in the skillet and cook for 2-3 minutes per side until golden and crispy.
- Slice and serve immediately.
Notes
- Use freshly cooked chicken for best flavor.
- Adjust Caesar dressing to taste.
- Add bacon bits for extra crunch.
- Prep Time: 10 mins
- Cook Time: 6 mins
- Category: Lunch
- Method: Pan-frying
- Cuisine: American
Nutrition
- Serving Size: 1 wrap
- Calories: 450
- Sugar: 3g
- Sodium: 850mg
- Fat: 22g
- Saturated Fat: 8g
- Unsaturated Fat: 12g
- Trans Fat: 0g
- Carbohydrates: 35g
- Fiber: 2g
- Protein: 30g
- Cholesterol: 90mg