Oh my goodness, let me tell you about my absolute favorite dessert – this Chocolate Strawberry Tart! It’s that magical moment when rich, velvety chocolate meets bright, juicy strawberries in the most elegant yet simple way. I first made this tart for my best friend’s birthday years ago, and now it’s become my go-to for every special occasion. There’s something about that crisp cocoa crust giving way to smooth ganache and fresh berries that makes people’s eyes light up. And the best part? It looks fancy but comes together with just a few basic ingredients. Trust me, once you try this Chocolate Strawberry Tart, you’ll understand why it’s the dessert I’m always asked to bring to gatherings!
Why You’ll Love This Chocolate Strawberry Tart
Let me count the ways this tart will steal your heart (and probably your waistline)! First off – it’s ridiculously easy to make, even if you’re not a baking pro. The crust comes together in minutes, and that chocolate filling? Just two ingredients whisked into silky perfection. But here’s what really gets me:
- Celebration-worthy – This tart looks like it came from a fancy patisserie but takes a fraction of the effort
- Flavor magic – The deep chocolate and bright strawberries balance each other beautifully
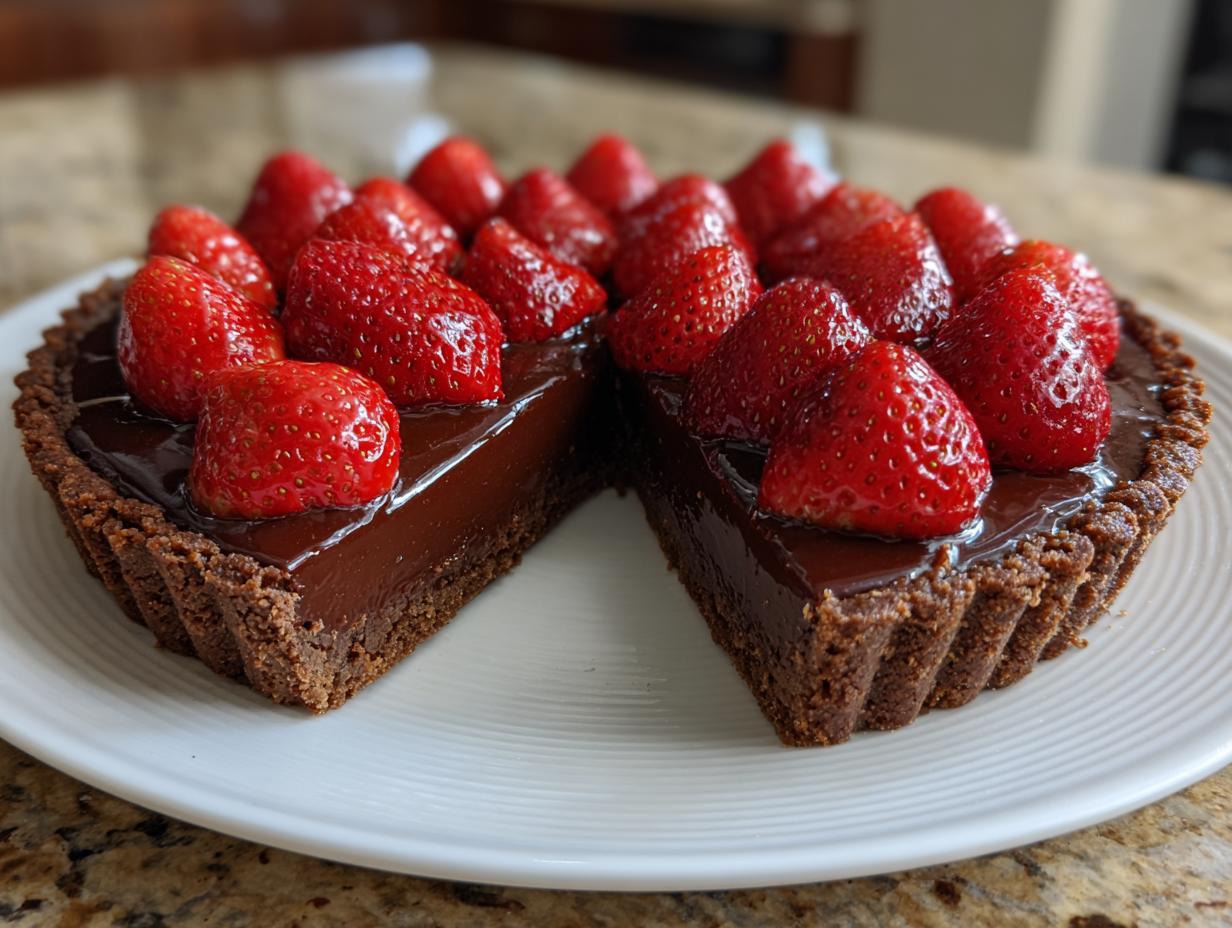
- Showstopper looks – That glossy chocolate topped with ruby-red berries is pure edible art
- Versatile – Equally at home at a summer picnic or winter dinner party
Seriously, this is the dessert that’ll make people think you slaved for hours when really, you were just being brilliantly simple!
Ingredients for Chocolate Strawberry Tart
Okay, let’s gather our goodies! One of the things I love about this tart is how few ingredients it needs – but each one matters. Here’s exactly what you’ll need, broken down by component:
For the Chocolate Crust:
- 1 1/2 cups all-purpose flour (spooned and leveled, please!)
- 1/4 cup cocoa powder (the good stuff – I use Dutch-processed)
- 1/2 cup unsalted butter, chilled and cubed (cold is crucial for flakiness)
- 1/4 cup granulated sugar (just enough sweetness to balance the cocoa)
- 1 egg yolk (save the white for breakfast!)
For the Luscious Filling:
- 1 cup heavy cream (minimum 36% fat – no skimping!)
- 200g dark chocolate (70% cocoa), finely chopped
- 1 tsp pure vanilla extract (the real deal, not imitation)
For the Beautiful Topping:
- 1 pint fresh strawberries, hulled and sliced (wait to prep these until assembly)
See? Nothing crazy – just quality ingredients that work magic together. Now let’s get mixing!

Essential Equipment for Chocolate Strawberry Tart
You won’t need fancy gadgets for this beauty, but a few key tools make all the difference. First – a 9-inch tart pan with removable bottom (trust me, this is non-negotiable for clean slices). My trusty mixing bowls get action for both crust and filling. A good whisk smooths out that chocolate ganache like a dream, and a medium saucepan gently heats the cream without scorching. Oh, and don’t forget a simple rubber spatula – it’s my MVP for scraping every last bit of that glorious chocolate filling into the crust!
How to Make Chocolate Strawberry Tart
Alright, let’s dive into the fun part – making this gorgeous tart come together! I’ll walk you through each step just like I would if we were baking together in my kitchen. Don’t worry – it’s easier than it looks, and I’ve got all the little tricks to make sure yours turns out perfect.
Step 1: Prepare the Crust
First things first – preheat your oven to 350°F (175°C). Now, grab a big bowl and whisk together the flour, cocoa powder, and sugar. Here’s my secret: sift the cocoa powder first to avoid lumps! Next comes the butter – make sure it’s chilled. I cut mine into small cubes and toss them into the dry ingredients.
Now for the fun part – use your fingers to rub the butter into the flour mixture until it looks like coarse breadcrumbs. Don’t overwork it! Just until the butter is pea-sized. Add the egg yolk and mix gently until the dough just comes together. Press it into your tart pan evenly – I like to use the bottom of a measuring cup to get it nice and smooth. Pop it in the fridge for 15 minutes to chill (this prevents shrinking!).
Step 2: Bake the Crust
Take your chilled crust straight from fridge to oven – no need to prick with a fork for this recipe. Bake for about 15 minutes until it’s set and smells chocolaty. You’ll know it’s ready when the edges look dry and the center is firm to the touch. Let it cool completely before adding the filling – a warm crust makes for runny ganache!
Step 3: Make the Chocolate Filling
While the crust cools, make that luscious filling. Chop your chocolate finely (small pieces melt faster!) and put it in a heatproof bowl. Heat the cream in a saucepan until it just starts to simmer – tiny bubbles at the edges are your cue. Pour it over the chocolate and let it sit for 1 minute (patience!). Then gently stir with a whisk until it’s gloriously smooth. Add the vanilla – this is when the magic happens!
Step 4: Assemble the Tart
Pour that silky chocolate filling into your cooled crust. Now for the pretty part – arrange your strawberry slices however you like! I usually start from the outside and work in circles. The tart needs to chill for at least 2 hours to set properly – I know, the waiting is torture! But trust me, it’s worth it for that perfect slice.
Pro tip: If you’re in a hurry, 30 minutes in the freezer will set it faster, but fridge time gives the best texture.
Tips for the Perfect Chocolate Strawberry Tart
Listen, I’ve made this tart more times than I can count, and here are the little tricks that make all the difference:
- Chill that crust! Pop it in the fridge for 15 minutes before baking—this keeps it from shrinking and gives you that perfect crisp texture.
- Room-temp strawberries slice like a dream without squishing. Just let them sit out while you prep everything else.
- Chop chocolate small for smooth melting—no one wants lumpy ganache!
- Let the tart set fully before slicing (I know, it’s hard to wait!). Clean cuts come from patience.
- Dab strawberry slices dry before arranging—extra moisture can make the chocolate weep.
Little things, big results—that’s my baking motto!
Variations for Chocolate Strawberry Tart
Oh, the fun part – playing with variations! Sometimes I swap the dark chocolate for white chocolate for a sweeter, creamier vibe – it looks stunning with the red berries. A few chopped toasted almonds in the crust add amazing crunch. Or for a fresh twist, I’ll sprinkle some finely chopped mint over the top right before serving. Honestly, this tart is like a blank canvas – once you master the base, you can get creative!
Serving and Storing Chocolate Strawberry Tart
Here’s the best way to serve this beauty – straight from the fridge, maybe with a dollop of fresh whipped cream on the side if you’re feeling fancy. The chilled tart slices cleanly, showing off those gorgeous layers. DESIGNATED Leftovers? No problem! Just cover tightly with plastic wrap (careful not to smash those pretty berries) and refrigerate for up to 3 days. Honestly though, in my house it never lasts that long – this tart tends to disappear faster than you can say “second slice!”
Chocolate Strawberry Tart Nutritional Information
Just so you know, these nutritional estimates can vary based on your specific ingredients – that gorgeous dark chocolate you splurged on might have different values than mine! Generally though, each slice gives you a decent protein boost from the eggs and chocolate, plus vitamin C from those fresh strawberries. Everything in moderation, right?
Frequently Asked Questions
Can I use milk chocolate instead of dark?
Absolutely! Milk chocolate makes a sweeter, creamier filling – just reduce the sugar in the crust slightly to balance it. White chocolate works too, though you’ll want to use only 3/4 cup cream since it melts thinner.
How do I prevent a soggy crust?
Two secrets: 1) Make sure your crust is completely cooled before adding the filling, and 2) Don’t slice strawberries too far in advance – their juices can make the crust soft. A quick brush of melted chocolate on the cooled crust creates a moisture barrier too!
Can I make this ahead?
You bet! The crust can be baked 1 day ahead (store at room temp). Assemble the tart up to 8 hours before serving – just wait to add strawberries until the last minute if you want them super fresh-looking.
My ganache split! How do I fix it?
Don’t panic! Just whisk in 1 tbsp hot cream at a time until it comes back together. Overheating causes separation, so keep the heat gentle next time.
Can I freeze leftovers?
The texture changes a bit, but yes! Freeze whole or in slices for up to 1 month. Thaw in the fridge overnight – the strawberries will soften but still taste great.
Final Thoughts
There you have it – my foolproof Chocolate Strawberry Tart that never fails to impress! I can’t wait for you to experience that first perfect bite where crisp crust meets velvety chocolate and juicy berries. Tag me if you make it – I love seeing your creations almost as much as I love eating this tart myself!
Print
Irresistible Chocolate Strawberry Tart Recipe in 4 Easy Steps
- Total Time: 2 hours 35 minutes
- Yield: 8 servings 1x
- Diet: Vegetarian
Description
A delicious chocolate strawberry tart with a crisp crust, rich chocolate filling, and fresh strawberries.
Ingredients
- 1 1/2 cups all-purpose flour
- 1/4 cup cocoa powder
- 1/2 cup unsalted butter, chilled
- 1/4 cup granulated sugar
- 1 egg yolk
- 1 cup heavy cream
- 200g dark chocolate, chopped
- 1 tsp vanilla extract
- 1 pint fresh strawberries, hulled and sliced
Instructions
- Preheat your oven to 350°F (175°C).
- Mix flour, cocoa powder, and sugar in a bowl.
- Cut in chilled butter until the mixture resembles breadcrumbs.
- Add egg yolk and mix until dough forms.
- Press dough into a tart pan and bake for 15 minutes.
- Heat heavy cream until simmering, then pour over chopped chocolate.
- Stir until smooth, add vanilla, and pour into the baked crust.
- Arrange sliced strawberries on top and refrigerate for 2 hours.
Notes
- Chill the tart crust before baking for a crispier texture.
- Use room-temperature strawberries for easier slicing.
- Store leftovers in the refrigerator.
- Prep Time: 20 minutes
- Cook Time: 15 minutes
- Category: Dessert
- Method: Baking
- Cuisine: International
Nutrition
- Serving Size: 1 slice
- Calories: 320
- Sugar: 18g
- Sodium: 25mg
- Fat: 22g
- Saturated Fat: 13g
- Unsaturated Fat: 7g
- Trans Fat: 0g
- Carbohydrates: 28g
- Fiber: 3g
- Protein: 4g
- Cholesterol: 65mg