Picture this: It’s Halloween night, and my kitchen is a whirlwind of laughter, sugar, and the faint smell of vanilla. My niece squeals as she presses marshmallows into warm cookies, transforming them into creepy Cyclops eyeballs before my eyes. That’s the magic of these cookies—they turn any Halloween party into a spooky, fun-filled event with almost zero effort. Trust me, if I can pull these off (and I’ve burned my fair share of cookies), so can you. Just a few simple ingredients, a bit of creativity, and suddenly, you’ve got a tray of deliciously eerie Cyclops Eyeball Cookies that’ll steal the spotlight at any gathering.

Why You’ll Love These Cyclops Eyeball Cookies
Let me tell you why these Cyclops Eyeball Cookies have become my go-to Halloween treat year after year:
- Instant Halloween vibes: One bite of these creepy cookies and you’re transported straight into spooky season. The kids go wild for them!
- Easier than they look: No fancy piping skills needed here – just simple shaping and decorating that even my 5-year-old nephew can handle.
- Pantry-friendly ingredients: You probably have everything except maybe the food coloring and marshmallows already in your kitchen.
- Endless customization: Make bloodshot eyes with extra red gel or give them zombie-green veins – the creative possibilities are endless!
- Perfect party food: They’re equally at home on a dessert table or packed in lunchboxes for school Halloween parties.
Seriously, once you see how these Cyclops Eyeball Cookies disappear at your next gathering, you’ll understand why they’re my favorite Halloween tradition!
Ingredients for Cyclops Eyeball Cookies
Gather these simple ingredients, and you’re halfway to spooky cookie magic! I’ve made these enough times to know exactly what works best:
- 1 cup all-purpose flour (spooned and leveled – no packing!)
- ½ cup butter, softened (take it out 30 minutes before baking – trust me, it matters)
- ¼ cup powdered sugar, packed (yes, packed! It makes the texture just right)
- 1 tsp vanilla extract (the real stuff, not imitation)
- Red food coloring (gel works better than liquid for vibrant veins)
- Mini marshmallows (whole ones only – the cut ones get too sticky)
- Black decorating gel (this gives the best “pupil” definition)
Ingredient Substitutions & Notes
Ran out of something? No worries – here’s how to adapt:
- Gluten-free? Swap the flour 1:1 with your favorite GF blend. The texture stays perfect.
- Vegan? Use plant-based butter and vegan marshmallows (Dandies work great).
- No food gel? Liquid coloring works in a pinch – just use a toothpick to apply carefully.
- Powdered sugar tip: If yours is lumpy, sift it first for smoother dough.
- Butter note: Margarine can work, but real butter gives that rich flavor we love.
Pro tip: Grab extra marshmallows – you’ll inevitably snack on a few while decorating!
How to Make Cyclops Eyeball Cookies
Alright, let’s dive into the fun part! Making these Cyclops Eyeball Cookies is seriously simple, but I’ll walk you through each step so yours turn out perfectly creepy (and delicious). Just follow along, and soon you’ll have a whole army of eyeballs staring up at you from your baking sheet!
Step 1: Prepare the Cookie Dough
First things first – preheat that oven to 350°F (175°C). While it’s heating up, let’s make magic happen in your mixing bowl. Combine the flour, softened butter, powdered sugar, and vanilla. Now here’s my secret: mix until it’s completely smooth, scraping down the sides as needed. You want zero lumps – we’re going for eyeball-smooth texture here! The dough should hold together when pinched but not be sticky. If it feels too dry, add a teaspoon of milk. Too wet? A sprinkle more flour. Simple!
Step 2: Shape and Bake the Cookies
Time for some hands-on fun! Roll tablespoon-sized portions of dough into smooth balls – about 1 inch across. Place them on an ungreased baking sheet (trust me, the butter in the dough handles that). These bad guys don’t spread much, so you can place them pretty close together. Bake for 10-12 minutes until you see those perfect golden edges peeking out. The tops should still look pale – we want them soft enough to press our marshmallow eyeballs into later!

Step 3: Add the Eyeball Details
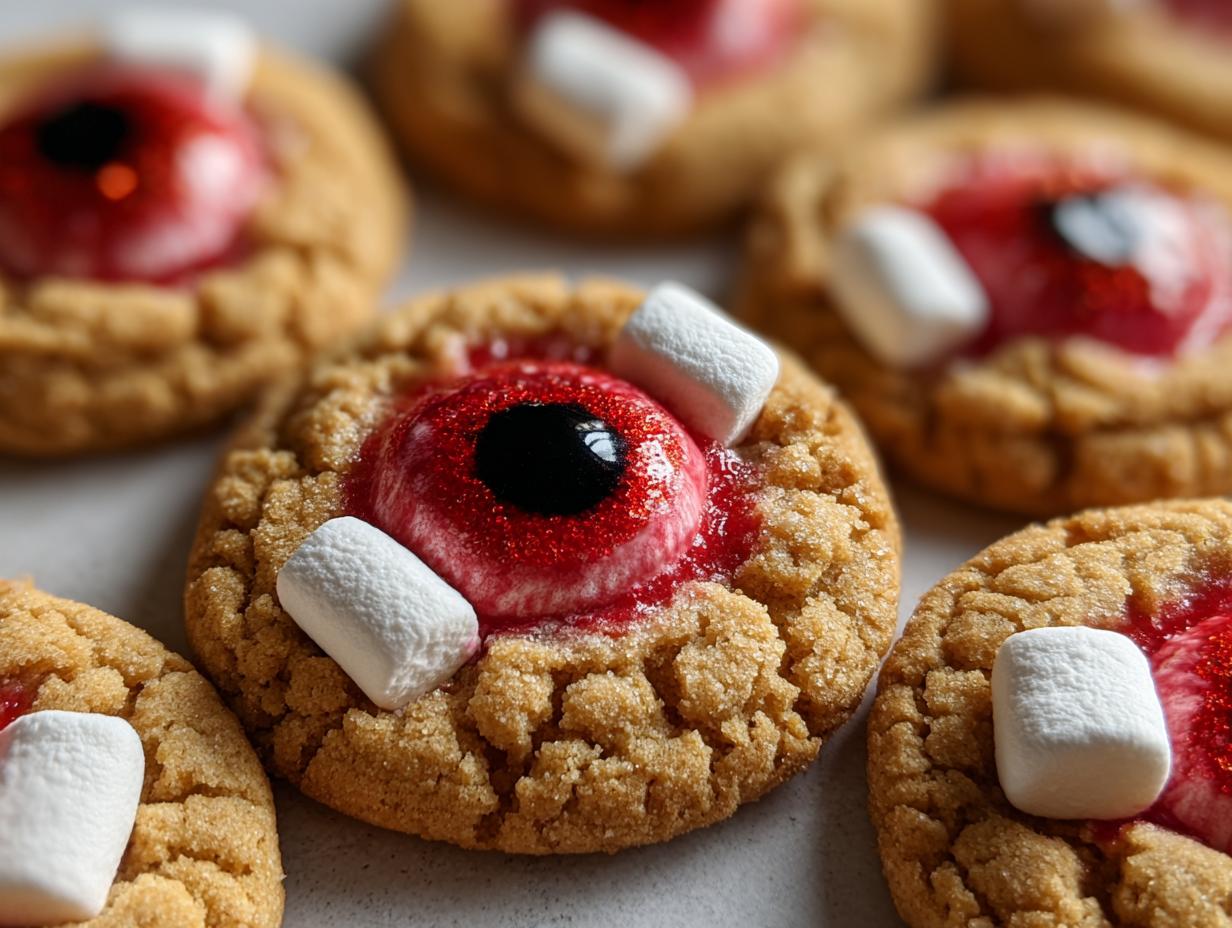
Here’s where the Cyclops Eyeball Cookies really come to life! Let your cookies cool for about 5 minutes – warm but not hot. Now press a mini marshmallow firmly into the center of each. Grab your red food coloring (I use a toothpick for control) and make squiggly “veins” radiating out from the marshmallow. Finally, dot the center with black decorating gel for the pupil. Pro tip: work quickly before the cookies cool completely – the marshmallows stick better when the cookies are slightly warm. Stand back and admire your terrifyingly tasty creations!
Tips for Perfect Cyclops Eyeball Cookies
After making these creepy cookies more times than I can count, I’ve picked up some foolproof tricks to get them just right every Halloween:
- Chill sticky dough: If your dough feels too soft after mixing, pop it in the fridge for 15 minutes. Makes shaping those eyeballs so much easier!
- Gel is gold: That black decorating gel gives way sharper pupils than frosting – just squeeze gently for perfect little dots.
- Baking tweaks: Want crispier cookies? Add 2 extra minutes to the bake time (watch those edges don’t go too dark).
- Warm cookie magic: The marshmallows stick best when pressed into slightly warm cookies – not hot enough to melt them, but just toasty.
- Less is more: Go easy on the red food coloring – just a few dramatic veins look creepiest!
Follow these simple tips, and your Cyclops Eyeball Cookies will be the hit of any Halloween bash!
Serving and Storing Cyclops Eyeball Cookies
Now that you’ve created these spooky masterpieces, let me show you how to keep them looking and tasting their best! I learned the hard way after one tragic Halloween when my beautiful eyeball cookies turned into mushy blobs by party time.
Serving these creep-tastic treats is half the fun! Arrange them on a dark platter with some fake spider webs for instant Halloween drama. Kids love when I serve them on a tray labeled “Eyeball Buffet” with a spooky sign. For classroom parties, I pack them in individual cupcake liners – no mess and every kid gets their own little monster eye.
Now for storage – this is important! These Cyclops Eyeball Cookies stay fresh in an airtight container at room temperature for 3 days max. Here’s my secret trick: place parchment paper between layers if stacking them. That black gel can smear if you’re not careful! And whatever you do, don’t refrigerate them – the marshmallows will sweat and get that weird sticky film (yuck).
If you need to make them ahead, here’s what I do: bake the cookies and store them undecorated for up to 2 days. Add the marshmallows and decorations the day of your event – that keeps everything looking fresh and creepy-perfect. Leftovers? They freeze surprisingly well (without decorations) for up to a month – just refresh them in a 300°F oven for 5 minutes before decorating.

Nutritional Information for Cyclops Eyeball Cookies
Okay, let’s be real – we’re not making these Cyclops Eyeball Cookies for their health benefits! But I know some folks like to keep track (or have dietary restrictions), so here’s the scoop on what’s in each deliciously creepy cookie:
- Calories: About 80 per eyeball (but who stops at just one?)
- Total Fat: 5g (mostly from that glorious butter)
- Saturated Fat: 3g
- Carbs: 8g (blame the marshmallow!)
- Sugar: 3g
- Protein: 1g (surprising protein boost from the flour!)
Important note: These numbers are estimates based on standard ingredients. Your actual nutrition facts might dance around a bit depending on your exact butter brand, marshmallow size, or how generously you apply those delicious red “veins.”
For my gluten-free friends using alternative flours or my vegan pals with plant-based butter – your numbers will vary slightly, but the spooky fun factor stays exactly the same! Now go enjoy your cookies – Halloween calories don’t count anyway, right?
FAQs About Cyclops Eyeball Cookies
Can I use frosting instead of marshmallows?
Absolutely, but hear me out – the marshmallows are what make these Cyclops Eyeball Cookies special! They give that perfect raised eyeball effect that frosting just can’t match. If you must substitute, try piping stiff white frosting in a dome shape, then chill before adding the pupil. But trust me, once you try the marshmallow version, you’ll never go back!
How long do these Halloween cookies stay fresh?
They’re best within 3 days when stored properly in an airtight container at room temperature. The marshmallows start to dry out after that. Pro tip: If you need to make them ahead, bake the cookies and store them undecorated for up to 5 days, then add the marshmallows and decorations right before serving.
Can kids help make these spooky cookies?
Oh my goodness, YES! This is one of my favorite Halloween baking projects to do with kids. Little hands are perfect for rolling the dough balls and pressing in the marshmallows. Just supervise the food coloring part – those red veins can get messy (but that’s half the fun)!
Why do my marshmallows keep falling off?
Three likely culprits: 1) You’re letting the cookies cool completely before adding marshmallows (they need to be slightly warm), 2) The marshmallows are too big or cut in half (use whole mini ones), or 3) You’re not pressing firmly enough – give that marshmallow a good push so it sticks!
Can I make these gluten-free or vegan?
You sure can! For gluten-free, just swap the flour 1:1 with your favorite GF blend. Vegan? Use plant-based butter and vegan marshmallows (Dandies brand works beautifully). The cookies might spread slightly differently, but they’ll still taste delicious and look perfectly spooky!
Share Your Creations!
Okay my fellow cookie monsters, now it’s your turn to show off! Nothing makes me happier than seeing your spooky interpretations of these Cyclops Eyeball Cookies. Did you give them zombie-green veins? Maybe purple alien pupils? Or – my personal favorite – a whole tray of bloodshot eyeballs that would make any mad scientist proud?
Snap a pic of your creepy creations and tag me @SpookySugarQueen on Instagram – I repost my favorites every Halloween season! Use the hashtag #CyclopsCookieSquad so we can all admire each other’s work. Bonus points if you include your little monsters helping with the decorating (flour on their noses optional but encouraged).
And hey, if your cookies turn out looking more “abstract art” than “perfect eyeballs”? That’s half the fun! Some of my earliest batches looked like they belonged in a haunted modern art museum. The important thing is that you had fun making them and they taste delicious. Now go forth and create some cookie chaos – I can’t wait to see what you come up with!


Scary-Easy 3-Ingredient Cyclops Eyeball Cookies Recipe
- Total Time: 27 minutes
- Yield: 20 cookies 1x
- Diet: Vegetarian
Description
Make these fun Cyclops Eyeball Cookies for Halloween. They are easy to prepare and perfect for parties.
Ingredients
- 1 cup all-purpose flour
- 1/2 cup butter, softened
- 1/4 cup powdered sugar
- 1 tsp vanilla extract
- Red food coloring
- Mini marshmallows
- Black decorating gel
Instructions
- Preheat oven to 350°F (175°C).
- Mix flour, butter, powdered sugar, and vanilla in a bowl until smooth.
- Shape dough into small balls and place on a baking sheet.
- Bake for 10-12 minutes until edges turn golden.
- Let cookies cool, then press a mini marshmallow into the center of each.
- Add a drop of red food coloring around the marshmallow.
- Use black decorating gel to draw a pupil on the marshmallow.
- Serve and enjoy.
Notes
- Store in an airtight container for up to 3 days.
- Adjust food coloring for desired effect.
- Prep Time: 15 minutes
- Cook Time: 12 minutes
- Category: Dessert
- Method: Baking
- Cuisine: American
Nutrition
- Serving Size: 1 cookie
- Calories: 80
- Sugar: 3g
- Sodium: 30mg
- Fat: 5g
- Saturated Fat: 3g
- Unsaturated Fat: 2g
- Trans Fat: 0g
- Carbohydrates: 8g
- Fiber: 0g
- Protein: 1g
- Cholesterol: 10mg