Nothing gets me more excited for Halloween than rolling out a batch of these eyeball sugar cookies! There’s something hilariously creepy about biting into a sweet, buttery cookie that stares right back at you. I’ve been making these spooky treats for years – ever since my niece squealed with equal parts delight and horror at her first “eyeball” encounter.
What makes these cookies special isn’t just their ghoulish appearance (though watching guests hesitate before taking a bite never gets old). It’s how simple they are to make while delivering that classic sugar cookie taste we all love. The dough comes together in minutes, and the decorating is where the real fun begins. Trust me, piping those red veins becomes oddly therapeutic after a while!
Whether you’re hosting a Halloween party or just want to surprise the kids with something fun, these eyeball sugar cookies always steal the show. They’re sweet enough to satisfy any sugar craving but creepy enough to fit right in with your haunted house decor. Just wait until you see people’s reactions when you bring out a platter of these staring sweets!

Why You’ll Love These Eyeball Sugar Cookies
These cookies aren’t just delicious – they’re a total blast to make and serve! Here’s why they’ve become my go-to Halloween treat year after year:
- Unbelievably easy: If you can make basic sugar cookies (and really, even if you can’t), you can pull these off. The decorating looks fancy but is actually super simple.
- Party perfect: They disappear fast at gatherings – both because they’re tasty and because everyone wants to snap photos of these edible eyeballs first!
- Endlessly creative: Go classic with red veins or get wild with zombie eyes, cat eyes, or even alien pupils. The decorating possibilities are endless.
- Kid-approved magic: My littlest helpers LOVE getting messy with the food coloring, and older kids can pipe the veins themselves. It’s edible arts and crafts!
Seriously, once you see how these transform a basic cookie into something spectacular, you’ll understand why I make them every October without fail.
Ingredients for Eyeball Sugar Cookies
Gathering the right ingredients is the first step to cookie success! Here’s everything you’ll need to bring these spooky sweets to life:
For the Cookie Dough:
- 1 cup (2 sticks) unsalted butter – softened but still cool to the touch (leave it out for about 30 minutes before baking)
- 1 cup granulated sugar – the perfect sweetness to balance the creepy decor
- 1 large egg – straight from the fridge is fine, it’ll incorporate better
- 1 teaspoon pure vanilla extract – the good stuff makes all the difference
Dry Ingredients:
- 3 cups all-purpose flour – spooned and leveled for accuracy
- 1/2 teaspoon baking powder – gives just the right lift
- 1/4 teaspoon fine salt – balances the sweetness perfectly
For the Spooky Decorations:
- Red and black gel food coloring – gel works better than liquid (it’s more vibrant and won’t thin your dough)
- 1 batch white royal icing – the perfect “eyeball white” base (store-bought works great too!)
A quick note – don’t skimp on the butter quality or try to substitute margarine here. Real butter gives these cookies their signature rich flavor and perfect texture that holds the eyeball shape beautifully.
How to Make Eyeball Sugar Cookies
Ready to bring these creepy cookies to life? Follow these simple steps and you’ll have a plate full of edible eyeballs staring back at you in no time!
Mixing the Dough
First, grab your trusty mixing bowl and let’s make that perfect sugar cookie base. Cream together the softened butter and sugar until it’s light and fluffy – this takes about 2-3 minutes with a hand mixer. Don’t rush this step! That airy texture is what gives our cookies their perfect bite. Crack in the egg and splash of vanilla, mixing until just combined. Now gradually add your dry ingredients (I like to do this in 3 batches), scraping down the sides of the bowl as you go. The dough should come together nicely without being sticky – if it feels too soft, pop it in the fridge for 15 minutes.
Shaping and Coloring the Eyeballs
Here’s where the fun begins! Divide your dough into three portions – one large (about 3/4 of the dough) and two small (the remaining 1/4). Tint the large portion with red gel coloring for those creepy veins, and one small portion black for the pupils. Leave the last bit plain – this will be our “eyeball white.” Roll out each color between sheets of parchment paper (no flour needed!) to about 1/4 inch thickness. Use a round cutter to make perfect eyeball shapes – I find a 2.5-inch diameter works great. Transfer to parchment-lined baking sheets, giving them some space to spread.

Baking and Decorating
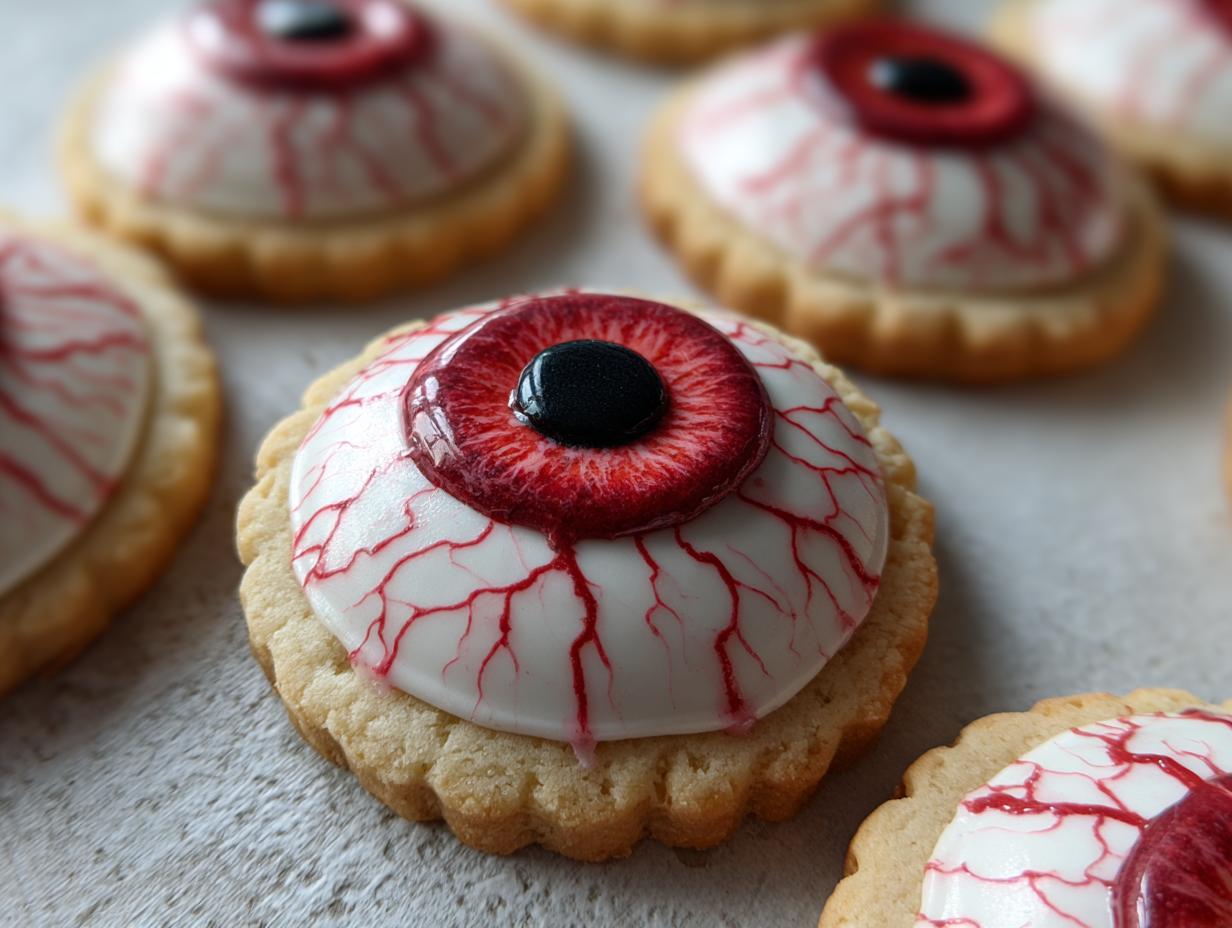
Bake at 350°F for 8-10 minutes – you want just the slightest golden edge. They’ll firm up as they cool, so don’t overbake! Let them cool completely before the real artistry begins. Pipe or spread white royal icing as your eyeball base, then get creative with red veins using a piping bag or toothpick. Finally, add that eerie black pupil right in the center. The gel coloring stays put beautifully – no bleeding here! Let the icing set completely before stacking or serving.
Pro tip: If your kitchen is warm, chill the decorated cookies for 10 minutes to help the icing set faster. Now stand back and admire your handiwork – you’ve just created edible Halloween magic!
Expert Tips for Perfect Eyeball Sugar Cookies
After making hundreds (okay, maybe thousands) of these eyeball cookies over the years, I’ve picked up some tricks that’ll take yours from good to ghoulishly perfect:
- Chill that dough! If your kitchen’s warm or the dough feels sticky, pop it in the fridge for 15-20 minutes. Cold dough holds its shape better when cutting those perfect eyeball circles.
- Piping bags are your BFF. A zip-top bag with the corner snipped works in a pinch, but real piping bags give you way more control for those delicate red veins.
- Patience with the icing. Let the white base set for at least 30 minutes before adding veins and pupils. Rushing this means smudged, bloodshot eyes (which, okay, could be a cool zombie effect!).
- Gel coloring FTW. Liquid food coloring can make your dough sticky and colors fade. Gel keeps everything vibrant without altering texture.
Remember – even “messy” eyeballs look intentionally creepy, so don’t stress perfection. The wobbly ones often get the biggest screams!
Ingredient Substitutions & Variations
Don’t stress if you’re missing an ingredient or want to put your own spin on these eyeball cookies! Here are my favorite swaps and creative twists:
- Butter alternatives: Margarine works in a pinch, but expect slightly less rich flavor. For dairy-free, coconut oil (solid, not melted) makes a decent substitute.
- Flour options: A 1:1 gluten-free flour blend works beautifully – just add 1 extra tbsp if the dough feels sticky.
- Natural colors:
- Next-level creepy: Try cat-eye slits, glow-in-the-dark pupils with luster dust, or go full zombie with cracked “bloodshot” icing lines!
Beet powder creates gorgeous red veins, while activated charcoal makes intense black pupils (just use gloves!).
The beauty of these cookies? Even “mistakes” look intentionally spooky – so have fun experimenting!
Storing and Serving Eyeball Sugar Cookies
These cookies stay fresh and creepy for days when stored right! I always use an airtight container with parchment between layers – those delicate icing veins need protection. They’ll keep at room temperature for up to 5 days (if they last that long!). For parties, arrange them on a dark platter to make the eyeballs really pop. They also make fantastic Halloween gifts – just package them in clear cellophane bags tied with black ribbon for a spooky-sweet surprise!
Eyeball Sugar Cookies FAQs
Got questions about these creepy cookies? I’ve answered all the most common ones that pop up (much like these eyeballs seem to do on my baking sheets every October!):
Can I freeze eyeball sugar cookies?
Absolutely! Freeze the baked (but undecorated) cookies in a single layer first, then stack them with parchment between layers in an airtight container. They’ll keep for up to 2 months. Decorate after thawing – frozen icing gets weirdly gummy.
How long do decorated eyeball cookies last?
Properly stored in an airtight container, they stay fresh for 4-5 days. The icing actually helps keep them moist! If your kitchen is humid, add a slice of bread to the container to prevent softening.
Can I use liquid food coloring instead of gel?
You can, but I don’t recommend it. Liquid coloring makes the dough sticky and the colors fade. If it’s all you have, use extra flour (1 tbsp at a time) until the dough firms up.
Why are my eyeballs lopsided?
This usually means your dough was too warm when baking. Next time, chill the cut-out shapes for 10 minutes before baking. Crooked eyeballs just look extra creepy though – call it a feature, not a bug!
Nutritional Information
As with any homemade treat, nutritional values for these eyeball sugar cookies are estimates and can vary based on the specific ingredients and brands you use. Enjoy them as part of a balanced diet – preferably while screaming at their creepy appearance!
Share Your Spooky Creations
I’d love to see your terrifying (and tasty) eyeball cookie creations! Snap some photos of your edible masterpieces and tag me on Instagram – nothing makes me happier than seeing other bakers get creative with these spooky sweets. Who knows, your version might just inspire next year’s batch!
Print
Creepy Eyeball Sugar Cookies: 1 Spooky Halloween Treat
- Total Time: 30 minutes
- Yield: 24 cookies 1x
- Diet: Vegetarian
Description
Delicious sugar cookies shaped like eyeballs, perfect for Halloween or spooky-themed parties.
Ingredients
- 1 cup unsalted butter, softened
- 1 cup granulated sugar
- 1 large egg
- 1 tsp vanilla extract
- 3 cups all-purpose flour
- 1/2 tsp baking powder
- 1/4 tsp salt
- Red and black food coloring
- White royal icing
Instructions
- Preheat your oven to 350°F (175°C).
- Cream butter and sugar until fluffy.
- Beat in the egg and vanilla extract.
- Mix flour, baking powder, and salt in a separate bowl.
- Gradually add dry ingredients to the wet mixture.
- Divide the dough and tint small portions red and black.
- Roll out the dough and cut into circles.
- Bake for 8-10 minutes until edges are lightly golden.
- Let cookies cool, then pipe white icing for the eyeball base.
- Add red veins and a black pupil for a spooky effect.
Notes
- Chill dough for 30 minutes if too soft.
- Use gel food coloring for vibrant colors.
- Store in an airtight container for up to 5 days.
- Prep Time: 20 minutes
- Cook Time: 10 minutes
- Category: Dessert
- Method: Baking
- Cuisine: American
Nutrition
- Serving Size: 1 cookie
- Calories: 120
- Sugar: 8g
- Sodium: 30mg
- Fat: 5g
- Saturated Fat: 3g
- Unsaturated Fat: 2g
- Trans Fat: 0g
- Carbohydrates: 17g
- Fiber: 0g
- Protein: 1g
- Cholesterol: 20mg