Halloween just isn’t Halloween in my house without a batch of these adorably spooky Frankenstein cupcakes staring up from the dessert table! I stumbled upon this recipe years ago when desperate for a last-minute party treat, and now they’re my go-to every October. The best part? You probably have everything you need right in your pantry—just grab some green food coloring and let your inner mad scientist loose! These Frankenstein cupcakes always steal the show at our Halloween gatherings, especially when the kids get involved decorating their own little monsters. Trust me, once you see how easy they are (and how fast they disappear), you’ll be making them every year too!

Why You’ll Love These Frankenstein Cupcakes
These Frankenstein cupcakes aren’t just adorable—they’re downright irresistible! Here’s why:
- Super simple: Box mix shortcut means you’re 30 minutes away from spooky deliciousness
- Total crowd-pleaser: Kids go wild for the fun monster faces (adults secretly do too)
- Super customizable: Swap chocolate chips for M&Ms or add candy bolts for extra drama
- Perfect party food: Makes a whole dozen so you’ll have plenty for your Halloween bash
Seriously, these might just become your new Halloween tradition—they’re that good!
Ingredients for Frankenstein Cupcakes
Here’s everything you’ll need to bring these little monsters to life! I swear by these exact ingredients because they create the perfect base for decorating – not too crumbly, not too dense. (And yes, I’ve learned this through many hilarious frosting disasters!)
- 1 box chocolate cake mix (15.25 oz): Devil’s food works great, but any chocolate variety will do
- 1 cup water: Room temp is ideal for smooth mixing
- 1/2 cup vegetable oil: Can substitute melted coconut oil if you prefer
- 3 large eggs: Let them sit out for 10 minutes – they incorporate better when not fridge-cold
- 1 can vanilla frosting (16 oz): The creamy kind, not whipped – it holds its shape better
- Green gel food coloring: Trust me, gel gives you that perfect Frankenstein hue without thinning the frosting
- 1/4 cup mini chocolate chips: For those classic bolt-neck eyes
- Black decorating gel: The squeeze tube kind makes stitching details a breeze
See? Nothing fancy – just simple ingredients that transform into something magically monstrous! Now let’s get those mad scientist hands dirty…
Equipment You’ll Need
No fancy gadgets required here—just the basics from your kitchen! Here’s what you’ll need to create your Frankenstein masterpieces:
- Muffin tin: Standard 12-cup works perfectly
- Cupcake liners: Green or black make extra festive monsters
- Mixing bowls: One large for batter, one medium for tinting frosting
- Hand mixer or whisk: Either works great
- Offset spatula or butter knife: For that perfectly messy Frankenstein frosting
- Toothpicks: Essential for adjusting chocolate chip eyes
That’s it! Now let’s make some magic (or should I say monster-ific science?) happen.
How to Make Frankenstein Cupcakes
Alright, let’s bring these little monsters to life! I’ve made these Frankenstein cupcakes so many times I could probably do it in my sleep, but I’ll walk you through every step so yours turn out picture-perfect. The secret is in the details – from the batter consistency to those signature crooked stitches!
Step 1: Prepare the Cupcake Batter
First things first – preheat that oven to 350°F (175°C). While it’s heating up, let’s make magic happen in a bowl! Dump in your chocolate cake mix (no need to sift – hallelujah!), then add the water, oil, and eggs. Here’s my pro tip: beat the eggs lightly with a fork before adding them – it helps everything incorporate evenly.
Mix with a hand mixer or by hand until the batter is smooth, about 2 minutes. You’re looking for that perfect lava-like consistency – thick enough to coat a spoon but still pourable. No lumps! If your batter seems too thick, add a tablespoon of water at a time until it’s just right.
Step 2: Bake and Cool the Cupcakes
Line your muffin tin with those cute cupcake liners (green ones make the Frankenstein theme extra fun!). Fill each one about 2/3 full – I use an ice cream scoop for perfect portioning every time. Pop them in the oven and set your timer for 18 minutes.
Now, here’s where patience comes in. When the timer goes off, do the toothpick test – it should come out with just a few moist crumbs, not wet batter. If needed, bake 2 more minutes (but no longer!). Overbaking is the enemy of moist cupcakes!
Transfer cupcakes to a wire rack immediately and let them cool completely. I know it’s tempting to frost them right away, but warm cupcakes = melty Frankenstein faces. Wait at least 30 minutes – maybe watch a scary movie while you wait!

Step 3: Decorate Your Frankenstein Cupcakes
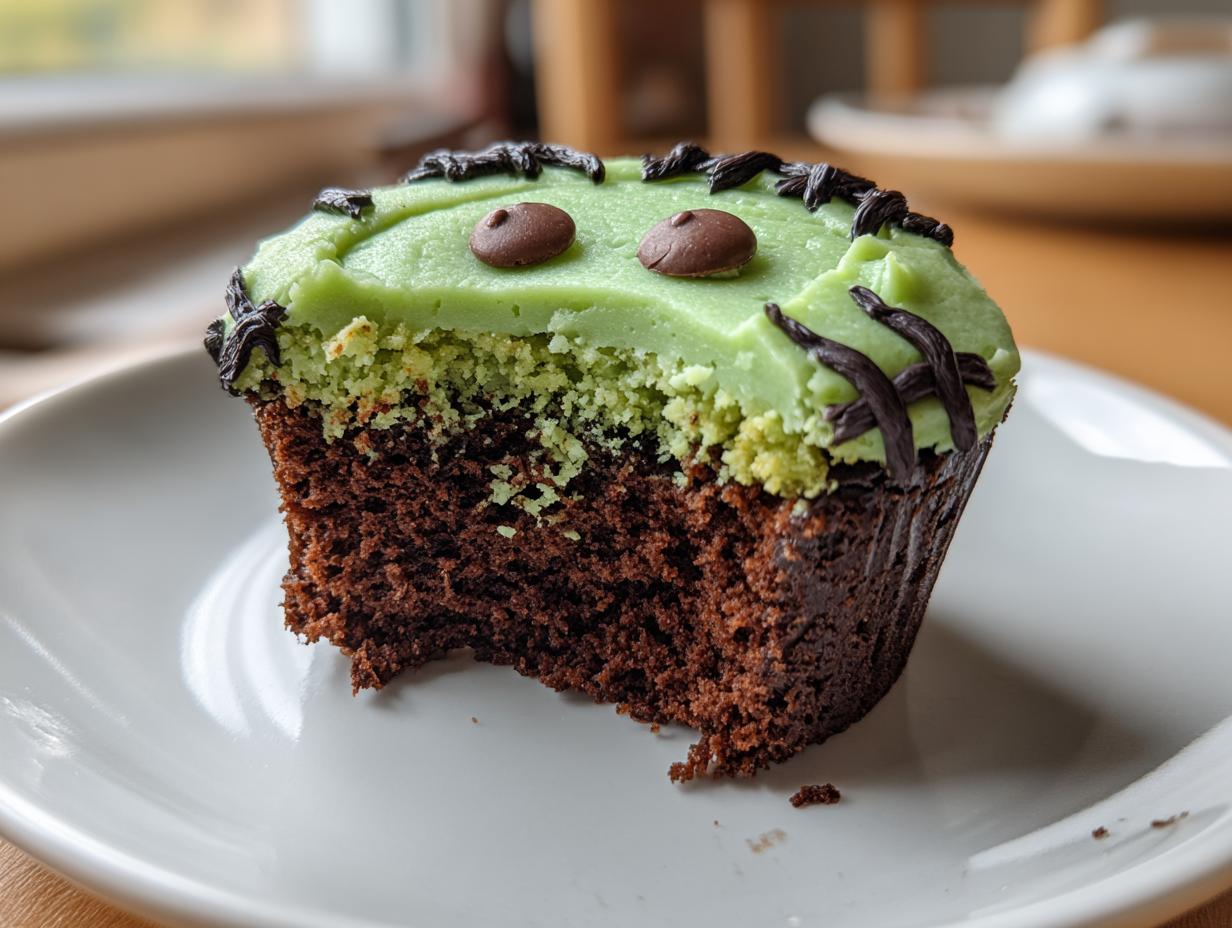
Time for the fun part! Scoop your vanilla frosting into a bowl and add green gel food coloring. Start with 3-4 drops and add more until you get that perfect monster green. Gel coloring gives you vibrant color without thinning the frosting – crucial for those defined Frankenstein features!
Slather on the green frosting with a butter knife or offset spatula – don’t worry about making it perfect, Frankenstein wasn’t exactly polished! Now the magic: press two mini chocolate chips into each cupcake for eyes (pointy ends in first for that classic bolt-neck look).
Finally, use your black decorating gel to draw the mouth and those signature zig-zag stitches. My trick? Start at the center and work outward with short, jerky motions – just like Dr. Frankenstein himself might have done! Let the cupcakes sit for 15 minutes so the gel sets before serving.
Tips for Perfect Frankenstein Cupcakes
After making more Frankenstein cupcakes than I can count (and fixing plenty of frosting mishaps along the way!), here are my tried-and-true secrets for picture-perfect monsters every time:
- Chill before decorating: Pop your cooled cupcakes in the fridge for 15 minutes – the slightly firmer surface makes frosting stick better and prevents crumbs in your beautiful green “skin”
- Gel coloring is your BFF: Liquid food coloring makes frosting runny, but gel gives you that rich monster green without sacrificing texture. Add it gradually until you get the perfect eerie shade!
- Toothpick trick: Use a toothpick to position chocolate chip eyes just right before pressing them in – saves you from lopsided Frankies
- Practice your stitches: Pipe a few test stitches on parchment first if you’re nervous – the gel washes right off for perfect monster scars every time
Oh! And one bonus tip from experience: make extras – these little guys disappear faster than a ghost when the kids spot them!
Frankenstein Cupcakes Variations
Who says Frankenstein has to be green? Here are some fun twists I’ve tried (and loved!):
- Minty Monster: Swap vanilla frosting with mint for a cool flavor – add extra green coloring for that radioactive look
- Bolt Neck Upgrade: Press yellow candy corn or peanut butter cups on the sides for 3D neck bolts
- Glow-in-the-Dark: Mix edible glow powder into white frosting under black light for a laboratory-ready effect
The best part? There’s no wrong way to make these monster cupcakes – just have fun with it!
Storing and Serving Frankenstein Cupcakes
Here’s the thing about these Frankenstein cupcakes – they rarely last long enough to need storing! But just in case you have some survivors after your Halloween bash (or if you’re smart and made extra), here’s how to keep them fresh:
Pop them in an airtight container at room temperature for up to 3 days. I like to put parchment between layers if I’m stacking them – those little chocolate chip eyes can get smudged otherwise. The fridge will dry them out, so I only refrigerate if it’s really warm in my kitchen.
Want to get ahead? You can bake the cupcakes 1-2 days early and store them unfrosted. Just wrap them well in plastic wrap so they don’t dry out. Frost and decorate the day you’re serving for the freshest, most vibrant monsters!
For serving, I always arrange mine on a creepy-cool platter – a black slate board with “stitches” drawn in chalk looks amazing. Or go full mad scientist with test tube holders for individual cupcakes! These little guys are tough enough to travel to school parties too – just pack them carefully so their faces stay perfect. Pro tip: bring extra black gel for touch-ups on-site!
Frankenstein Cupcakes Nutrition Information
Okay, let’s be real – we’re not eating these Frankenstein cupcakes for their health benefits! But since some folks like to know what they’re biting into (especially parents tracking treats), here’s the nutritional breakdown per cupcake. Keep in mind these are estimates – your exact counts might vary depending on the specific brands you use or if you add extra chocolate chips (no judgment here!).
- Serving Size: 1 cupcake
- Calories: About 250
- Total Fat: 10g
- Saturated Fat: 3g
- Cholesterol: 30mg
- Sodium: 200mg
- Total Carbohydrates: 35g
- Dietary Fiber: 1g
- Sugars: 20g
- Protein: 3g
Remember, nutritional values are estimates and will change if you use sugar-free cake mix, light frosting, or different add-ins. But hey – it’s Halloween! Maybe save the calorie counting for November and enjoy your monstrous creations guilt-free!
Frankenstein Cupcakes FAQs
After years of making these Frankenstein cupcakes (and fielding questions from fellow monster-makers), I’ve answered every question under the full moon! Here are the most common things people ask me about these spooky treats:
Q1. Can I use homemade cake batter instead of a mix?
Absolutely! My grandma’s chocolate cake recipe works beautifully if you want to go homemade. Just make sure your batter isn’t too thin – you want that sturdy cupcake structure to hold all that monster decoration. The box mix is just my go-to when I need quick Halloween magic!
Q2. How far in advance can I decorate Frankenstein cupcakes?
I’ve found they look best when decorated the same day, but you can frost them up to 24 hours ahead if you store them in an airtight container. Wait to add the black gel stitches until about an hour before serving though – they can bleed a tiny bit over time.
Q3. My green frosting looks too bright – how do I get that perfect Frankenstein color?
Oh, I’ve been there! The trick is adding a tiny drop of black or brown gel coloring to mute that neon green. Just a toothpick’s worth at a time until you get that perfect spooky shade. Remember – Frankenstein wasn’t exactly minty fresh!
Q4. Can I freeze Frankenstein cupcakes?
You bet! Freeze them unfrosted for up to 3 months in an airtight container. Thaw overnight in the fridge, then frost as usual. The decorations won’t freeze well though, so always add those fresh. Pro tip: freeze some plain cupcakes in October so you can whip up last-minute monsters!
Q5. Help! My chocolate chip eyes keep falling off – what gives?
Been there, cried over that! Make sure your frosting is thick enough (that’s why I don’t use whipped frosting) and give each chip a gentle press to embed it. If they’re still rebellious, dab a tiny dot of frosting on the back of each chip before placing – it acts like monster glue!
Share Your Spooky Creations
I absolutely LIVE for seeing your Frankenstein cupcake masterpieces come to life! There’s nothing more fun than spotting all the creative twists you brilliant bakers come up with. Did you give your monster purple hair? Add candy corn teeth? I wanna see it all!

Snap a photo of your terrifyingly tasty creations and tag me on Instagram – I’ll feature my favorites in my stories! Use #FrankensteinCupcakes so we can all admire each other’s handiwork. Who knows? Your version might just inspire next year’s Halloween recipe!
And hey, if your cupcakes turn out a little… creatively unique (we’ve all had those “Oops, that’s not a stitch, that’s a scribble” moments), share those too! Some of my earliest Frankenstein attempts looked more like sad zombies, and now those photos are my favorite kitchen memories. The messier the monster, the better the story!


Spooktacular Frankenstein Cupcakes That’ll Steal the Show in Just 30 Minutes!
- Total Time: 35 minutes
- Yield: 12 cupcakes 1x
- Diet: Vegetarian
Description
Spooky and fun Frankenstein cupcakes perfect for Halloween. These easy-to-make treats are a hit at parties.
Ingredients
- 1 box chocolate cake mix
- 1 cup water
- 1/2 cup vegetable oil
- 3 eggs
- 1 can vanilla frosting
- Green food coloring
- Mini chocolate chips
- Black decorating gel
Instructions
- Preheat oven to 350°F (175°C). Line a muffin tin with cupcake liners.
- Mix cake mix, water, oil, and eggs in a large bowl until smooth.
- Pour batter into cupcake liners, filling each 2/3 full.
- Bake for 18-20 minutes or until a toothpick comes out clean. Cool completely.
- Tint vanilla frosting with green food coloring. Frost cupcakes.
- Add mini chocolate chips for eyes and use black gel to draw stitches and a mouth.
Notes
- Use gel food coloring for vibrant frosting.
- Let cupcakes cool before frosting to prevent melting.
- Store in an airtight container for up to 3 days.
- Prep Time: 15 minutes
- Cook Time: 20 minutes
- Category: Dessert
- Method: Baking
- Cuisine: American
Nutrition
- Serving Size: 1 cupcake
- Calories: 250
- Sugar: 20g
- Sodium: 200mg
- Fat: 10g
- Saturated Fat: 3g
- Unsaturated Fat: 6g
- Trans Fat: 0g
- Carbohydrates: 35g
- Fiber: 1g
- Protein: 3g
- Cholesterol: 30mg