Picture this: It’s Halloween night, the air’s crisp with autumn magic, and you need a showstopping dessert that’ll have everyone screaming for seconds. That’s where my Graveyard Dirt Cake comes in – the spookiest, most delicious mess you’ll ever serve with pride. I still remember the first time I made it for my nephew’s Monster Mash birthday party. The kids went wild when they saw gummy worms crawling out of chocolate “dirt,” and the adults? Let’s just say I caught my sister sneaking third helpings when she thought no one was looking.
This isn’t just any chocolate cake – it’s an experience. Layers of moist cake, creamy pudding, and rich frosting get transformed into edible graveyard magic with crushed cookies and playful decorations. Whether you’re hosting a Halloween bash or just want to surprise your family with something fun, this Graveyard Dirt Cake always steals the show. Best part? You probably have most ingredients in your pantry already.

Why You’ll Love This Graveyard Dirt Cake
This isn’t just dessert—it’s edible Halloween magic! Here’s why you’ll adore it:
- Effortlessly spooky: Crushed cookies = instant “dirt,” and gummy worms do all the decorating work for you
- Crowd-thriller: Kids giggle, adults sneak seconds (trust me, I’ve seen it happen)
- No fancy skills needed: If you can stir and spread, you’ve got this
- Customizable fun: Swap tombstones for skeleton cookies or add candy “bones”
Perfect for when you want maximum wow factor with minimum stress!
Ingredients for Graveyard Dirt Cake
Here’s everything you’ll need to conjure up this spooky sweet treat:
For the Cake Base
- 1 box (15.25 oz) chocolate cake mix (I swear by Devil’s Food for extra darkness!)
- 1 cup water
- 1/2 cup vegetable oil
- 3 large eggs (room temperature works best)
For the Pudding Layer
- 1 package (3.9 oz) instant chocolate pudding mix
- 2 cups cold milk (whole milk makes it extra creamy)
For the “Dirt” & Decorations
- 1 container (16 oz) chocolate frosting (or homemade if you’re feeling ambitious)
- 12 chocolate sandwich cookies, finely crushed (I toss them in a bag and whack with a rolling pin—stress relief!)
- 6-8 gummy worms (the more colorful, the better)
- 6-8 small tombstone-shaped cookies (store-bought or homemade—see my notes section for an easy recipe)

Pro Tip: Grab extra cookies—you’ll want to snack while baking!
Equipment You’ll Need
Don’t worry—you won’t need any fancy kitchen gadgets for this graveyard masterpiece! Just grab:
- Large mixing bowl (for the cake batter)
- Whisk (pudding hates lumps!)
- 9×13-inch baking pan (the graveyard plot)
- Rubber spatula (for smooth frosting application)
- Ziploc bag + rolling pin (cookie crushing therapy)
That’s it—now let’s get messy!
How to Make Graveyard Dirt Cake
Ready to dig into the fun part? Making this spooky dessert is as easy as 1-2-3 – just like a witch’s spell but way tastier! Follow these steps, and you’ll have a graveyard masterpiece that’ll make everyone say, “Ooooh!” instead of “Boo!”
Step 1: Bake the Chocolate Cake
First things first – preheat your oven to 350°F (175°C). While it’s heating up, grab your mixing bowl and let’s make some cake magic happen! Dump in the chocolate cake mix, water, oil, and eggs. Beat everything together for about 2 minutes until it’s smooth as a cauldron potion (no lumps allowed!). Pour this dark, delicious batter into your greased 9×13-inch pan – this will be the foundation of our edible graveyard.
Slide it into the oven and bake for 30-35 minutes. You’ll know it’s done when the top springs back when lightly touched, and a toothpick comes out clean (no wet batter clinging to it). Let the cake cool completely in the pan – I know it’s tempting to rush, but warm cake + pudding = mushy mess!
Step 2: Prepare the Chocolate Pudding
While the cake cools, let’s whip up the creepy-crawly layer! In a medium bowl, whisk together the pudding mix and cold milk for 2 full minutes. This isn’t the time for lazy stirring – really put some muscle into it to avoid lumps. Then walk away and let it thicken for about 5 minutes. It should coat the back of a spoon when it’s ready. Pro tip: If you’re impatient like me, you can speed up the cooling by placing the bowl in the fridge for a bit.
Step 3: Assemble the Graveyard Dirt Cake
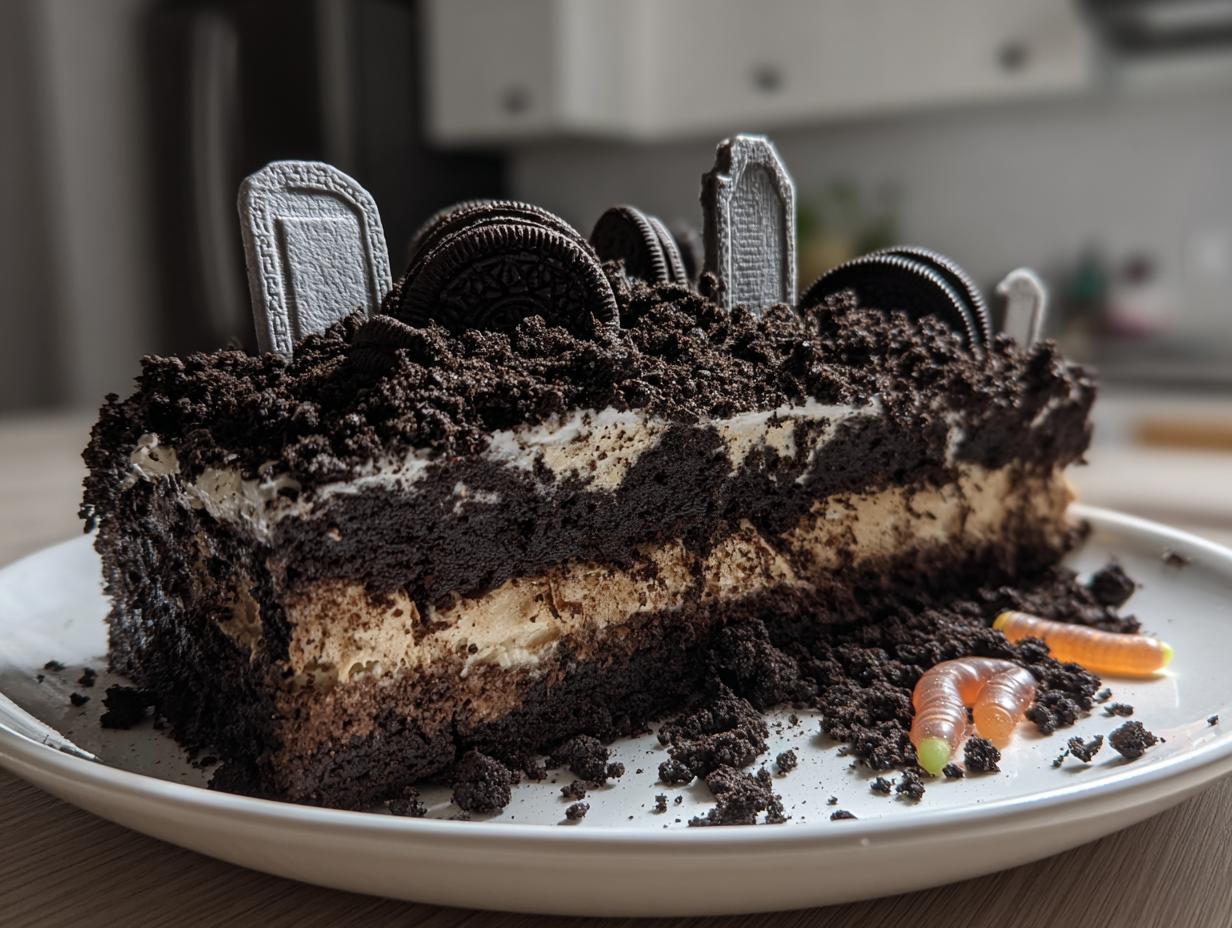
Now for the transformation! Spread the pudding evenly over your cooled cake – think of it like spreading ghostly ectoplasm. Next comes a generous layer of chocolate frosting – don’t skimp here! This is the glue that’ll hold our “dirt” in place. Speaking of dirt, grab those crushed cookies and sprinkle them thickly over the frosting. Use your hands if you want – getting messy is part of the fun!
Finally, the best part – decorations! Press gummy worms halfway into the “dirt” so they look like they’re crawling out. Arrange tombstone cookies standing upright (I like to space them out like a real graveyard). Pop your masterpiece in the fridge for at least an hour to set – the chilling time makes slicing cleaner. And there you have it – a graveyard so delicious, even the ghosts will come back for seconds!

Tips for the Best Graveyard Dirt Cake
Want your Graveyard Dirt Cake to be the talk of the crypt? Here are my tried-and-true secrets:
- Chill like it’s haunted: That hour in the fridge isn’t just for show—it helps the layers set so you get perfect slices without pudding oozing everywhere.
- Make your own tombstones: Grab some Milano cookies and pipe “RIP” with icing—it takes 5 minutes but looks store-bought-fancy.
- Go wild with decorations: Add candy bones, edible glitter “ghosts,” or even a chocolate fence around the edges for extra spook points.
- Crush cookies like a pro: Leave some bigger chunks mixed with fine crumbs—real graveyard dirt isn’t perfectly even!
Remember—the messier it looks, the more authentic your graveyard becomes!
Variations & Substitutions
Don’t have every ingredient? No problem! This Graveyard Dirt Cake is super flexible:
- Pudding switcheroo: Try vanilla or butterscotch pudding for contrast against the chocolate
- Cookie alternatives: Oreo crumbs make fantastic “dirt,” or use graham crackers for a milder flavor
- Vegan version: Use plant-based milk, egg replacer, and dairy-free frosting (the worms are usually vegan already!)
- Gluten-free: Swap the cake mix and cookies for GF versions—the pudding’s usually safe
The beauty? It still looks spooky no matter what tweaks you make!
Serving & Storage
When it’s party time, serve your Graveyard Dirt Cake straight from the fridge – that chill makes the layers hold together perfectly when you slice it. Leftovers? Just cover with plastic wrap (or transfer slices to an airtight container) and refrigerate. It’ll stay deliciously fresh for 3-4 days – if it lasts that long! The pudding layer actually makes it taste even better on day two.
Graveyard Dirt Cake FAQs
Can I make this Graveyard Dirt Cake ahead of time?
Absolutely! In fact, I recommend making it a day ahead—the flavors meld beautifully. Just hold off on adding the gummy worms until 2-3 hours before serving so they don’t get too sticky. The pudding layer sets up even better overnight.
How long will leftovers stay fresh?
Your spooky creation will keep for 3-4 days in the fridge if you can resist eating it all! The cake stays moist thanks to the pudding layer. Just press plastic wrap directly onto any cut edges to prevent drying out.
Can I use homemade chocolate cake instead of a mix?
Go for it! My from-scratch chocolate cake works perfectly—just bake it in the same 9×13 pan. The box mix is my go-to for speed, but homemade adds that extra “made with love” touch.
Why did my pudding layer turn out runny?
Two likely culprits: not whisking for the full 2 minutes, or using warm milk instead of cold. The pudding needs that initial vigorous mixing and chill to set properly. If it happens, pop the whole assembled cake in the fridge for an extra hour—it’ll firm up.
Nutritional Information
Here’s the scoop on what’s haunting your Graveyard Dirt Cake (per serving):
- Calories: 350
- Fat: 15g (5g saturated)
- Carbohydrates: 45g
- Sugar: 25g
- Protein: 4g
Note: Nutrition varies based on brands/ingredients – consider this your friendly neighborhood ghost’s approximation!
Final Thoughts
Now that you’ve got all my graveyard secrets, it’s time to unleash your inner mad scientist! This cake is impossible to mess up – the messier it looks, the better. Tag me if you share your creepy creations (#NoZombiesWereHarmed). Happy haunting… I mean baking!


Spooky Graveyard Dirt Cake That Haunts Taste Buds
- Total Time: 1 hour 55 minutes (including cooling and chilling)
- Yield: 12 servings 1x
- Diet: Vegetarian
Description
A spooky and delicious dessert perfect for Halloween or themed parties, resembling graveyard dirt with edible decorations.
Ingredients
- 1 package of chocolate cake mix
- 1 cup of water
- 1/2 cup of vegetable oil
- 3 eggs
- 1 package of chocolate pudding mix
- 2 cups of cold milk
- 1 container of chocolate frosting
- 12 chocolate sandwich cookies, crushed
- 6–8 gummy worms
- 6–8 small tombstone-shaped cookies
Instructions
- Preheat oven to 350°F (175°C). Grease a 9×13-inch baking pan.
- Mix cake mix, water, oil, and eggs in a bowl until smooth. Pour into the pan.
- Bake for 30-35 minutes or until a toothpick comes out clean. Let cool.
- Prepare pudding by whisking pudding mix and milk for 2 minutes. Let thicken for 5 minutes.
- Spread pudding over the cooled cake. Cover with chocolate frosting.
- Sprinkle crushed cookies evenly over the frosting to resemble dirt.
- Press gummy worms and tombstone cookies into the “dirt” to decorate.
- Chill for at least 1 hour before serving.
Notes
- For extra texture, mix crushed cookies with a bit of cocoa powder.
- Use store-bought or homemade tombstone cookies.
- Keep refrigerated until ready to serve.
- Prep Time: 20 minutes
- Cook Time: 35 minutes
- Category: Dessert
- Method: Baking
- Cuisine: American
Nutrition
- Serving Size: 1 slice
- Calories: 350
- Sugar: 25g
- Sodium: 300mg
- Fat: 15g
- Saturated Fat: 5g
- Unsaturated Fat: 8g
- Trans Fat: 0g
- Carbohydrates: 45g
- Fiber: 2g
- Protein: 4g
- Cholesterol: 50mg