Remember when playing in the dirt was the highlight of your day? These gummy worm dirt cups bring that same childhood joy—but in dessert form! I first made these for my nephew’s birthday party, and let me tell you, the kids went wild. They couldn’t decide whether to dig in or squeal at the “worms” crawling out. The best part? You’re just 10 minutes away from a no-bake, crowd-pleasing treat that looks as fun as it tastes. Layer up chocolate pudding, crushed cookies, and whipped cream, then let those gummy worms peek out like they’re plotting an escape. Pure magic.

Why You’ll Love These Gummy Worm Dirt Cups
Let me count the ways these dirt cups will steal your heart (and impress your littlest guests):
- Instant kid magnet: Those wiggly worms peeking out? Pure magic—my nephew still talks about “the dessert with worms” from last summer.
- No oven required: When it’s 90 degrees outside and baking sounds like torture, this no-bake treat saves the day.
- Looks fancy, takes zero effort: Layer pudding and crumbs in clear cups, and suddenly you’re Martha Stewart (but with way less stress).
- Party-ready in minutes: Last-minute playdate? Birthday surprise? These cups have your back—I’ve whipped them up while the pizza delivery guy was still at the door.
Ingredients for Gummy Worm Dirt Cups
Okay, let’s raid the pantry! Here’s what you’ll need to create this wiggly masterpiece (and yes, I’ve included all my favorite shortcuts and swaps):
- 2 cups prepared chocolate pudding – The instant kind is my weeknight hero, but homemade pudding makes it extra special (I’ll never judge if you grab the pre-made cups at the store!)
- 1 cup finely crushed Oreo cookies – Pro tip: toss the whole cookies (cream filling and all) in a zip-top bag and roll with a wine bottle if you don’t have a food processor. The crumbs should look like real dirt clumps!
- 10-12 gummy worms plus a few extra for garnish – Trolli or Haribo both work great, but splurge on the neon ones if you really want to wow the kids
- 1 cup whipped cream – Cool Whip is perfect here, but fresh whipped cream with a tiny bit of vanilla? *chef’s kiss*
- 4 small clear cups – I use 8-oz plastic tumblers from the dollar store, but mason jars make it look fancy (just don’t tell anyone how easy it was!)
See? Nothing fancy – just pantry staples transformed into pure childhood joy. Now let’s get messy!
Equipment You’ll Need
Grab just a few basic tools (no fancy gadgets required!):
- Small clear cups – Plastic tumblers or mason jars work perfectly
- Food processor or rolling pin – Though I usually just crush cookies in a zip-top bag with my hands when I’m feeling lazy
- Mixing bowl – For whipping cream if you’re going homemade
- Spoons – One for scooping pudding, one for sprinkling “dirt”
- Fridge space – To chill for that perfect texture (though impatient kids often skip this step!)
How to Make Gummy Worm Dirt Cups
Ready to get your hands dirty (figuratively, of course)? Here’s how I layer these cups so they look like a worm-filled garden—but taste like heaven:
Layering the Pudding and Dirt
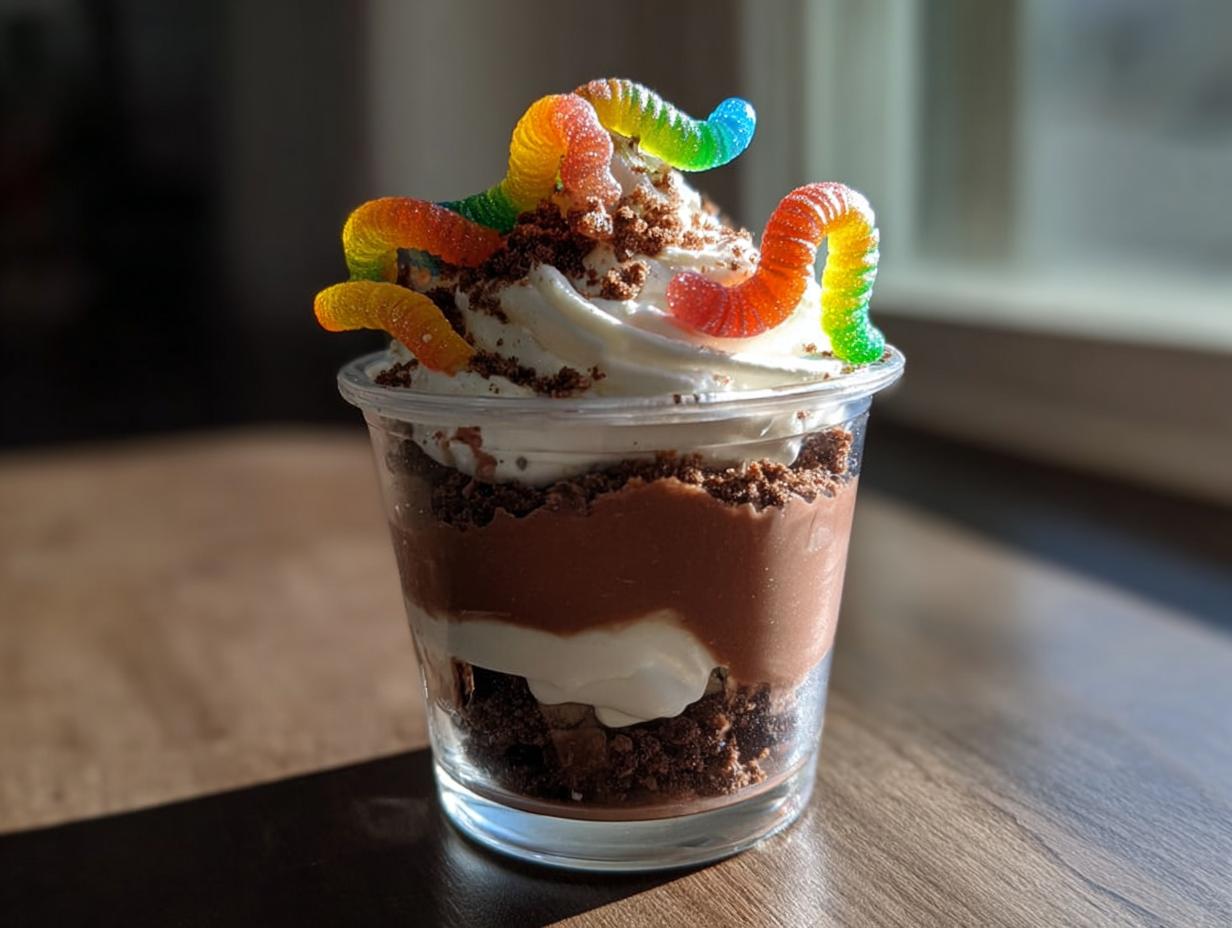
First, spoon about 2 tablespoons of pudding into each cup—just enough to coat the bottom. Now grab those crushed Oreos! Sprinkle a thin layer (about 1 tablespoon) over the pudding, pressing gently so it sticks. The secret? Think “geology lesson” and make your layers distinct—pudding rivers between dirt strata!
Adding the Final Touches
Repeat the layers until cups are three-quarters full, finishing with cookie crumbs. Now the fun part: dollop whipped cream on top like fluffy clouds. Take 2-3 gummy worms per cup and press them halfway into the cream so they look like they’re burrowing out. For extra drama, let one worm dangle over the cup’s edge like it’s making a break for it!
Chill for at least 30 minutes if you can wait (the layers set better), but we both know the kids will probably attack them immediately. And hey—that’s part of the charm!

Tips for Perfect Gummy Worm Dirt Cups
After making these for every kid’s birthday and potluck under the sun, I’ve picked up a few tricks to take your dirt cups from “cute” to “showstopper”:
- Chill that pudding cold! I stick mine in the fridge for at least an hour before layering—it makes those strata hold their shape like sedimentary rock (but way tastier). Nothing sadder than pudding rivers mixing with your dirt layer!
- Crush cookies to dust. That bag-and-rolling-pin method? Go to town until your crumbs look like the finest garden soil. Big chunks = suspiciously un-dirtlike. (Learned this the hard way when a 5-year-old accused me of “putting cookies in the dirt.”)
- Pipe your whipped cream. A piping bag with a star tip makes those tops look bakery-perfect, but here’s my lazy hack: snip the corner off a zip-top bag. Still looks fancy, and you get to lick the cream afterward.
- Freeze your worms! Toss gummy worms in the freezer for 10 minutes before using—they’ll hold their wiggly shape better when pressed into the cream. Bonus: the kids think they’re eating “ice age worms.”
Remember—messy hands mean happy memories. If the layers aren’t perfect, just call it “earthquake dirt” and watch the kids devour it anyway!
Variations and Substitutions
Want to mix things up? Try vanilla pudding with golden Oreos for “sand cups,” or go wild with strawberry pudding and crushed graham crackers. Need allergy-friendly options? Gluten-free cookies work great, and vegan gummy worms (like Surf Sweets) keep it plant-based. For a grown-up twist, soak the worms in a little rum first—just don’t tell the kids!
Serving and Storing Gummy Worm Dirt Cups
These dirt cups are best served fresh—the cookies stay crisp and those worms look perfectly creepy-crawly. If you must prep ahead, refrigerate for up to 2 hours (though the “dirt” will soften—I call that “mud pie mode”). No need to cover; just let the kids dig in!
Nutritional Information
Let’s be real – nobody eats dirt cups for the health benefits! But because I know some parents (and curious kids) ask, here’s the scoop on what’s in these wiggly treats. Remember, these numbers are just estimates – they’ll change depending on whether you use homemade pudding or different cookie brands.
For one standard dirt cup (made with my favorite store-bought ingredients):
- Calories: About 250 – perfect for an after-school energy boost
- Sugar: 20g (mostly from the pudding and those sneaky sweet worms)
- Fat: 10g (thank those delicious Oreos for that!)
My nutritionist friend always reminds me: “It’s about balance!” So maybe serve these with some fresh fruit… or just let the kids burn off the sugar running around the backyard!
FAQs About Gummy Worm Dirt Cups
I’ve gotten so many questions about these wiggly wonders over the years! Here are the ones that pop up most often (along with my brutally honest answers):
Can I use homemade pudding instead of store-bought?
Absolutely! My grandma’s cooked pudding recipe makes these extra special – just be sure to chill it completely before layering. Though between us? When I’m in a rush, those little snack cups from the grocery store work like a charm. No shame in shortcuts!
How far in advance can I make these?
You can assemble them about 2 hours ahead, but here’s the thing – the cookies start losing their crunch after that. If you must prep earlier, keep the cookie crumbs separate and sprinkle them on just before serving. Learned this lesson the hard way at a birthday party where we ended up with “mud puddles” instead of dirt cups!
Are there allergy-friendly alternatives?
You bet! For gluten-free, use gluten-free chocolate sandwich cookies. Dairy-free? Swap the pudding for a plant-based version and use coconut whipped cream. And those gummy worms? Surf Sweets makes great vegan ones. Just read labels carefully – one mom told me her son’s face lit up when he realized he could eat “worms” with his friends!
Can I make these in one big bowl instead of individual cups?
Oh honey, I’ve done this for sleepovers – just layer everything in a clear trifle bowl and call it a “worm garden.” Pro tip: stick extra worms to the sides of the bowl so they look like they’re crawling up. The kids go nuts digging for them with spoons!
My worms keep sinking – help!
Freeze them for 10 minutes first – it makes them stiffer. Then press them in deep enough that just their heads poke out (like they’re emerging from the dirt). If all else fails? More worms! Nobody complains about extra gummies.
Final Thoughts
Listen—if there’s one recipe that guarantees squeals of delight, it’s these gummy worm dirt cups. I’ve seen tough-to-please toddlers, picky pre-teens, and even skeptical adults cave to their charm. The best part? You’ll spend more time watching the kids’ reactions than actually making them. So grab those worms and get ready for your new secret weapon: messy hands, sticky faces, and requests for “just one more cup, pleeeease?” Trust me, you’ll be the coolest grown-up at the party (and you might just sneak a few for yourself when no one’s looking). Now go make some edible magic!


10-Minute Gummy Worm Dirt Cups Kids Adore
- Total Time: 10 mins
- Yield: 4 servings 1x
- Diet: Vegetarian
Description
A fun and easy dessert that looks like dirt with gummy worms crawling out. Perfect for kids and parties.
Ingredients
- 2 cups chocolate pudding
- 1 cup crushed chocolate cookies
- 10–12 gummy worms
- 1 cup whipped cream
- 4 small clear cups
Instructions
- Prepare the chocolate pudding according to package instructions and let it chill.
- Crush the chocolate cookies into fine crumbs using a food processor or rolling pin.
- Layer the bottom of each cup with a spoonful of pudding.
- Sprinkle a layer of cookie crumbs on top of the pudding.
- Repeat the layers until the cup is nearly full.
- Top with whipped cream and a few gummy worms sticking out.
- Serve immediately or refrigerate until ready to eat.
Notes
- Use store-bought pudding for convenience or make it from scratch.
- Oreo cookies work well for the dirt layer.
- Add more gummy worms for extra fun.
- Prep Time: 10 mins
- Cook Time: 0 mins
- Category: Dessert
- Method: No-Bake
- Cuisine: American
Nutrition
- Serving Size: 1 cup
- Calories: 250
- Sugar: 20g
- Sodium: 180mg
- Fat: 10g
- Saturated Fat: 4g
- Unsaturated Fat: 5g
- Trans Fat: 0g
- Carbohydrates: 35g
- Fiber: 2g
- Protein: 3g
- Cholesterol: 15mg