There’s something magical about Halloween baking—the way a simple cookie transforms into a tiny haunted masterpiece never fails to delight me. These haunted house scene cookies have been my go-to for years, ever since my niece begged me to make “something spooky but not too scary” for her school party. The joy on her face when she saw those little edible ghosts peeking out from cookie houses? Priceless.
What I love most is how easy these are to customize—whether you’re a piping pro or just starting out, a few swirls of white icing and some candy eyes turn basic sugar cookies into a whole graveyard scene. They’re the perfect project for a cozy October afternoon, especially if you’ve got kids (or fun-loving adults) eager to help decorate. Just wait until you see how quickly they disappear at parties!

Why You’ll Love These Haunted House Scene Cookies
Listen, I’ve made a LOT of Halloween treats over the years, but these cookies? They’re the ones people beg me to bring every single October. Here’s why they’re special:
- Impossible to mess up – Even if your icing skills are “kindergarten art class” level (no shame!), the messy ghosts look intentionally spooky
- Kids go wild for them – My neighbor’s 6-year-old now demands we make these together every year (pro tip: let them scatter the candy eyes for maximum giggles)
- Secretly easy – The dough comes together in minutes, and the decorating is way simpler than those fussy iced cookies that take hours
- Instant Halloween vibes – One bite of these and you’re instantly transported to that perfect crisp fall evening with jack-o’-lanterns glowing
Trust me, once you see how these vanish at parties (sometimes before they even hit the plate!), you’ll be making them every season too.
Ingredients for Haunted House Scene Cookies
What I love about this recipe? It’s basically your favorite sugar cookie dough with a spooky makeover! Here’s everything you’ll need (and yes, that black gel coloring is worth hunting down):
- 2 ¼ cups all-purpose flour – Spoon and level it, don’t scoop!
- ½ tsp baking powder – The secret lift for cookie houses that stand tall
- ¼ tsp salt – Just enough to balance the sweetness
- ¾ cup unsalted butter, softened – Leave it out for 30 minutes until it gives slightly when pressed
- ¾ cup granulated sugar – Regular white sugar works best here
- 1 large egg – Straight from the fridge is fine, it’ll warm up while mixing
- 1 tsp vanilla extract – The good stuff makes a difference
- Black and orange gel food coloring – Gel gives vibrant colors without thinning the dough
- White royal icing – Store-bought or homemade both work
- Edible candy eyes – Because ghosts need to see where they’re floating!

Ingredient Substitutions & Notes
Out of something? Been there! Here’s how to adapt:
- Butter swap: Margarine works in a pinch, but your cookies might spread more
- Color alternatives: Liquid food coloring will work if you reduce other liquids slightly (add it drop by drop)
- Egg-free option: Try ¼ cup applesauce, though the texture will be cakier
- Gluten-free: Use 1:1 GF flour blend (I like King Arthur’s)
- No candy eyes? Pipe white dots with black icing or use mini chocolate chips upside down
Pro tip: If your kitchen’s warm, pop the colored dough in the fridge for 10 minutes before rolling – it’ll be much easier to handle!
Equipment You’ll Need
No fancy gadgets required here—just the basics from your kitchen (plus a couple special items for decorating):
- Baking sheets – Standard half-sheet pans work perfectly
- Parchment paper – Lifesaver for easy cookie removal
- Rolling pin – Even a wine bottle works in a pinch!
- Haunted house cookie cutters – Or get creative with a knife and freehand shapes
- Piping bags or zip-top bags – For those ghostly icing swirls
- Small offset spatula – Makes smoothing icing way easier
That’s it! Now let’s make some spooky magic.
How to Make Haunted House Scene Cookies
Alright, let’s get spooky! These cookies come together faster than you can say “Boo!” Here’s exactly how I make them (including all my little tricks for perfect haunted houses every time):
- Preheat & prep: Crank your oven to 350°F (175°C) and line baking sheets with parchment paper. Trust me, you’ll thank me later when your ghosts slide right off!
- Dry team: Whisk together the flour, baking powder, and salt in a bowl. I like to do this first so everything’s ready when the butter mixture is fluffy.
- Butter magic: Cream the softened butter and sugar for 2-3 minutes until it’s light and fluffy. This is where the texture magic happens—don’t rush it! Beat in the egg and vanilla until just combined.
- Bring it together: Gradually mix in the dry ingredients. The dough should come together nicely but not be sticky. If it is, add a tablespoon more flour.
- Color time! Divide the dough in half. Knead black gel color into one portion and orange into the other. Wear gloves unless you want Halloween hands for days!
- Roll & cut: On a lightly floured surface, roll each color to ¼-inch thickness. Cut out haunted house shapes—press firmly and lift straight up for clean edges.
- Bake: 8-10 minutes is all they need! The edges should just barely start to brown. They’ll firm up as they cool.
Let them cool completely on the baking sheet—this is crucial if you don’t want your ghosts to melt into puddles!
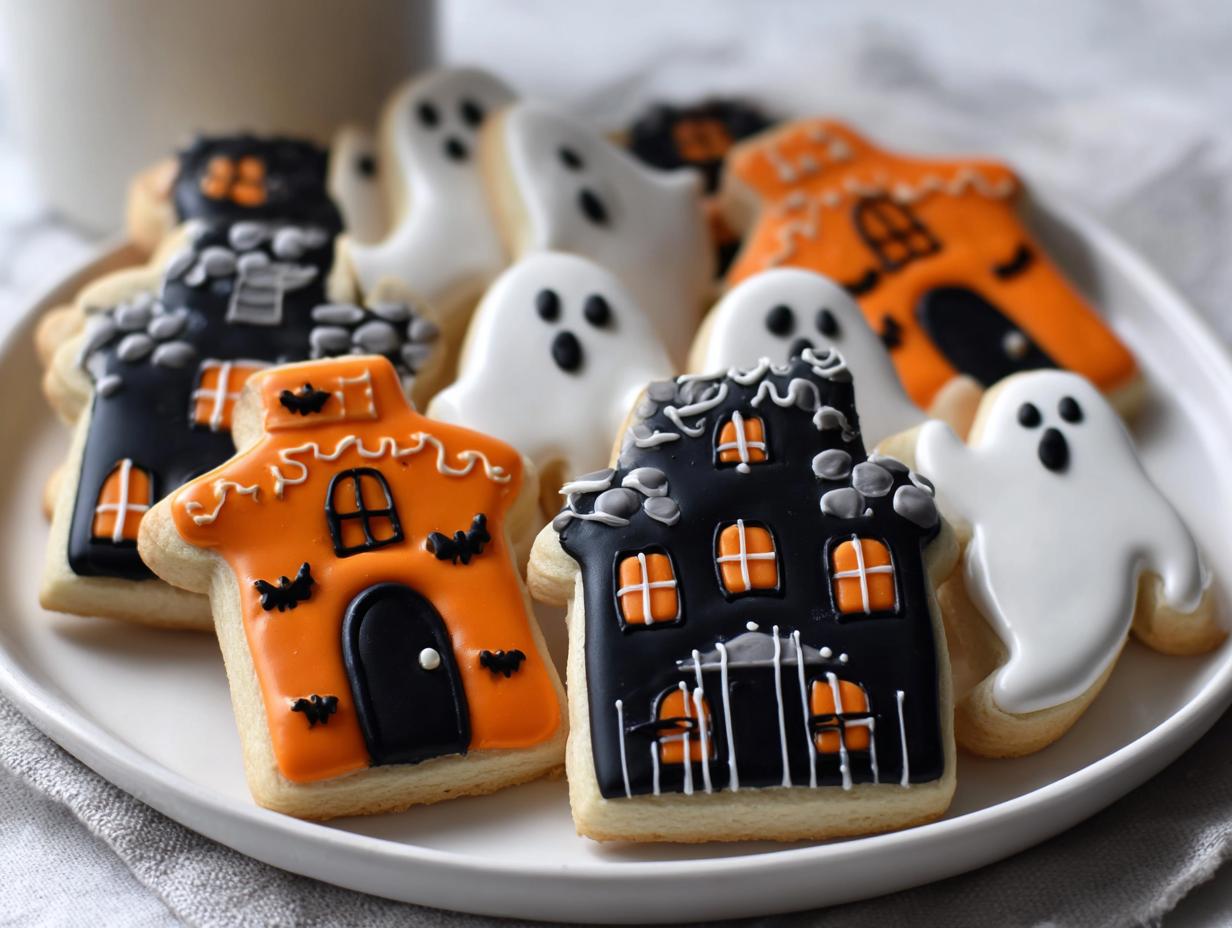
Decorating Your Spooky Cookies
This is where the real fun begins! Here’s how I create those eerily adorable details:
- Ghosts: Use a piping bag with a small round tip (or a zip-top bag with the corner snipped) to make wavy ghost shapes. Start with a blob at the bottom and wiggle upwards for that floaty effect.
- Eyes: Press candy eyes into the icing while it’s still wet. No eyes? Pipe two white dots and add a tiny black dot in the center with a toothpick.
- Spooky details: Use black icing to draw broken windows, crooked doors, or spiderwebs on the houses. A toothpick can help fix any oops moments!
Pro tip: Let the white icing set for 5 minutes before adding black details so they don’t bleed together. Now step back and admire your edible haunted neighborhood!
Tips for Perfect Haunted House Scene Cookies
After years of trial and (hilarious) error, I’ve learned a few tricks to make these cookies foolproof. Here’s what’ll take yours from “cute” to “OMG how’d you make these?!” level:
- Chill for sharp edges: If your dough feels sticky after coloring, wrap it and refrigerate for 15 minutes. Cold dough holds those haunted house shapes perfectly when baking.
- Gel color is king: Liquid food coloring makes dough sticky and pale. A little gel goes a long way—I use Americolor Super Black for that deep, spooky shade.
- Icing control: Keep unused royal icing covered with a damp towel to prevent crusting. If it thickens, add drops of water (one at a time!) to bring it back.
- Bake in batches: Overcrowding causes uneven baking. Give cookies at least 2 inches apart—ghosts need personal space too!
- Fix-it trick: Accidentally break a cookie roof? A dab of icing makes the perfect “haunted house glue” for repairs.
Follow these, and your cookies will be the talk of the graveyard—I mean, party!
Storing and Serving Suggestions
These little haunted houses stay fresh for days if you stash them right! I always use an airtight container with parchment between layers—they’ll keep their spooky charm for up to 5 days at room temperature. For parties, arrange them on a black platter with some candy corn “gravel” for extra Halloween drama.
Want to get ahead? The undecorated cookies freeze beautifully for a month—just thaw and decorate when you’re ready. Pro tip: Store decorated cookies in a single layer, or your ghosts might end up with some…interesting facial expressions from smushed icing!
Nutritional Information
Each haunted house cookie is a spooky little treat that won’t haunt your diet too much! Based on standard ingredients, one cookie has about:
- 120 calories
- 8g sugar (those ghosts need their sweetness!)
- 5g fat (3g saturated)
- 17g carbs
- 1g protein
Keep in mind—these numbers might wiggle a bit depending on your icing thickness or exact brands used. But let’s be real… when they’re this cute, who’s counting?
FAQ About Haunted House Scene Cookies
I get asked about these cookies every Halloween—here are the burning questions (pun intended!) that always come up:
“Can I freeze the dough for later?”
Absolutely! Wrap colored dough tightly in plastic and freeze for up to 3 months. Thaw overnight in the fridge—it rolls out perfectly. I always stash a batch in October for last-minute Halloween emergencies!
“How do I make these vegan?”
Easy swaps: Use plant-based butter and flax eggs (1 tbsp ground flax + 3 tbsp water per egg). For icing, powdered sugar with aquafaba whips up beautifully. Candy eyes are trickier—try vegan white chocolate chips with edible marker dots!
“Will my decorations melt overnight?”
Royal icing sets rock-hard, so no smudging! Just store decorated cookies in a single layer. Hot tip: Avoid refrigerating or they’ll sweat—room temp keeps ghosts looking their spookiest for 4-5 days.
“Help! My black dough turned gray!”
Been there! Add a teaspoon of cocoa powder to deepen the color before adding black gel. And always use Super Black or Chefmaster Liqua-Gel—regular food coloring just can’t compete.
Got your own haunted cookie questions? Share your spooky creations (and troubleshooting wins!) with us in the comments—I love seeing everyone’s edible ghost towns!


Spooky and Simple 6-Ingredient Haunted House Scene Cookies
- Total Time: 30 mins
- Yield: 24 cookies 1x
- Diet: Vegetarian
Description
Make spooky haunted house cookies perfect for Halloween. These fun treats are easy to decorate and great for parties.
Ingredients
- 2 ¼ cups all-purpose flour
- ½ tsp baking powder
- ¼ tsp salt
- ¾ cup unsalted butter, softened
- ¾ cup granulated sugar
- 1 large egg
- 1 tsp vanilla extract
- Black and orange gel food coloring
- White royal icing
- Edible candy eyes
Instructions
- Preheat oven to 350°F (175°C). Line baking sheets with parchment paper.
- Whisk flour, baking powder, and salt in a bowl.
- Cream butter and sugar until fluffy. Beat in egg and vanilla.
- Gradually mix in dry ingredients to form dough.
- Divide dough. Color one part black and one part orange.
- Roll dough to ¼-inch thickness. Cut into haunted house shapes.
- Bake 8-10 minutes. Cool completely.
- Use white icing to create ghostly details. Add candy eyes.
Notes
- Chill dough for 30 minutes if too soft.
- Store cookies in an airtight container.
- Use gel food coloring for vibrant colors.
- Prep Time: 20 mins
- Cook Time: 10 mins
- Category: Dessert
- Method: Baking
- Cuisine: American
Nutrition
- Serving Size: 1 cookie
- Calories: 120
- Sugar: 8g
- Sodium: 35mg
- Fat: 5g
- Saturated Fat: 3g
- Unsaturated Fat: 2g
- Trans Fat: 0g
- Carbohydrates: 17g
- Fiber: 0g
- Protein: 1g
- Cholesterol: 20mg