Nothing says “holiday magic” quite like a stunning dessert board loaded with sweet treats. I still remember the first time I threw one together—my aunt’s annual Christmas party was in full swing, and I needed something quick, beautiful, and delicious to wow the crowd. Enter: the holiday dessert board. It’s seriously the easiest way to impress guests without spending hours in the kitchen. Just pile on cookies, chocolates, fruits, and a little cheese (trust me, it works), and suddenly, you’ve got a centerpiece that disappears faster than wrapping paper on Christmas morning. Best part? No baking required—just pure, festive fun.
Why You’ll Love This Holiday Dessert Board
Listen, I know holiday hosting can be stressful—between the gifts, the guests, and the never-ending to-do list, who has time to fuss over desserts? That’s why this holiday dessert board is my secret weapon. Here’s why it’ll be yours too:
- No baking required – Just grab your favorite sweets, arrange them beautifully, and voilà! Instant holiday magic.
- Something for everyone – Picky eater? Chocolate lover? Cheese fanatic? Your board can handle it all. I always sneak in some brie for the adults—it balances the sweetness perfectly.
- Looks fancier than it is – The “wow factor” is real here. Guests will think you spent hours, but we’ll keep that little secret between us.
- Perfect for last-minute guests – Unexpected visitors? Raid your pantry and fridge. Stale cookies? No one will notice when they’re drizzled with chocolate!
- Kids can help – My nieces love “decorating” the board with me. Bonus: it keeps them busy while the grown-ups chat.
Honestly, once you try this, you’ll want to make dessert boards for every occasion. Valentine’s Day? Add heart-shaped cookies. Fourth of July? Berries and white chocolate. The possibilities are endless!
Ingredients for Your Holiday Dessert Board
Here’s the beautiful thing about a holiday dessert board—you can totally make it your own! But after years of trial and error (and many happy guests), these are my go-to ingredients that always work:
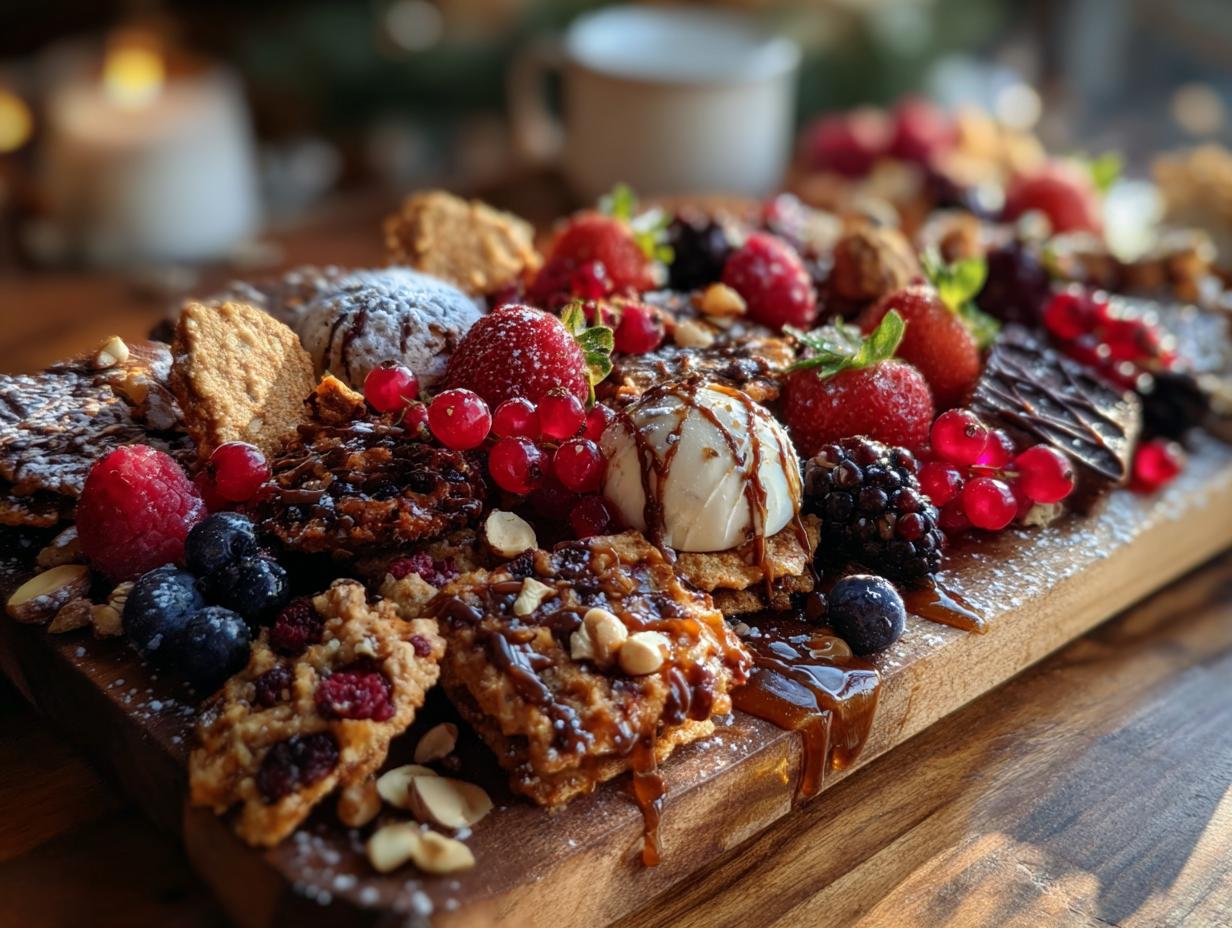
- 1 cup assorted cookies – Shortbread and gingerbread are holiday classics, but don’t be afraid to throw in some chocolate chip or peppermint cookies too. Pro tip: break a few in half for visual interest!
- 1 cup chocolate truffles – The fancy ones from the grocery store work great, but homemade is even better if you’ve got time.
- 1 cup fresh berries – Raspberries, strawberries, and blackberries add gorgeous color. In winter, pomegranate arils make a stunning (and festive!) alternative.
- 1/2 cup mixed nuts – Almonds, pecans, or walnuts—whatever you’ve got. I like to toast them lightly for extra flavor.
- 1/2 cup dried fruits – Apricots, figs, or cranberries add chewy texture. Look for the plump, moist ones—they taste way better.
- 1/2 cup cheese – A small wedge of brie or some sharp cheddar cubes balance all that sweetness beautifully.
- 1/4 cup honey or chocolate sauce – For drizzling! I keep mine in little squeeze bottles for precision.
Remember—these are just guidelines. The best boards happen when you raid your pantry and get creative!
Equipment You’ll Need
Don’t overthink this—your holiday dessert board doesn’t need fancy gear! Here’s what I always grab:
- A large board or tray – Wooden, marble, or ceramic works best. Mine’s an old cutting board I only bring out for special occasions.
- Small bowls or ramekins – For dips, sauces, or anything messy (looking at you, honey!).
- Serving utensils – Tiny spoons, cheese knives, or even toothpicks for easy grabbing.
That’s it! No special tools required—just whatever helps you create (and devour) your sweet masterpiece.
How to Assemble Your Holiday Dessert Board
Okay, here’s where the magic happens! Assembling your holiday dessert board is like edible art—just follow these simple steps, and you’ll have guests snapping photos before they even take a bite.
Step 1: Prepare the Base
First, grab your board and find a nice central spot on your table—you want this beauty to be the star! Place your small bowls or ramekins where they’ll hold dips or sauces. I usually tuck one in a corner for honey and another opposite for chocolate sauce. This creates natural “zones” that make the board look intentional rather than random.
Step 2: Arrange Sweets and Fruits
Now the fun begins! Start with your largest items—pile cookies in little groups, scatter truffles in between, and let berries spill into open spaces. The key here is contrast: pair deep red raspberries next to pale shortbread, or dark chocolate truffles beside bright citrus slices. Don’t be afraid to leave some breathing room—it makes the board look abundant rather than crowded. Pro tip: turn some cookies on their sides to add height!

Step 3: Add Cheese and Final Touches
Here’s where your board goes from pretty to spectacular. Add cheese wedges or cubes near the savory bowls—the brie always disappears first at my parties. Now grab your drizzle bottles and make zigzags over cookies or fruit clusters. A light dusting of powdered sugar looks like fresh snow, and a few sprigs of mint make everything pop. Step back, adjust anything that looks sparse, and—ta-da!—you’ve just created holiday magic in 15 minutes flat.

Tips for the Perfect Holiday Dessert Board
Want to take your holiday dessert board from good to “I-need-the-recipe” great? Here are my hard-won secrets after years of holiday hosting fails and wins:
- Seasonal swaps are your friend – No fresh berries in December? Try dried orange slices or candied cranberries instead. Summer parties love watermelon wedges and fresh peaches.
- Allergy alerts – Keep nuts in a separate bowl (with a cute “contains nuts” sign). Dairy-free? Swap in dark chocolate and skip the cheese—nobody will miss it with all those other goodies.
- Prep ahead like a pro – Wash and dry fruits, portion dips into containers, and even arrange non-perishables the night before. Just add fresh items right before serving.
- Texture is everything – Mix crunchy (nuts), chewy (dried fruit), creamy (truffles), and crisp (cookies) for that perfect bite.
- Hide the evidence – Got broken cookies or misshapen truffles? Tuck them under prettier items or crumble them as garnish. Your secret’s safe with me!
Remember—the best boards happen when you relax and have fun with it. If the chocolate drizzle goes rogue? Call it “abstract art” and pour another cocktail!
Holiday Dessert Board Variations
Once you’ve mastered the classic holiday dessert board, the fun really begins—switching up themes is my favorite way to keep things fresh! For chocolate lovers, I do an all-brown board with dark truffles, chocolate-dipped pretzels, and cocoa-dusted almonds. Kid-friendly version? Swap in animal crackers, mini marshmallows, and rainbow sprinkles (just watch those little hands dive in!). Need gluten-free? Almond flour cookies and fresh fruit save the day. Last year, I even did a “breakfast board” with mini pancakes, maple syrup, and yogurt dip for Christmas morning. The rule? If it’s sweet and makes you smile, it belongs!

Serving and Storage Tips
Here’s the best part—your holiday dessert board is meant to be devoured immediately! I always serve mine at room temperature so the chocolate is slightly soft and the cheese perfectly spreadable. If you need to chill it briefly (maybe 15 minutes max), just cover loosely with plastic wrap—any longer and your cookies might get soggy. Leftovers? Ha! Good luck with that. But if you miraculously have some, store components separately: berries in the fridge, cookies in airtight containers, and nuts at room temp. Pro tip: those “leftover” truffles make excellent next-day coffee companions… not that I’d know from experience or anything.
Nutritional Information
Just a heads up—these numbers are rough estimates since your holiday dessert board will vary based on what goodies you include! A typical serving (about 1/10 of the board) might have around 250 calories, 20g sugar, and 12g fat. Want it lighter? Load up on fresh fruit and go easy on the drizzles. Either way, it’s the holidays—enjoy every bite!
Common Questions About Holiday Dessert Boards
I get so many questions when I serve my holiday dessert boards—here are the ones that pop up most often with my real-world answers:
Can I make any parts ahead of time?
Absolutely! I often prep the whole board (minus fresh fruit) a few hours before guests arrive. Cookies stay crisp, dried fruits hold up great, and chocolate truffles actually taste better at room temp. Just cover with a clean kitchen towel to keep dust off.
How do you balance sweet and savory items?
My golden ratio is about 80% sweets to 20% savory—just enough cheese or nuts to cut through the sugar without overwhelming. A small wedge of brie or some salty roasted almonds gives people’s taste buds a nice break between chocolate indulgences.
What if I don’t have a fancy board?
Honey, I’ve used baking sheets, cutting boards, even a big serving platter! The magic is in the arrangement, not the surface. One year I arranged everything on a holiday-themed tray from the dollar store—got just as many compliments!
How do you keep berries from making cookies soggy?
Two tricks: 1) Place berries near but not touching cookies (use nuts as buffers) and 2) Add them last, right before serving. If using juicy fruits like oranges, pat them dry with a paper towel first.
Can this work for large parties?
Totally! Just double (or triple) everything and use multiple smaller boards instead of one giant one. I arrange them at different heights on cake stands for serious wow factor. More boards = more grazing space for guests!


Irresistible Holiday Dessert Board Magic in 10 Minutes
- Total Time: 15 minutes
- Yield: 1 large dessert board (serves 8-10) 1x
- Diet: Vegetarian
Description
A festive dessert board featuring a variety of sweet treats perfect for holiday gatherings.
Ingredients
- 1 cup assorted cookies
- 1 cup chocolate truffles
- 1 cup fresh berries
- 1/2 cup nuts (almonds, pecans, or walnuts)
- 1/2 cup dried fruits
- 1/2 cup cheese (brie or cheddar)
- 1/4 cup honey or chocolate sauce for drizzling
Instructions
- Arrange a large wooden or ceramic board as the base.
- Place small bowls or ramekins for dips or sauces.
- Spread cookies and truffles evenly across the board.
- Fill gaps with berries, nuts, and dried fruits.
- Add cheese slices or wedges for balance.
- Drizzle honey or chocolate sauce over select items.
- Serve immediately or chill briefly before serving.
Notes
- Use seasonal fruits for freshness.
- Adjust quantities based on guest count.
- Keep nuts separate for allergy concerns.
- Prepare dips ahead to save time.
- Prep Time: 15 minutes
- Cook Time: 0 minutes
- Category: Dessert
- Method: No-Cook
- Cuisine: International
Nutrition
- Serving Size: 1 serving (1/10 of board)
- Calories: 250
- Sugar: 20g
- Sodium: 50mg
- Fat: 12g
- Saturated Fat: 5g
- Unsaturated Fat: 6g
- Trans Fat: 0g
- Carbohydrates: 30g
- Fiber: 3g
- Protein: 4g
- Cholesterol: 10mg