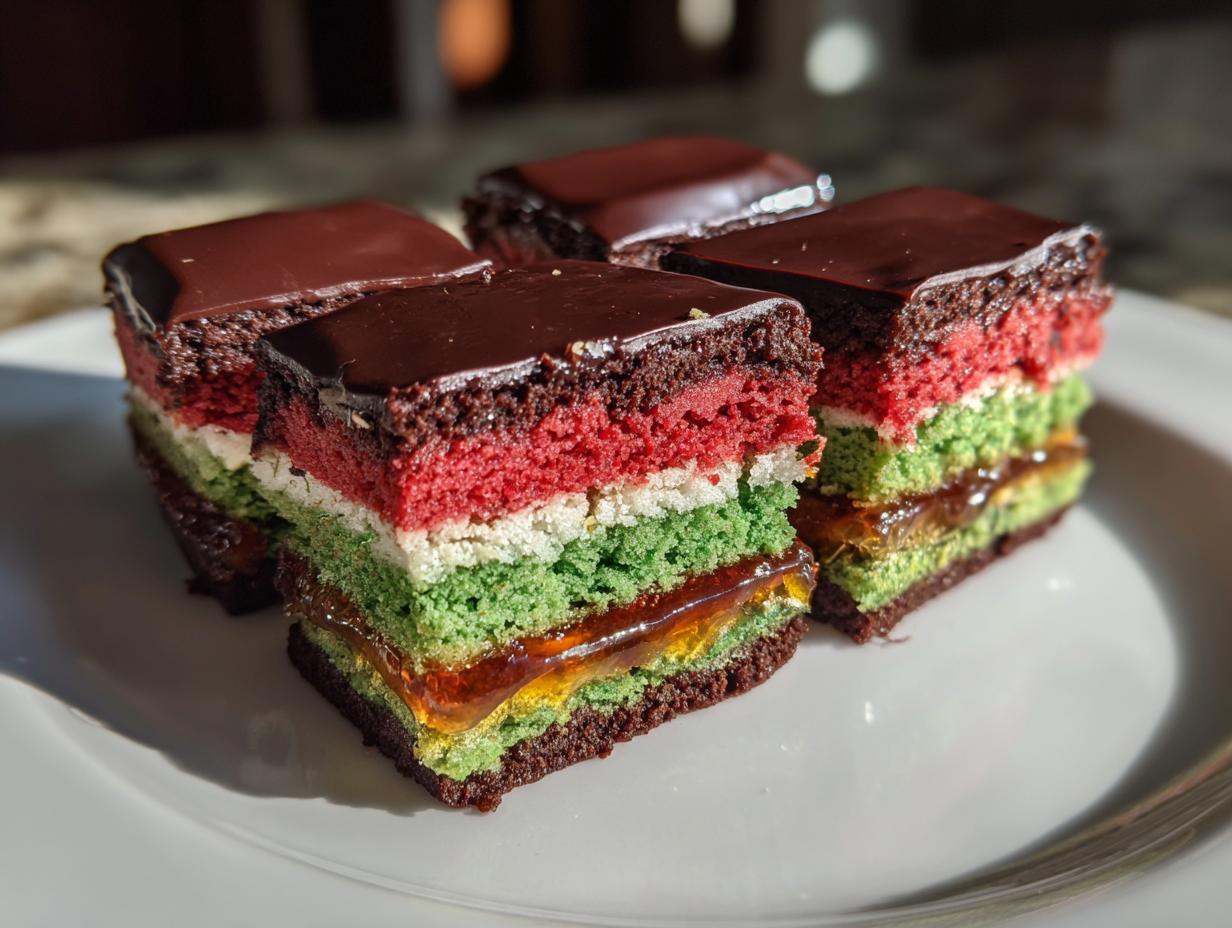
Oh my gosh, let me tell you about my first encounter with Italian rainbow cookies – it was love at first bite! I’ll never forget walking into my friend Gina’s Nonna’s kitchen and seeing this gorgeous layered cookie on her vintage cake stand. The vibrant red, white, and green layers caught my eye immediately, but that first taste? Pure magic. The almond flavor just sings through every bite, and that chocolate coating sends it over the top.

These Italian rainbow cookies (sometimes called tri-color cookies) have become my go-to for special occasions ever since. They look fancy but trust me, they’re easier than you’d think! The secret is in the almond paste – don’t even think about skipping it. That’s what gives these cookies their signature chewy texture and rich flavor. And those colorful layers? They’ll make you feel like a pastry artist even if you’re just starting out in the kitchen.
Every time I make these now, the smell takes me right back to Gina’s Nonna’s kitchen – the almond extract perfuming the air, the chocolate melting just right. It’s not just a cookie, it’s a memory maker. And I can’t wait to share my version with you!
Why You’ll Love These Italian Rainbow Cookies
Let me count the ways these cookies steal hearts:
- The colors! Those bright red, white, and green layers make every plate look like a celebration
- That almond flavor – rich and nutty without being overpowering – it’s pure Italian bakery magic
- They’re showstoppers that look fancy but are secretly easy to make (shh, our little secret!)
- The texture combo – tender cakey layers with jammy sweetness and crisp chocolate – is downright addictive
- Perfect for holidays, but honestly? I make them year-round because life’s too short for boring cookies
Italian Rainbow Cookies Ingredients
Gathering the right ingredients is half the magic with these cookies. Here’s what you’ll need:
- 1 cup almond paste, crumbled (not marzipan!)
- 1 cup unsalted butter, softened but still cool
- 1 cup granulated sugar
- 4 large eggs, room temperature
- 2 cups all-purpose flour, spooned and leveled
- 1/4 teaspoon fine sea salt
- 1/2 teaspoon pure almond extract (the good stuff!)
- Red and green gel food coloring (about 1/4 teaspoon each)
- 1/2 cup smooth apricot jam, warmed slightly
- 8 oz high-quality dark chocolate, chopped (60-70% cacao works best)

Ingredient Notes & Substitutions
Almond paste is non-negotiable here – marzipan’s too sweet and changes the texture. If you can’t find gel food coloring, liquid works but use sparingly (it thins the batter). Raspberry jam makes a lovely alternative to apricot, and I sometimes add orange zest to the white layer for extra zing. Just promise me you’ll use real butter – no substitutes!
Equipment Needed for Italian Rainbow Cookies
Now, don’t stress about needing fancy tools here – I’ve made these with bare-bones equipment when I had to! But these are my ideal helpers for perfect Italian rainbow cookies every time:
- Three 9×13 inch baking pans (or bake in batches if you only have one – no biggie!)
- Parchment paper (trust me, you’ll want this for easy removal of those thin layers)
- Stand mixer or hand mixer (you could technically do it by hand, but your arm will thank you for the electric help)
- Offset spatula – my secret weapon for spreading that batter paper-thin and even
- Small bowls for dividing the batter (I just use my cereal bowls – nothing fancy)
- Rubber spatula for scraping every last bit of batter (waste not, want not!)
- Serrated knife for those clean cuts through the chocolate (a bread knife works great)
That’s it! See? Nothing too crazy. Just grab what you’ve got and let’s make some magic happen.
How to Make Italian Rainbow Cookies
Preparing the Cookie Layers
First things first – preheat that oven to 350°F and line your pans with parchment paper (I like to leave some overhang for easy lifting later). Now, let’s make magic happen! Cream together the almond paste, butter, and sugar until it’s light and fluffy – this takes about 3 minutes in my stand mixer. Add those eggs one at a time, letting each fully incorporate before adding the next. That almond extract goes in last – oh, that smell already has me dreaming of Italian bakeries!
Here’s where the fun starts: divide your batter into three equal portions (I use a kitchen scale for precision). Color one portion red, one green, and leave one plain. Spread each into your prepared pans – this is where that offset spatula earns its keep! You want these layers thin (about 1/4 inch) and perfectly even. Bake them one at a time for 10-12 minutes until just set – they’ll firm up as they cool. Let them cool completely in the pans before assembling.

Assembling the Italian Rainbow Cookies
Time to build our masterpiece! Start with the green layer on the bottom – spread half the warmed apricot jam evenly across it. Carefully place the white layer next, then the remaining jam. Top with the red layer and gently press down. Now, here’s the secret: wrap this stack tightly in plastic and weigh it down with a baking sheet topped with some heavy cans. Chill for at least 2 hours (overnight is even better!).
When you’re ready for the grand finale, melt your chocolate and spread it over the top layer. Let it set slightly before cutting – I dip my knife in hot water and wipe it dry between slices for those picture-perfect edges. See? I told you these Italian rainbow cookies were easier than they look!
Tips for Perfect Italian Rainbow Cookies
After making dozens (okay, maybe hundreds) of batches, I’ve learned a few tricks that’ll take your Italian rainbow cookies from good to “Nonna would be proud!” level:
- Go bold with gel colors: Those grocery store liquid food colorings? Forget ’em. Gel colors give you vibrant layers without watering down the batter. Start with 1/4 teaspoon and add more until you get that iconic Italian flag red and green – they should make you smile just looking at them!
- Patience pays with chilling: I know, I know – you want to dig in! But that 2-hour chill (or better yet, overnight) is what makes the layers stick together and gives you clean cuts. No crumbly messes here!
- Hot knife secret: When it’s time to slice, dip your serrated knife in hot water and wipe it dry between each cut. This gives you those bakery-sharp edges that’ll impress everyone at the party. Bonus tip: cut off the edges first for that picture-perfect center piece!
Storing and Serving Italian Rainbow Cookies
These beauties keep like a dream! Store them in an airtight container at room temperature for up to 3 days, or refrigerate for a week (if they last that long!). For longer storage, freeze them between parchment layers – they’ll stay perfect for a month. When serving, I love arranging them on a vintage cake stand or colorful platter. They’re stunning with espresso after dinner or packed in pretty boxes as edible gifts. Pro tip: bring them to room temperature before serving for the best texture!
Italian Rainbow Cookies Nutrition
Now, let’s be real – we’re not eating Italian rainbow cookies for their health benefits! But since you asked, here’s the scoop on nutrition. These are definitely a special occasion treat, packed with all the good stuff – almond paste, butter, and that glorious chocolate coating.
Keep in mind that nutrition values can vary depending on your specific ingredients (like using premium chocolate vs. grocery store brand) and how big you slice them. My Nonna always said “Eat one cookie with joy is better than ten with guilt!” So savor each bite of these beauties.

The almond paste gives these cookies a nice protein boost compared to regular sugar cookies, and dark chocolate adds antioxidants. But let’s be honest – we’re here for that magical combo of flavors and textures, not a health food! Everything in moderation, right?
Italian Rainbow Cookies FAQs
I get asked these questions all the time when I bring these cookies to gatherings – let me save you some trouble with my hard-earned answers!
Can I freeze Italian rainbow cookies? Absolutely! These freeze like a dream. Wrap the whole slab before adding chocolate (or individual cookies after) in plastic, then foil. They’ll keep for a month – just thaw overnight in the fridge. The texture stays perfect!
Why almond paste instead of marzipan? Oh honey, they’re not the same! Almond paste has more almonds and less sugar, giving that signature dense-yet-tender texture. Marzipan’s too sweet and crumbly – trust me, I learned this the hard way!
How do I prevent cracking? Chill, chill, chill! Rushing the chilling step causes cracks when cutting. That weighted press-down and minimum 2-hour chill lets the layers bond properly. Your patience will be deliciously rewarded!
Print
Irresistible Italian Rainbow Cookies: 3-Layer Bliss
- Total Time: 1 hour plus chilling
- Yield: 24 cookies 1x
- Diet: Vegetarian
Description
Colorful layered Italian cookies with almond flavor and chocolate coating.
Ingredients
- 1 cup almond paste
- 1 cup unsalted butter
- 1 cup granulated sugar
- 4 large eggs
- 2 cups all-purpose flour
- 1/4 teaspoon salt
- 1/2 teaspoon almond extract
- Red and green food coloring
- 1/2 cup apricot jam
- 8 oz dark chocolate
Instructions
- Preheat oven to 350°F. Line a 9×13 inch baking pan with parchment paper.
- Cream almond paste, butter, and sugar until light and fluffy.
- Add eggs one at a time, then mix in flour, salt, and almond extract.
- Divide batter into 3 equal parts. Color one red, one green, leave one plain.
- Spread each colored batter into separate prepared pans. Bake for 10-12 minutes.
- Cool completely. Stack layers with apricot jam between them.
- Spread melted chocolate over top layer. Chill until set before cutting.
Notes
- Use gel food coloring for vibrant layers
- Chill stacked layers before adding chocolate coating
- Cut with a sharp knife dipped in hot water for clean slices
- Prep Time: 30 minutes
- Cook Time: 30 minutes
- Category: Dessert
- Method: Baking
- Cuisine: Italian
Nutrition
- Serving Size: 1 cookie
- Calories: 180
- Sugar: 12g
- Sodium: 35mg
- Fat: 10g
- Saturated Fat: 5g
- Unsaturated Fat: 4g
- Trans Fat: 0g
- Carbohydrates: 20g
- Fiber: 1g
- Protein: 3g
- Cholesterol: 35mg