Oh my gosh, you HAVE to try this Layered Greek Dip – it’s my secret weapon for every party! I first made it for a last-minute gathering when my sister surprised me with 10 extra guests, and let me tell you, it saved the day. This vibrant, flavorful dip comes together in minutes but tastes like you spent hours in the kitchen. The best part? Everyone goes crazy for those beautiful layers of creamy hummus, tangy yogurt, and all the fresh Mediterranean toppings. I’ve lost count of how many times people have asked me for the recipe after just one bite. Trust me, once you try this crowd-pleaser, you’ll be making it for every potluck, game night, and summer barbecue too!

Why You’ll Love This Layered Greek Dip
Seriously, what’s not to love about this dip? I make it constantly because it checks all the boxes:
- Effortless entertaining: Throw it together in 15 minutes flat – perfect when guests show up unannounced!
- Bursting with freshness: Crisp cucumbers, juicy tomatoes, and briny olives make every bite exciting.
- Always disappears first: I have to hide a portion for myself or there’s never any left.
- Vegetarian magic: Even my meat-loving friends can’t resist those creamy layers.
The colors alone will make your snack table look like a Mediterranean sunset – but wait till you taste it!
Ingredients for Layered Greek Dip
Okay, let’s talk ingredients – because quality matters here! I’ve made this dip enough times to know exactly what works best. Everything gets divided into three groups that make assembly foolproof:
- The Creamy Base:
- 1 cup hummus (I swear by roasted garlic or lemon flavor)
- 1 cup thick Greek yogurt (full-fat for creaminess, 2% works in a pinch)
- The Crunchy Veggies:
- 1 cup chopped cucumbers (peeled, seeded, and diced small)
- 1 cup diced tomatoes (seeds removed so they don’t water everything down)
- 1/4 cup finely chopped red onion (soak in cold water for 10 mins if you want less bite)
- The Flavor Bombs:
- 1/2 cup sliced Kalamata olives (pitted – no one wants surprise olive pits!)
- 1/2 cup crumbled feta (buy the block and crumble yourself – it’s creamier)
- 1 tbsp good olive oil (for drizzling)
- 1 tsp dried oregano (rub between fingers to wake up the flavor)
Pro tip: Measure all this out before starting – assembly goes crazy fast once you begin layering!

How to Make Layered Greek Dip
Alright, let’s get layering! I promise this is so easy you could do it with your eyes closed (though I don’t recommend it – those olives can be slippery!). Follow these steps for dip perfection every single time.
Step 1: Prepare the Base Layers
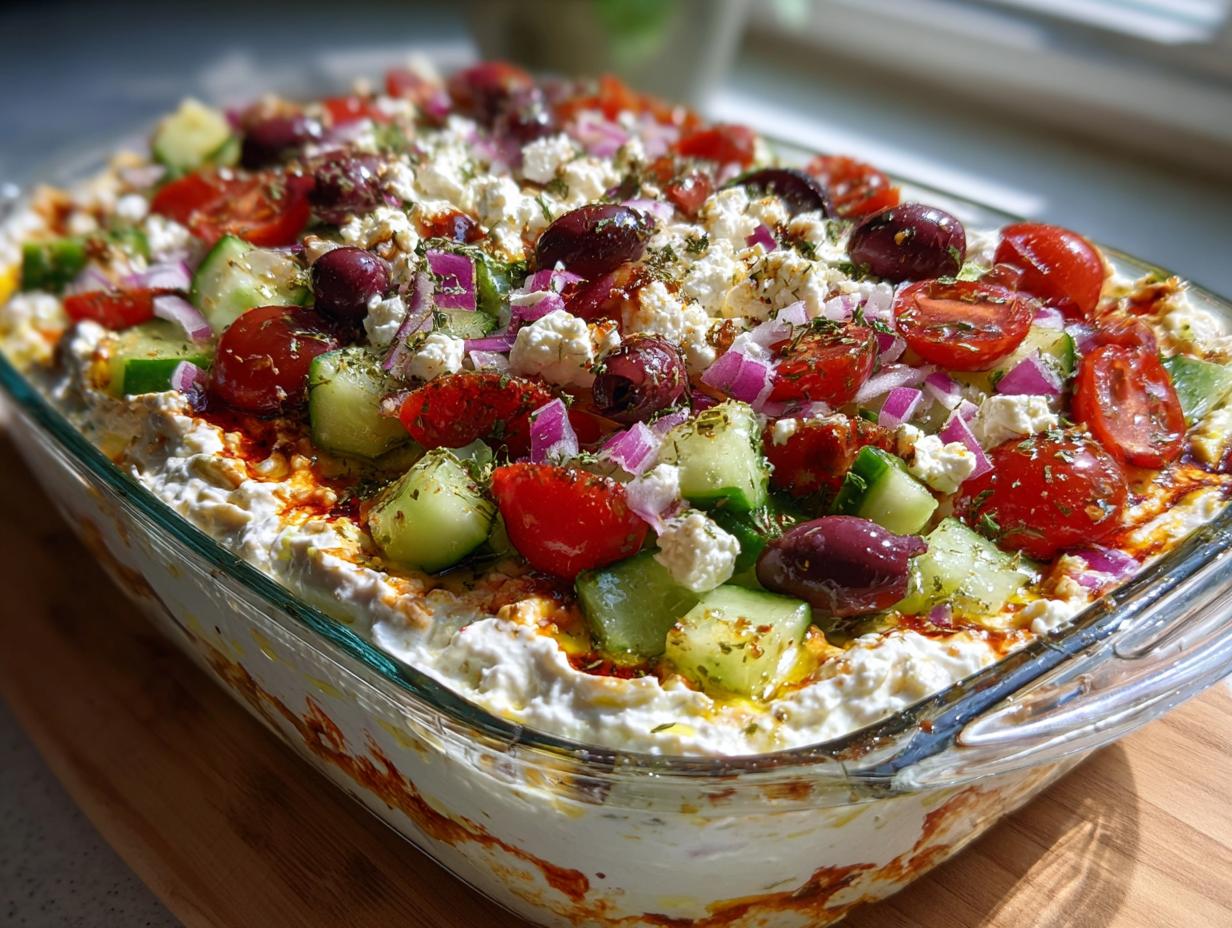
Grab your prettiest shallow dish – I use a 9-inch pie plate because everyone can see those gorgeous layers. First, spread that hummus evenly across the bottom. I like using the back of a spoon in circular motions – it’s oddly satisfying! Then comes the Greek yogurt. Spoon it over the hummus and gently spread it out. Don’t stress about mixing them – the slight swirls where they meet look artisanal!
Step 2: Add Fresh Toppings
Now the fun part – the confetti of flavors! Sprinkle your chopped cucumbers first, then tomatoes, making sure every area gets some love. I do onions next (remember to pat them dry if you soaked them). Scatter those beautiful Kalamata olives around like little edible jewels. Finally, shower everything with that glorious feta – go heavy on the crumbles because, well, cheese makes everything better.
Step 3: Garnish and Serve
Almost there! Drizzle that golden olive oil over the top like you’re Picasso with a squeeze bottle. Then take your dried oregano between your fingers and give it a little rub before sprinkling – this wakes up those earthy flavors. Pop it in the fridge for at least 30 minutes (if you can wait that long!) to let the flavors mingle. Serve with warm pita wedges, crunchy veggies, or sturdy crackers that can handle all that goodness.

Tips for the Best Layered Greek Dip
Listen, I’ve made this dip enough times to learn all the little tricks that take it from good to “Oh my god, what is this?!” Here are my can’t-live-without tips:
- Drain those cukes! After chopping, press cucumbers in a clean towel to remove excess water – soggy dip is sad dip.
- Olive upgrade: Splurge on good Kalamatas packed in brine, not the sad canned ones – the flavor difference is insane.
- Chill time matters: That 30-minute fridge rest isn’t optional! It lets the flavors get to know each other properly.
- Feta first: Crumble your own from a block right before serving – pre-crumbled stuff dries out too fast.
Follow these and I promise your dip will be the star of every party!
Ingredient Substitutions & Variations
Okay, let’s get creative! While I love the classic version, sometimes you’ve got to improvise based on what’s in your fridge or dietary needs. Here are my favorite tweaks that still keep that amazing Greek flavor:
- Yogurt swap: Out of Greek yogurt? Tzatziki works beautifully and adds extra garlicky goodness. For vegan folks, coconut yogurt surprisingly works if you strain it first.
- Tomato twist: No fresh tomatoes? Sun-dried tomatoes (oil-packed, chopped fine) give an intense flavor pop – just use half the amount.
- Feta alternatives: Vegan feta has come a long way! Or try ricotta salata for a milder cheese option.
- Hummus hack: Roasted red pepper hummus makes the base extra vibrant, while beet hummus turns it into a showstopping pink dip!
The beauty? Each variation becomes its own delicious creation – have fun with it!
Serving Suggestions for Layered Greek Dip
Now, let’s talk about the best ways to serve this beauty! I always put out an array of dippers so everyone can choose their adventure. Warm pita wedges are my go-to – just cut them into triangles and pop them in the oven for a few minutes until toasty. Crunchy cucumber rounds, bell pepper strips, and carrot sticks make perfect fresh vehicles too. For parties, I arrange everything around the dip on a big wooden board with little serving knives – it looks so inviting! Pro tip: Keep extra pita bread nearby because trust me, people will come back for more.

Storage and Reheating Instructions
Here’s the scoop on keeping your dip delicious (if there’s any left!): Pop it in an airtight container and it’ll stay fresh in the fridge for up to 2 days. No reheating needed – actually, don’t even try it! The yogurt will separate and turn sad. And freezing? Forget about it – those crisp veggies turn into mush when thawed. Trust me, I learned that lesson the hard way!
Layered Greek Dip FAQs
Let me answer the questions I get asked ALL the time about this dip – consider this your cheat sheet for party success!
Can I make Layered Greek Dip ahead?
Absolutely! Assemble everything except the feta and oregano up to 24 hours in advance. Add those right before serving so they stay fresh and vibrant.
Is this dip gluten-free?
Yes! Just serve it with gluten-free crackers or veggies instead of pita. All the layers are naturally gluten-free – another reason it’s such a crowd-pleaser.
How long does it last in the fridge?
About 2 days max – the veggies start losing their crunch after that. But honestly? It never lasts that long in my house!
Can I double the recipe?
Of course! Use a 9×13 dish instead of a pie plate. Just be sure to keep the same layer ratios so every bite has perfect flavor balance.
Nutritional Information
Just a heads up – these numbers can vary based on your exact ingredients (especially how generous you are with that feta!). Per serving (about 1/6 of the recipe), you’re looking at roughly:
- 180 calories
- 12g fat (3g saturated)
- 6g protein
- 12g carbs with 3g fiber
Not bad for something that tastes this indulgent, right? Now I want to hear – what’s your favorite way to customize this dip? Tell me in the comments!
Print
15-Minute Layered Greek Dip That Wows Every Crowd
- Total Time: 15 minutes
- Yield: 6 servings 1x
- Diet: Vegetarian
Description
A delicious and easy-to-make layered Greek dip perfect for parties and gatherings.
Ingredients
- 1 cup hummus
- 1 cup Greek yogurt
- 1 cup chopped cucumbers
- 1 cup diced tomatoes
- 1/2 cup sliced Kalamata olives
- 1/2 cup crumbled feta cheese
- 1/4 cup chopped red onions
- 1 tbsp olive oil
- 1 tsp dried oregano
Instructions
- Spread hummus evenly in a serving dish.
- Layer Greek yogurt on top of the hummus.
- Add chopped cucumbers, diced tomatoes, and sliced olives.
- Sprinkle crumbled feta cheese and chopped red onions.
- Drizzle olive oil and sprinkle dried oregano.
- Serve with pita chips or fresh vegetables.
Notes
- Refrigerate for at least 30 minutes before serving for best flavor.
- Adjust ingredient quantities based on your taste.
- Use fresh ingredients for better texture.
- Prep Time: 15 minutes
- Cook Time: 0 minutes
- Category: Appetizer
- Method: No-Cook
- Cuisine: Greek
Nutrition
- Serving Size: 1/6 of recipe
- Calories: 180
- Sugar: 3g
- Sodium: 320mg
- Fat: 12g
- Saturated Fat: 3g
- Unsaturated Fat: 8g
- Trans Fat: 0g
- Carbohydrates: 12g
- Fiber: 3g
- Protein: 6g
- Cholesterol: 10mg