There’s something about mini chicken pot pies that just screams comfort food. Maybe it’s the flaky crust giving way to that creamy, savory filling, or how each little pie feels like a personal gift of warmth. I first made these when my niece declared “big pies are too much commitment” at our family potluck – and wow, did they steal the show! Now my freezer always has a batch ready for last-minute dinners or when friends drop by. The best part? You can customize each one – extra peas for the kids, more chicken for my brother-in-law – making everyone feel special with their own perfect little pie.

Why You’ll Love These Mini Chicken Pot Pies
These little pies are my go-to for so many reasons – let me count the ways:
- Quick magic: From fridge to table in under an hour (perfect for those “what’s for dinner?” panic moments)
- Easy does it: Even my 12-year-old nephew can assemble them with minimal supervision
- Customizable cuties: Make some veggie-heavy for health nuts, extra chicken for protein lovers – everyone gets their dream pie
- Party stars: No messy slicing! Just pop these golden beauties on a platter and watch them disappear
- Freezer friendly: Bake a double batch and thank yourself later on busy weeknights
Trust me, once you try these, regular pot pies will seem downright boring!
Ingredients for Mini Chicken Pot Pies
Here’s what you’ll need to make these adorable little comfort food packages. I’ve included all my favorite tweaks and substitutions – because let’s be honest, who always has exactly what a recipe calls for?
- 1 cup cooked chicken, diced (rotisserie chicken works beautifully here – no shame in shortcuts!)
- 1 cup mixed vegetables (I use equal parts carrots, peas and corn – fresh or frozen both work, just thaw frozen veggies first)
- 1/2 cup chicken broth (low-sodium is best so you can control the salt level)
- 1/2 cup heavy cream (whole milk works in a pinch, but cream gives that luscious texture we crave)
- 1 tbsp butter (the real deal, please – it makes the roux magical)
- 1 tbsp all-purpose flour (this is our thickening agent – don’t skip it!)
- 1 tsp garlic powder (fresh minced garlic is great too – use 2 cloves if you’re feeling fancy)
- 1 tsp onion powder (or 1/4 cup finely diced onions sautéed with the butter)
- Salt and pepper to taste (I always start with 1/4 tsp each and adjust after the sauce thickens)
- 1 sheet puff pastry, thawed (found in the freezer aisle – so much easier than making dough from scratch)
- 1 egg, beaten (for that gorgeous golden finish – water works in emergencies but won’t give the same shine)
See? Nothing too crazy – just good, honest ingredients that come together in the most comforting way. The beauty of this recipe is how forgiving it is – swap in what you’ve got and it’ll still be delicious!
Equipment You’ll Need
Don’t worry – you won’t need any fancy gadgets for these mini chicken pot pies! Just grab these kitchen basics (you probably already have most of them):
- Standard muffin tin (the 12-cup kind works perfectly – no need for specialty pans)
- Rolling pin (or an empty wine bottle in a pinch – we’ve all been there!)
- Mixing bowl (medium-sized is ideal for tossing the filling together)
- Small saucepan (for making that luscious creamy sauce)
- Whisk (to smooth out any flour lumps in your roux)
- Pastry brush (or just use your fingers to spread the egg wash if needed)
- Round cookie cutter (about 3-4 inches wide – or a drinking glass works great too)
That’s it! No stand mixers, no fancy tools – just simple equipment for maximum comfort food magic. Now let’s get baking!
How to Make Mini Chicken Pot Pies
Alright, let’s get these little pockets of joy into the oven! I’ll walk you through each step – it’s easier than you think, and so satisfying when you pull them out all golden and bubbling. Just follow along and you’ll be a mini pot pie pro in no time.
Preparing the Filling
First things first – that creamy, dreamy filling that makes these pies so irresistible. Here’s how to nail it every time:
- Melt your butter in a saucepan over medium heat. Watch it closely – we want it bubbly but not browned.
- Whisk in the flour and keep stirring for about a minute. This is our roux – it should look like wet sand and smell slightly nutty. Don’t walk away or it might burn!
- Slowly pour in the chicken broth while whisking constantly. This is key to avoiding lumps – pretend you’re making magic potion and whisk with enthusiasm!
- Add the heavy cream, garlic powder, onion powder, salt and pepper. Keep whisking until the sauce thickens enough to coat the back of a spoon – about 3-4 minutes.
- Remove from heat and stir in your chicken and veggies. The residual heat will warm everything through without turning your vegetables to mush. Trust me, nobody likes soggy peas!
Assembling the Pies
Now for the fun part – creating those adorable individual pies! Here’s how I do it:
- Roll out your thawed puff pastry on a lightly floured surface. Don’t go too thin – about 1/8 inch thick keeps it sturdy.
- Cut circles using your cookie cutter or glass. Pro tip: dip the cutter in flour first to prevent sticking.
- Gently press the circles into your greased muffin tin, letting the edges hang over slightly. No need to be perfect – rustic is charming!
- Spoon in the filling, leaving about 1/4 inch at the top. Overfilling leads to messy spills (learned that the hard way!).
- For the tops, you’ve got options:
- Simple circles: Just lay another pastry round on top and crimp the edges with a fork
- Lattice: Cut strips and weave them for a fancy look (great for impressing guests!)
- Cut-out vents: Use small cookie cutters to make decorative holes in the top crust
- Brush the tops with beaten egg – this gives that gorgeous golden shine we all love.

Baking Tips
Almost there! Just a few key things to remember when baking:
- Preheat your oven to 375°F (190°C) – no cheating on this step or your pastry won’t puff properly!
- Bake for 20-25 minutes. Start checking at 20 – you want the tops deeply golden and the filling bubbling at the edges.
- Rotate the pan halfway through if your oven has hot spots (most do).
- Let them cool in the tin for 5 minutes before removing – the filling sets and you won’t burn your mouth (another hard lesson!).
- If the tops brown too quickly, tent with foil – but don’t do this too early or the pastry won’t crisp up.
See? Not so complicated after all. Now just try to resist eating them all straight from the oven – I dare you!
Ingredient Notes and Substitutions
One of my favorite things about these mini chicken pot pies is how flexible they are! Here are all my tried-and-true swaps – because life happens and we don’t always have exactly what a recipe calls for. I’ve made these with just about every variation imaginable, so you can trust these tweaks:
Protein Options
The chicken is easily swapped if you need to:
- Turkey: Leftover Thanksgiving turkey works beautifully here – just chop it up small
- Ham: Adds a smoky twist – reduce salt since ham is already salty
- Mushrooms: For vegetarians, use a mix of cremini and shiitake for great texture
Dairy Swaps
Got dairy issues? No problem:
- Coconut milk: The full-fat canned kind works surprisingly well (just a hint of sweetness)
- Oat milk + cornstarch: Mix 1/2 cup oat milk with 1 tsp cornstarch as thickener
- Vegan butter: Works fine for the roux, though the flavor won’t be quite as rich
Veggie Variations
Clean out that veggie drawer:
- Sweet potatoes: Diced small, they add great sweetness
- Green beans: Fresh or frozen – just blanch them first
- Frozen mixed veggies: The classic “peas and carrots” mix is totally acceptable
Crust Alternatives
Puff pastry not your thing? Try:
- Pie crust: More traditional, but needs extra egg wash for browning
- Biscuit dough: Press canned biscuits into the cups – fluffy and delicious
- Gluten-free pastry: Many brands now make excellent GF puff pastry
My biggest tip? Don’t stress about substitutions – these little pies are incredibly forgiving. The only non-negotiable is love (and well, maybe the butter if you can swing it). Happy experimenting!
Serving Suggestions for Mini Chicken Pot Pies
Oh, the possibilities! These adorable mini chicken pot pies are like little edible canvases just waiting for your creative touches. Here’s how I love to serve them up:
For cozy weeknights: Two pies per person is usually perfect (though my brother always sneaks a third!). Pair with:
- A simple green salad with tangy vinaigrette to cut through the richness
- Garlic mashed potatoes (because you can never have too many carbs)
- Buttered peas – they just belong with pot pies, don’t they?
For fancy gatherings: Serve one per person as an appetizer with:
- A drizzle of truffle oil right before serving – so decadent!
- A dollop of cranberry sauce on the side for festive flair
- Mini ramekins of extra gravy for dipping (trust me on this one)
My kids’ favorite way: Cut one pie open piping hot and let the steam escape for exactly 2 minutes (they’ve timed it!), then serve with:
- Ketchup (I know, I know… but kids will be kids)
- A side of apple slices to balance the savory
- Chilled milk in tiny mason jars – makes everything more fun
The beauty of these mini pies? They’re perfectly portioned however you want to serve them – appetizer, main course, or midnight snack (I won’t judge!). Just add love and watch them disappear.
Storing and Reheating Mini Chicken Pot Pies
Let’s be real – these mini chicken pot pies are so delicious, leftovers are rare in my house. But just in case you manage to resist eating them all at once (heroic!), here’s how to keep them tasting fresh-baked:
In the fridge:
- Let pies cool completely first – no condensation means no soggy bottoms!
- Store in airtight container with parchment between layers for up to 3 days
- Pro tip: Place a paper towel underneath to absorb any moisture
In the freezer:
- Flash freeze unbaked pies on a tray first (1 hour), then transfer to freezer bags
- Pre-baked pies freeze beautifully too – just wrap each individually in foil
- They’ll keep for 2 months – any longer and the pastry starts suffering
Reheating magic:
- Oven method: 350°F for 15-20 minutes (20 if frozen) – keeps crust crisp
- Air fryer: 320°F for 8-10 minutes – shockingly good results!
- Microwave: Only in emergencies! 30 seconds at a time with parchment underneath
The pastry might not be quite as flaky after reheating, but a quick trick – brush with melted butter before warming gives it new life. Honestly though? These taste so good cold that I’ve been known to eat them straight from the fridge at midnight. Your secret’s safe with me!
Mini Chicken Pot Pies Nutritional Information
Now, I’m no nutritionist, but I know we all like to have a rough idea of what we’re eating (especially when it tastes this good!). Keep in mind these numbers can vary depending on your exact ingredients and portion sizes – my heavy-handed cream pouring might differ from yours!
Per mini chicken pot pie (based on my standard recipe):
- Calories: About 320 (perfect little indulgence!)
- Fat: 18g (that’s what makes it so satisfying)
- Saturated Fat: 7g (worth every delicious bite)
- Carbohydrates: 25g (mostly from that flaky crust we love)
- Fiber: 2g (thank you, veggies!)
- Sugar: 3g (natural from the vegetables)
- Protein: 14g (that chicken really packs a punch)
- Sodium: 420mg (use low-sodium broth if you’re watching this)
A few things to note: if you use turkey instead of chicken, the protein goes up slightly. Swap in coconut milk for the cream? You’ll save a few calories but lose some protein. And if you’re like me and sneak extra veggies in, you’re adding fiber without many extra calories – bonus!
At the end of the day, these mini chicken pot pies are comfort food – meant to be enjoyed without too much number-crunching. But it’s nice to know they offer a decent balance of protein, carbs, and fat in each perfectly portioned package!
FAQs About Mini Chicken Pot Pies
I get so many questions about these little pies – here are the ones that pop up most often. If you’re wondering something, chances are someone else is too!
Can I use store-bought pie crust instead of puff pastry?
Absolutely! The texture will be different (more flaky than puffy), but still delicious. Just roll it a bit thinner since pie crust is denser. I sometimes do this when I want that classic pot pie vibe. Bonus – the scraps make cute little cut-out decorations for the tops!
What’s the best way to freeze these before baking?
Oh, I’ve mastered this! Assemble the pies completely but don’t egg wash them yet. Freeze solid on a baking sheet (about 2 hours), then wrap each tightly in plastic. They’ll keep for 2 months. When ready, bake from frozen – just add 5-10 minutes to the cooking time and brush with egg wash first.
Help! My filling is too runny. What did I do wrong?
Don’t panic! Usually means the roux needed more cooking time or the sauce didn’t thicken enough before adding veggies. Easy fix – scoop out the filling and simmer it a few more minutes to reduce. Or mix in a teaspoon of cornstarch slurry (equal parts cornstarch and water). Next time, cook your roux until it smells nutty – that flour needs time to lose its raw taste.
Can I make these vegetarian?
You bet! Swap the chicken for mushrooms (sauté them first to remove moisture) or extra veggies like diced potatoes. Use vegetable broth instead of chicken broth. The creamy sauce still makes it feel indulgent. My niece is vegetarian and she loves when I make a special batch just for her!
Why do my pies stick to the muffin tin?
Ugh, the worst! Two tricks: 1) Really grease every nook of the tin – I use butter or baking spray. 2) Let them cool 5 minutes before removing – the filling sets and the pastry firms up. Still stuck? Run a butter knife around the edges gently. Pro tip: silicone muffin cups are foolproof if this keeps happening to you.

Share Your Mini Chicken Pot Pies
Nothing makes me happier than seeing your versions of these mini chicken pot pies! Seriously, it’s like Christmas morning every time I check my notifications and find your creations. Here’s how we can keep the comfort food love going:
Snap & Share: Did you add an unexpected twist? Maybe extra cheese or a dash of hot sauce? Take a photo of those golden beauties fresh from the oven (or half-eaten – no judgment here!) and tag me @[YourHandle]. I’ll repost my favorites!
Rate & Review: Tried the recipe? Leave a quick star rating below – it helps other home cooks know what to expect. Even better, tell us in the comments what worked (or what hilarious kitchen mishaps happened – we’ve all been there!).
Family Traditions: Did these become part of your weekly meal rotation? Maybe you served them at a special gathering? I’d love to hear how these little pies fit into your life. Bonus points if you include cute kid reactions – nothing beats a toddler’s messy, sauce-covered grin!
Your feedback and creativity inspire me to keep testing new variations (next up: buffalo chicken pot pies!). So don’t be shy – share the comfort food love. And if you’re feeling extra generous, pass the recipe along to a friend who needs some kitchen joy in their life!


Tasty Mini Chicken Pot Pies in Just 30 Minutes
- Total Time: 40 mins
- Yield: 6 mini pies 1x
- Diet: Low Lactose
Description
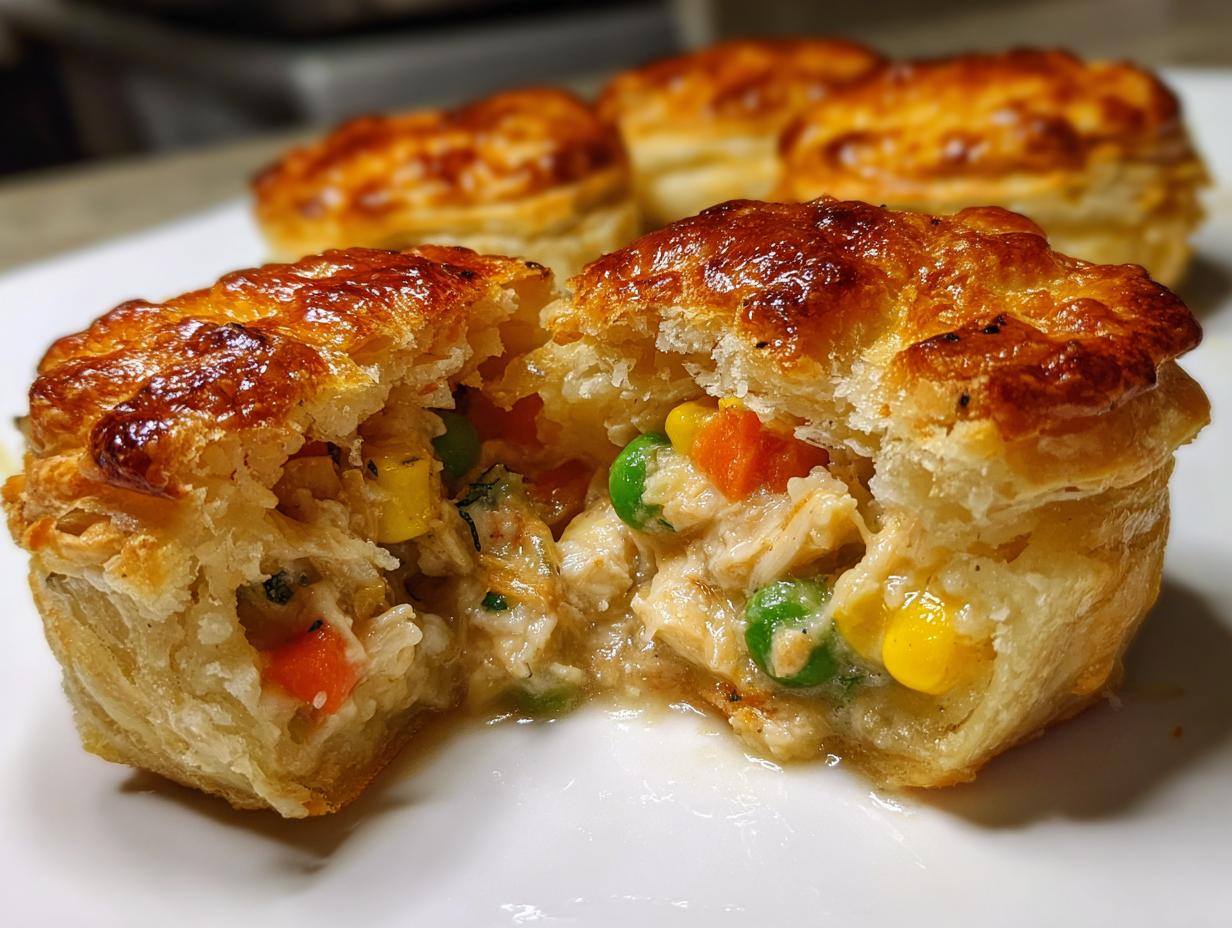
Mini chicken pot pies are delicious individual-sized pies filled with tender chicken and vegetables in a creamy sauce, all encased in a flaky crust.
Ingredients
- 1 cup cooked chicken, diced
- 1 cup mixed vegetables (carrots, peas, corn)
- 1/2 cup chicken broth
- 1/2 cup heavy cream
- 1 tbsp butter
- 1 tbsp all-purpose flour
- 1 tsp garlic powder
- 1 tsp onion powder
- Salt and pepper to taste
- 1 sheet puff pastry, thawed
- 1 egg, beaten (for egg wash)
Instructions
- Preheat oven to 375°F (190°C).
- Melt butter in a pan and stir in flour to make a roux.
- Add chicken broth, cream, garlic powder, onion powder, salt, and pepper. Stir until thickened.
- Mix in chicken and vegetables. Remove from heat.
- Roll out puff pastry and cut into circles to fit a muffin tin.
- Press pastry into muffin tin cups and fill with chicken mixture.
- Cover with another pastry circle or create a lattice top.
- Brush with egg wash and bake for 20-25 minutes until golden.
Notes
- Use leftover rotisserie chicken for convenience.
- You can substitute frozen vegetables if fresh ones aren’t available.
- For a crispier crust, brush with egg wash before baking.
- Prep Time: 15 mins
- Cook Time: 25 mins
- Category: Main Dish
- Method: Baking
- Cuisine: American
Nutrition
- Serving Size: 1 mini pie
- Calories: 320
- Sugar: 3g
- Sodium: 420mg
- Fat: 18g
- Saturated Fat: 7g
- Unsaturated Fat: 9g
- Trans Fat: 0g
- Carbohydrates: 25g
- Fiber: 2g
- Protein: 14g
- Cholesterol: 65mg