Nothing screams Halloween like the smell of chocolate cake baking while “Monster Mash” plays on repeat in the background! This Monster Mash Layer Cake became our family’s instant tradition after I whipped it up last year for my daughter’s costume party – the kids went wild for the creepy colors and candy eyes peeking through the frosting. What started as a fun experiment turned into our must-make Halloween dessert, and now I’m sharing all my tricks (no treats needed!) for creating this showstopper. The best part? It’s way easier to make than those elaborate haunted house cakes, but still gets all the oohs and ahhs at any spooky gathering.

Why You’ll Love This Monster Mash Layer Cake
This cake isn’t just dessert—it’s a Halloween party in cake form! Trust me, once you see how easy it is to transform basic ingredients into a spooky masterpiece, you’ll want to make this Monster Mash Layer Cake every October. Here’s why it’s become my go-to:
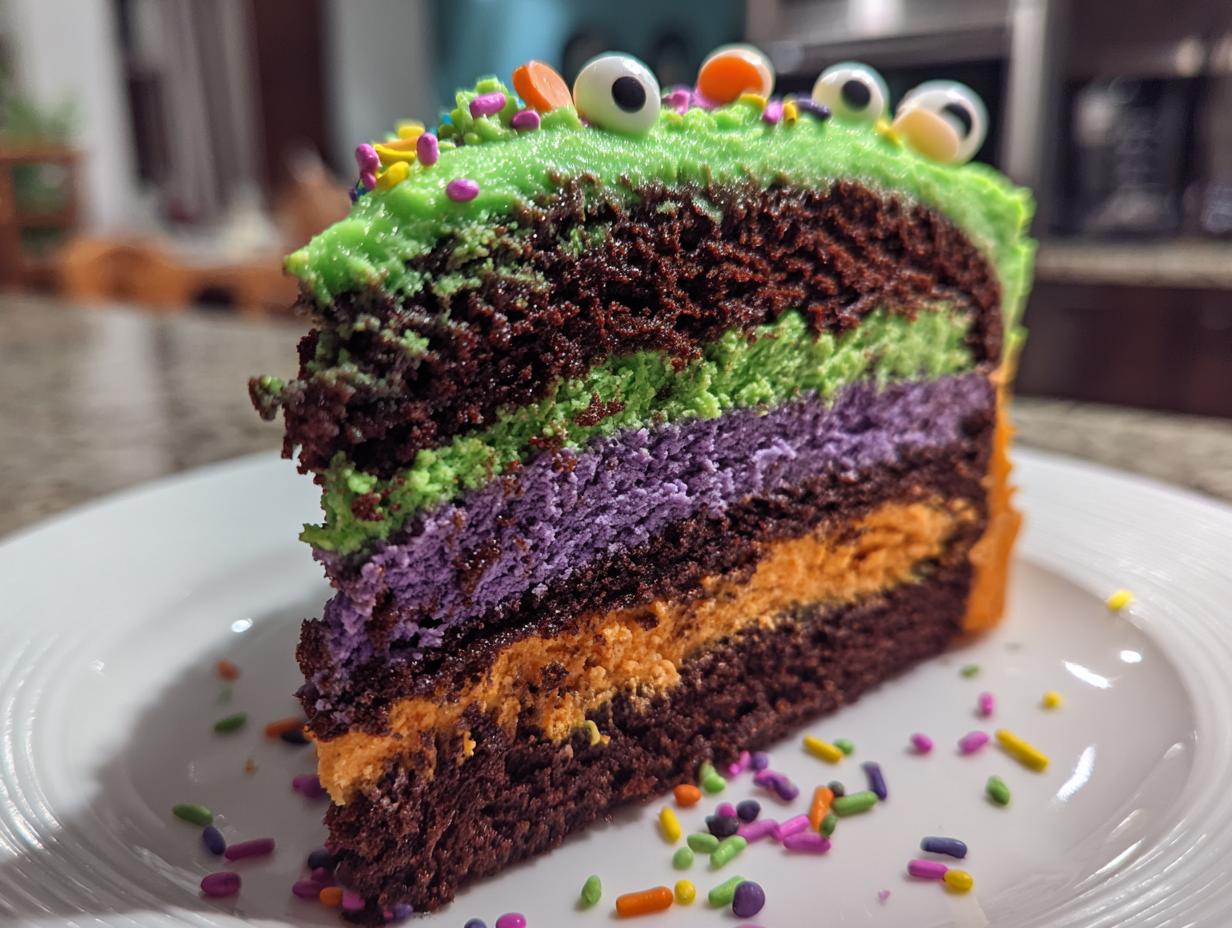
- Festive colors that pop: Swirling green, purple, and orange frosting makes it instantly recognizable as Halloween magic
- Simple decorating wins: No fancy piping skills needed—just smear on the colors and let candy eyes do the work
- Total crowd-pleaser: Kids adore the monster theme, while adults go crazy for the rich chocolate layers
- Perfect make-ahead: Bake the cake one day, decorate the next—no last-minute stress before your party
The secret? That vinegar in the batter makes the chocolate layers extra tender, while the tri-color frosting looks way more complicated than it actually is. I’ve watched even the most baking-challenged friends pull this off flawlessly!
Monster Mash Layer Cake Ingredients
Gather these simple ingredients to create your spooky masterpiece. I’ve grouped them by cake and frosting components so you can assemble everything easily before starting. Trust me – having everything prepped makes the whole process way more fun (and less messy when those food colors come out)!
For the Cake Layers:
- 2 cups all-purpose flour (spooned and leveled – don’t pack it!)
- 1 cup granulated sugar
- 1/2 cup unsweetened cocoa powder (I prefer natural over Dutch process for this)
- 1 teaspoon baking soda
- 1/2 teaspoon salt
- 1 cup water (room temp works fine)
- 1/3 cup vegetable oil
- 1 teaspoon pure vanilla extract
- 1 tablespoon white vinegar (yes, really!)
For the Monster Frosting:
- 1 cup unsalted butter, softened (that’s 2 sticks – leave out for 30 minutes)
- 4 cups powdered sugar (sifted to avoid lumps)
- 2 teaspoons vanilla extract
- 2-3 tablespoons milk or cream (start with 2)
- Green, purple, and orange gel food coloring (liquid works but gel gives better color)
For Decorating:
- Assorted Halloween decorations (candy eyes make it monster-tastic!)
- Festive sprinkles (the crazier the better)
- Black licorice for spider legs (optional but so fun)
Ingredient Notes & Substitutions
That vinegar isn’t a typo – it reacts with the baking soda to give our cake perfect lift. For dietary needs: swap butter for vegan sticks and use almond milk. Gluten-free 1:1 flour works great too! Want natural colors? Try beet powder for pinkish-purple, turmeric for orange, and matcha for green (mix with white frosting). The key is using gel food coloring though – just a drop gives vibrant monster-worthy hues without thinning your frosting. And don’t skimp on the vanilla – it balances all that chocolatey goodness!
How to Make Monster Mash Layer Cake
Ready to create your monster masterpiece? Follow these simple steps – I promise it’s easier than carving a pumpkin! The secret is taking your time with each part, especially letting those cake layers cool completely. Nobody wants melted monster frosting!
- Heat things up: Preheat oven to 350°F (175°C). Grease two 9-inch round pans and dust with cocoa powder (no white flour spots on our chocolate cake!)
- Mix dry ingredients: In a big bowl, whisk together flour, sugar, cocoa powder, baking soda and salt – get out all those cocoa lumps!
- Add the wet team: Pour in water, oil, vanilla and vinegar. Mix just until smooth – overmixing makes tough monsters!
- Bake to perfection: Divide batter between pans. Bake 30-35 minutes until a toothpick comes out clean. Let cool 10 minutes in pans, then flip onto racks to cool completely (this is crucial!)
- Whip up the frosting: Beat butter until creamy. Gradually add powdered sugar, then vanilla and milk. Divide into three bowls and tint them your monster colors (gel colors work best!)

Decorating Your Monster Mash Layer Cake
Now for the fun part – bringing your monster to life! Place one cooled layer on your plate and slather with green frosting (monster skin, obviously!). Carefully top with the second layer. Here’s my pro tip: use a butter knife to randomly smear the purple and orange frostings around the sides – messy is good here! Press candy eyes into the frosting while it’s still soft. Scatter Halloween sprinkles like monster freckles, or get creative with licorice spider legs crawling up the sides. Want extra drama? Pipe “monster scars” with black frosting! The crazier it looks, the better – after all, monsters weren’t made in baking school!
Monster Mash Layer Cake Success Tips
Want your Monster Mash Layer Cake to turn out perfectly spooky every time? Here are my tried-and-true tricks from years of Halloween baking disasters (yes, I’ve had a few cake-tastrophes!):
- Oven thermometer is your BFF: That “350°F” needs to be exact – chocolate cakes are picky! I keep a cheap oven thermometer hanging inside mine because dials lie.
- Frosting too thick or thin? Test a spoonful – it should hold its shape but spread easily. Add milk drop by drop if stiff, or more powdered sugar if runny. Pro tip: Chilling the bowl helps firm up frosting fast!
- Gel colors = monster magic: Those liquid food colorings? They’ll turn your frosting into soup. Gel gives intense monster hues without changing texture. Start with toothpick dots – these colors pack a punch!
- Crumb coat first: A thin layer of frosting seals in crumbs before the colorful top coat. Think of it as monster makeup primer!
Remember – the messier your Monster Mash Layer Cake looks, the more authentically monstrous! Those “imperfections” just add character.

Storing Your Monster Mash Layer Cake
This monster likes to hang around! Keep your cake covered at room temperature for up to 2 days – just tuck it under a cake dome or overturned bowl. For longer storage (up to 5 days), refrigerate in an airtight container. The frosting might sweat a little coming to room temp, but those candy eyes will still stare right through you!
Monster Mash Layer Cake Nutrition
Nutritional values are estimates only. Per slice: 450 calories, 35g sugar, 18g fat (8g saturated), 65g carbs, 2g fiber, 3g protein, 220mg sodium, 30mg cholesterol. Made with standard ingredients and servings may vary based on decoration amounts. Enjoy your monster treat guilt-free—it’s Halloween after all!
Monster Mash Layer Cake FAQs
I’ve fielded so many questions about this cake from friends that I could probably write a Monster Mash troubleshooting manual! Here are the answers to the ones I get asked most:
Can I make cupcakes instead of a layer cake?
Absolutely! This batter makes about 18 perfectly monstrous cupcakes. Just fill liners 2/3 full and bake at the same temperature for 18-20 minutes. The decorating fun gets even better with individual monster faces on each one!
How do I get those crazy-bright monster colors?
Oh honey, we’ve all been there with those sad pastel frostings! The secret weapon is gel food coloring – that stuff is like neon paint for bakers. The little squeeze bottles at craft stores last forever. Start with a toothpick dip of color and add more as needed. My purple still shocks people every year!
Can I freeze this cake for later?
You bet! Wrap the unfrosted cake layers tightly in plastic, then foil, and they’ll haunt your freezer happily for up to 3 months. Thaw overnight in the fridge before frosting. The frosting itself freezes great too – just rewhip it with a splash of milk to bring it back to life.

Spooky Monster Mash Layer Cake Recipe That Will Haunt Your Taste Buds
- Total Time: 1 hour 15 minutes (includes cooling)
- Yield: 12 servings 1x
- Diet: Vegetarian
Description
A fun and festive layer cake inspired by the classic Halloween song, perfect for parties and celebrations.
Ingredients
- 2 cups all-purpose flour
- 1 cup granulated sugar
- 1/2 cup cocoa powder
- 1 tsp baking soda
- 1/2 tsp salt
- 1 cup water
- 1/3 cup vegetable oil
- 1 tsp vanilla extract
- 1 tbsp vinegar
- 1 cup butter, softened
- 4 cups powdered sugar
- 2 tsp vanilla extract
- 2–3 tbsp milk
- Green, purple, and orange food coloring
- Assorted Halloween decorations (candy eyes, sprinkles, etc.)
Instructions
- Preheat oven to 350°F (175°C). Grease and flour two 9-inch round cake pans.
- In a large bowl, whisk together flour, sugar, cocoa, baking soda, and salt.
- Add water, oil, vanilla, and vinegar. Mix until smooth.
- Divide batter evenly between prepared pans. Bake for 30-35 minutes or until a toothpick comes out clean.
- Cool cakes in pans for 10 minutes, then transfer to wire racks to cool completely.
- For frosting: Beat butter until creamy. Gradually add powdered sugar, vanilla, and milk until smooth.
- Divide frosting into three bowls. Tint one green, one purple, and one orange.
- Place one cake layer on a serving plate. Spread with green frosting. Top with second layer.
- Frost sides with alternating colors. Decorate with Halloween candies and sprinkles.
Notes
- For a firmer frosting, refrigerate for 30 minutes before decorating
- Cake can be made 1 day ahead – store covered at room temperature
- Use gel food coloring for brighter colors
- Prep Time: 30 minutes
- Cook Time: 35 minutes
- Category: Dessert
- Method: Baking
- Cuisine: American
Nutrition
- Serving Size: 1 slice
- Calories: 450
- Sugar: 35g
- Sodium: 220mg
- Fat: 18g
- Saturated Fat: 8g
- Unsaturated Fat: 7g
- Trans Fat: 0g
- Carbohydrates: 65g
- Fiber: 2g
- Protein: 3g
- Cholesterol: 30mg