There’s something magical about baking cookies that look like they were plucked straight from a misty graveyard under a full moon. These Moonlit Graveyard Cookies are my go-to for Halloween—spooky, simple, and just sweet enough to disappear faster than a ghost in the night. I’ve been making them for years, ever since my niece begged me for “the creepiest cookies ever” for her costume party. Now, they’re a must-have every October. The best part? They’re easy enough for beginners but look like they took hours of haunted effort. Trust me, one bite and you’ll be hooked!

Why You’ll Love These Moonlit Graveyard Cookies
Let me tell you why these cookies are my absolute favorite for Halloween—and why they’ll become yours too. First, they’re so easy to make, even if baking isn’t your usual thing. Just mix, shape, and bake—no fancy skills needed. Second, they’re a total showstopper at parties. Imagine the oohs and ahhs when you bring out a tray of these eerie, moonlit treats! Want them extra spooky? A few drops of black food coloring transforms them into shadowy delights. And that crumbly texture? Pure magic with every bite. You’ll see—these cookies vanish faster than a ghost in the night!
Moonlit Graveyard Cookies Ingredients
Alright, let’s gather our eerie ingredients – and trust me, measuring exactly matters here unless you want cookie ghosts that crumble into dust! You’ll need:
- 2 cups all-purpose flour (spooned gently into the cup and leveled off – no packing!)
- 1 cup granulated sugar (yes, the full cup – we want these sweetly sinister)
- 1/2 cup unsalted butter, softened (leave it out for 30 minutes – cold butter won’t cream right)
- 1 large egg (room temperature is ideal)
- 1 tsp pure vanilla extract (imitation just won’t haunt the same way)
- 1/2 tsp baking powder (freshness counts – check your dates!)
- 1/4 tsp fine salt (the secret flavor booster)
- Black gel food coloring (optional but so fun for midnight-dark cookies)

Ingredient Notes & Substitutions
Need to tweak things? I’ve got you covered:
For dairy-free: Swap butter with vegan sticks (I like Earth Balance). Gluten-free? Try a 1:1 flour blend, but add 1 tbsp cornstarch for that perfect crumbly texture.
Want really dark cookies? Replace 1/4 cup flour with black cocoa powder – they’ll look like they baked under a new moon! Out of food coloring? Activated charcoal works (just 1/2 tsp!), though it tastes earthy. For more information on food coloring, you can check out FDA guidelines on food colors.
Pro tip: Natural dyes (like squid ink) sound cool but can make cookies taste… questionable. Stick with gel colors for best results!
How to Make Moonlit Graveyard Cookies
Okay, let’s get spooky! First, preheat your oven to 350°F (175°C) – this gives it time to reach the perfect haunting temperature while we mix. Grab your trusty mixer (or strong arms and a wooden spoon) and cream that softened butter with sugar until it’s pale and fluffy – about 2 minutes should do it. Crack in the egg and vanilla, mixing until just combined. Now, whisk together all your dry ingredients in a separate bowl (this prevents baking powder lumps – trust me, I’ve learned the hard way!). Slowly add the dry mixture to the wet ingredients, mixing until a dough forms. Want those midnight-black cookies? Now’s the time to add your black food coloring gel – start with a few drops and knead it in until you get that perfect eerie shade!
Shaping and Baking the Cookies
Here’s where the magic happens! Roll tablespoon-sized portions of dough into balls between your palms – they’ll look like little moons. Place them on a parchment-lined baking sheet about 2 inches apart. Gently flatten each ball with the bottom of a glass (I dip mine in sugar first to prevent sticking). Bake for 10-12 minutes – you’ll know they’re done when the edges just start turning golden but the centers still look slightly soft. Let them cool on the sheet for 5 minutes before transferring to a wire rack – this patience prevents ghostly crumbles!

Tips for Perfect Moonlit Graveyard Cookies
Want bakery-worthy results every time? Here are my hard-earned secrets! If your dough feels sticky after mixing (especially with food coloring), pop it in the fridge for 30 minutes – chilled dough holds its eerie shapes better. Always use parchment paper – it prevents spreading and gives you those crisp bottoms. Rotate your baking sheet halfway through for even browning, because oven hotspots can make some cookies look more “burnt ghost” than “moonlit.” And for the love of Halloween, don’t overbake! Pull them when the edges are just set – they’ll firm up as they cool into that perfect graveyard texture.
Serving and Storing Moonlit Graveyard Cookies
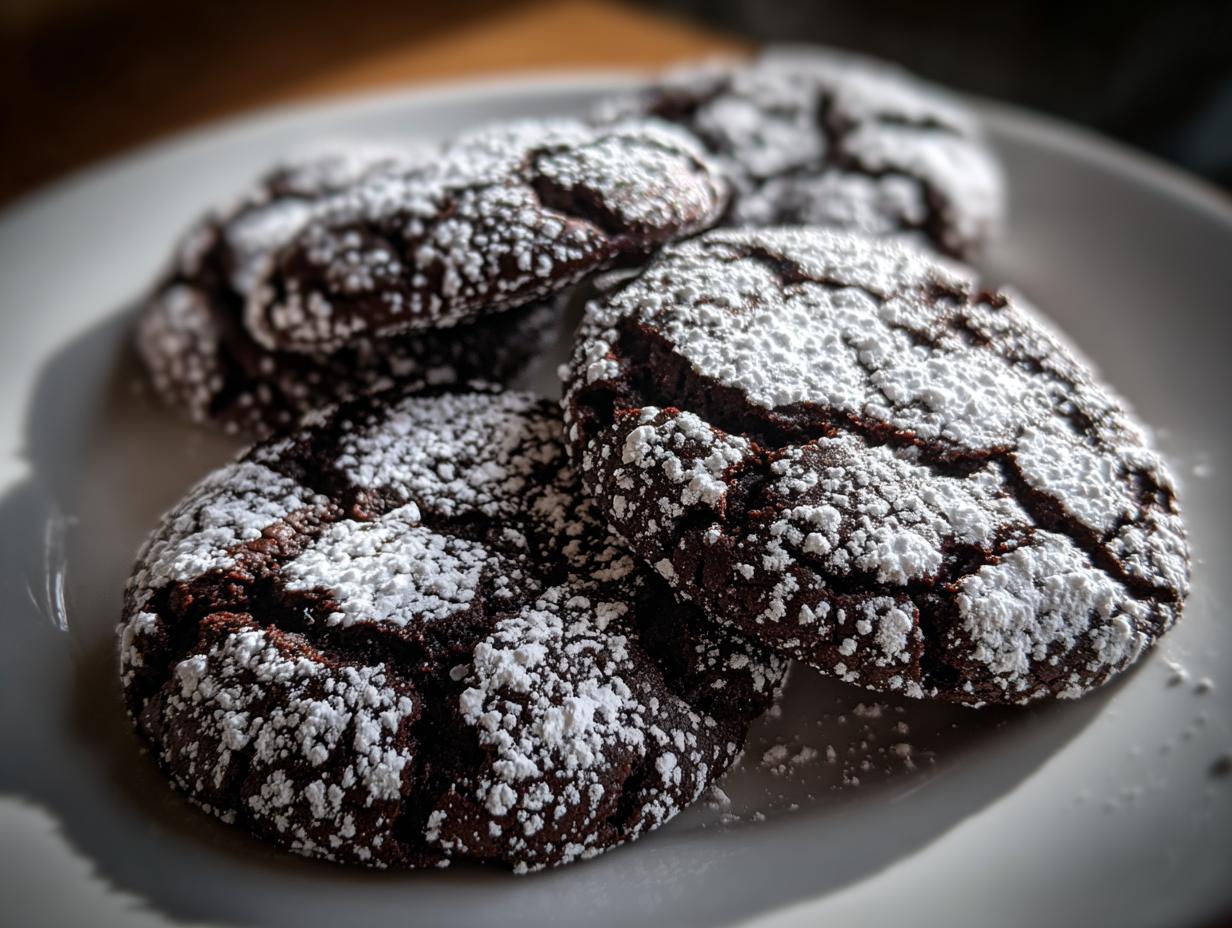
Right before serving, I love giving these cookies their final ghostly touch – a light dusting of powdered sugar! It looks like moonlit frost settling on tombstones. Just sift it through a fine mesh strainer for that perfect misty effect. Store leftovers (if you have any!) in an airtight container at room temperature – they’ll stay fresh for up to a week. Want to prep ahead? The dough freezes beautifully too – just roll into balls and freeze raw on a sheet before transferring to a freezer bag. Spooky goodness whenever the craving strikes!
Moonlit Graveyard Cookies Nutritional Information
Now, let’s talk about what’s lurking in these tasty treats—nutritionally speaking, of course! While we’re all here for the spooky fun, I know some folks like to keep an eye on what they’re eating (especially after devouring three cookies… not that I’ve ever done that).
These cookies are pretty standard as desserts go—you’ve got your carbs from the flour and sugar, some fat from the butter, and just enough egg to hold everything together. The black food coloring adds drama but zero calories, which is my kind of magic trick!
Important note: All nutritional values are estimates—your exact numbers might vary based on ingredient brands and how big you make your cookies. My “tablespoon-sized” balls sometimes grow to “oh-come-on-that’s-definitely-two-cookies” size when I’m not looking!
Moonlit Graveyard Cookies FAQs
Can I make these cookies gluten-free? Absolutely! Just swap the all-purpose flour with your favorite 1:1 gluten-free baking blend. I recommend adding 1 tablespoon of cornstarch to keep that perfect crumbly texture—trust me, no one will suspect they’re GF!
How can I get really DARK black cookies? Two secrets: First, use black cocoa powder (swap 1/4 cup flour for it). Second, add gel food coloring plus 1/2 tsp activated charcoal powder (food-grade!). Warning: natural dyes like squid ink may alter the taste.
Can I freeze these after baking? You bet! Freeze cooled cookies in a single layer first, then store in airtight bags for up to 3 months. Thaw at room temperature—they’ll taste freshly baked! The dough freezes beautifully too (just roll into balls first).
Why did my cookies spread too much? Oops! Your butter was probably too soft. Next time, chill dough for 30 minutes before baking. Also, check your baking powder—old ones lose their rising power! For tips on baking, check out this guide on ingredient substitutions.

Share Your Creations!
I’d love to see your spooky masterpieces! Snap a pic of your Moonlit Graveyard Cookies and tag me—nothing makes me happier than seeing how you’ve brought these eerie treats to life in your own kitchen. Happy baking, and may your cookies be delightfully haunted!
Print
15 Spooky Moonlit Graveyard Cookies to Haunt Your Halloween
- Total Time: 27 minutes
- Yield: 24 cookies 1x
- Diet: Vegetarian
Description
Delicious cookies inspired by the mystery of moonlit graveyards. Perfect for Halloween or themed parties.
Ingredients
- 2 cups all-purpose flour
- 1 cup granulated sugar
- 1/2 cup unsalted butter
- 1 egg
- 1 tsp vanilla extract
- 1/2 tsp baking powder
- 1/4 tsp salt
- Black food coloring (optional)
Instructions
- Preheat oven to 350°F (175°C).
- Cream butter and sugar together.
- Add egg and vanilla, mix well.
- Combine dry ingredients in separate bowl.
- Gradually mix dry ingredients into wet mixture.
- Add food coloring if desired.
- Roll dough into balls and flatten on baking sheet.
- Bake for 10-12 minutes.
Notes
- Store in airtight container for up to 1 week.
- For extra effect, dust with powdered sugar after baking.
- Prep Time: 15 minutes
- Cook Time: 12 minutes
- Category: Dessert
- Method: Baking
- Cuisine: American
Nutrition
- Serving Size: 1 cookie
- Calories: 120
- Sugar: 8g
- Sodium: 35mg
- Fat: 5g
- Saturated Fat: 3g
- Unsaturated Fat: 2g
- Trans Fat: 0g
- Carbohydrates: 17g
- Fiber: 0g
- Protein: 1g
- Cholesterol: 20mg