Is there anything more delightfully spooky than pulling a tray of freshly baked mummy wrapped cookies from the oven? Every Halloween, my kitchen transforms into a cookie mummy-wrapping station, with kids giggling as they drizzle white chocolate “bandages” across the warm cookies. These adorable treats became our family tradition after one disastrous attempt at pumpkin-shaped cookies – turns out, shaky little hands make perfect messy mummy wraps!
The magic of these cookies isn’t just in how cute they look (though watching candy eyes peer through chocolate wraps never gets old). It’s how something so simple – basic cookie dough and melted chocolate – creates such showstopping Halloween magic. Last year, my niece declared them “the best cookies ever” while carefully placing each eye, her tongue sticking out in concentration. That’s when I knew this recipe was special.
Whether you’re hosting a monster mash or just want to surprise your family with something fun, these mummy wrapped cookies always disappear faster than a ghost in the night. And trust me – the messier the chocolate drizzle, the more authentically “mummy” they look!
Why You’ll Love These Mummy Wrapped Cookies
These aren’t just cookies – they’re edible Halloween magic that’ll have everyone reaching for seconds. Here’s why they’ve become my go-to spooky season treat year after year:
Fun for All Ages
Watching my kids’ faces light up as they “wrap” the cookies never gets old. The best part? Adults love decorating them just as much! Last Halloween, my book club turned into an impromptu cookie-decorating party, with grown women giggling like schoolgirls over whose mummy looked silliest.
Quick and Simple Ingredients
No fancy trips to specialty stores needed here – just butter, flour, sugar, and chocolate you likely already have. My secret? Keeping a bag of candy eyes year-round (they’re irresistible on pancakes too). The dough comes together faster than you can say “Boo!”
- Perfect for last-minute Halloween parties
- Messy hands = happy memories
- Impressively cute with minimal effort
Seriously, if I can make these look presentable after three cups of pumpkin spice coffee, anyone can!
Ingredients for Mummy Wrapped Cookies
Gather these simple ingredients – you probably have most in your pantry already! The magic is in how you combine them:
- 1 cup all-purpose flour (spooned and leveled – no packed flour here!)
- 1/2 cup unsalted butter, softened just enough that your finger leaves a slight dent
- 1/4 cup granulated sugar – yes, just a quarter cup makes them perfectly sweet
- 1 large egg yolk (save the white for breakfast!)
- 1 tsp pure vanilla extract – the good stuff makes all the difference
- 1/4 tsp fine sea salt to balance the sweetness
- 1/2 cup white chocolate chips for melting (or a chopped bar if you’re fancy)
- 24 candy eyes (about 2 per cookie – but who’s counting?)
Equipment You’ll Need
No fancy gadgets required – just grab these kitchen basics (most already in your drawers!):
- Mixing bowl – any medium-sized one will do, though I’m partial to my grandma’s chipped yellow one
- Baking sheet lined with parchment paper (trust me, the cleanup is way less scary this way)
- Piping bag or ziplock with a tiny corner snipped off for perfect mummy bandage drizzles
- Small spoon for when little hands inevitably “accidentally” eat half the chocolate
That’s it! Though I won’t judge if you add a Halloween apron for full spooky baking vibes.
How to Make Mummy Wrapped Cookies
Don’t let the adorable mummy faces fool you – these spooky treats come together with just a few simple steps. The key is taking it slow, especially when little hands are helping. Here’s exactly how we make ours every Halloween:
Step 1: Prepare the Cookie Dough
First, grab that softened butter (if you forgot to take it out early, 15 seconds in the microwave at 50% power works in a pinch – just don’t tell Grandma!). Cream it with the sugar in your mixing bowl until it looks pale and fluffy. This takes about 2 minutes with a hand mixer, or 3-4 minutes by hand if you need to work off some pre-candy energy.
Beat in the egg yolk and vanilla until everything’s combined – it’ll smell heavenly already! Then gently mix in the flour and salt just until no dry streaks remain. The dough should be soft but not sticky. If it clings to your fingers like spiderwebs, pop it in the fridge for 15 minutes to firm up.
Step 2: Shape and Bake the Cookies
Roll tablespoon-sized portions of dough between your palms – they should be slightly smaller than ping pong balls. Place them on your parchment-lined baking sheet, then press each gently with your palm to flatten into rustic circles (perfectly round cookies would be way too modern for mummies!).
Bake at 350°F for 10-12 minutes until the edges turn golden like autumn leaves. The tops will still look soft – that’s perfect! Let them cool completely on the baking sheet. Trying to decorate warm cookies leads to melty chocolate disasters (learned that the hard way!).

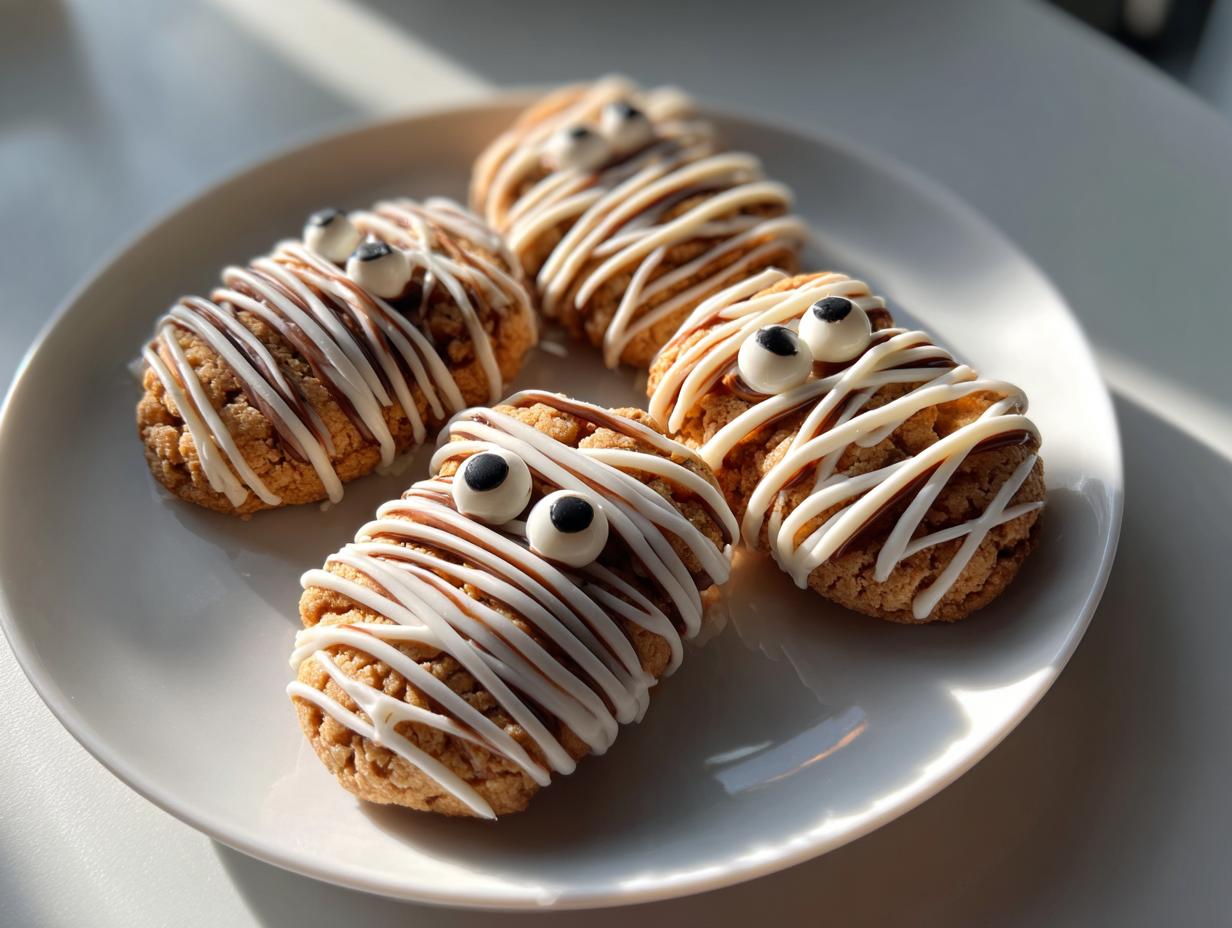
Step 3: Decorate Like Mummies
Melt your white chocolate slowly in the microwave (30 second bursts, stirring between each) until it’s smooth as a ghost’s sheet. Transfer to your piping bag or ziplock with a tiny corner cut off – about 1/8 inch opening makes perfect “bandage” lines.
Now the fun begins! Squiggle chocolate across each cookie in random zigzags, leaving little gaps to peek through like ancient wrappings. Immediately press on candy eyes while the chocolate’s still soft – I use about two per cookie, but some of ours end up with three eyes (alien mummies are totally a thing). Let the chocolate set completely before serving – if you can resist!

Pro Tips for Perfect Mummy Wrapped Cookies
After years of wrapping cookie mummies (and plenty of hilarious fails), I’ve learned these tricks make all the difference between “spooky cute” and “spooky mess”:
Chill that dough! If your dough feels sticky, 30 minutes in the fridge makes it much easier to handle. I once tried skipping this step and ended up with mummies that looked more like blobs – not the vibe we wanted!
No piping bag? A plastic ziplock with the tiniest corner snipped off works great. Or go old-school – use a fork to drizzle chocolate in quick back-and-forth motions. The messier it looks, the more authentic the mummy effect!
Trouble with eyes? If your candy eyes won’t stick, dab a tiny bit of melted chocolate first as “glue.” Bonus: This prevents them from sliding off when little fingers grab them!
Variations and Serving Ideas
Once you’ve mastered the classic mummy look, try these fun twists to make your cookies extra spooktacular! My kids love when I mix orange sanding sugar into the white chocolate drizzle – it looks like glowing mummy wrappings under blacklight (perfect for teen parties).
For a grown-up Halloween gathering, sandwich two cookies with orange marmalade to create “mummy macabres” – the jam peeking through the chocolate cracks looks eerily awesome. Serve them with witch’s brew punch (just grape juice and ginger ale with gummy worms) for maximum effect.
- Monster mash-up: Add green food coloring to half the dough for Frankenstein versions
- Spooky sparkle: Dust with edible glitter before the chocolate sets
- Coffin platter: Arrange cookies on a black slate with candy bones

The best part? However you decorate them, they’ll disappear faster than a vampire at sunrise!
Storing and Freezing Instructions
These cookies stay fresh in an airtight container at room temperature for up to 3 days – if they last that long! For longer storage, freeze the undecorated cookies between layers of parchment paper for up to 2 months. Thaw completely before adding your chocolate wraps and googly eyes. The dough balls freeze beautifully too – just bake as needed for fresh mummy magic all season!
Mummy Wrapped Cookies FAQs
Can I use dark chocolate instead of white?
Absolutely! Dark chocolate makes for some seriously spooky mummy wraps – kind of like they’ve been buried in an ancient tomb. Just know the flavor will be richer, and I’d recommend smaller drizzle lines since dark chocolate tends to spread more. Pro tip: Add a pinch of orange zest to the melted chocolate for a hauntingly good combo!
Help! My icing is too runny – what do I do?
Don’t panic! If your melted chocolate feels more like soup than drizzle, just stir in a teaspoon of powdered sugar at a time until it thickens. Or pop it in the fridge for 5 minutes – works like magic. I’ve saved many a mummy this way after getting overzealous with microwave melting!
Can I make these cookies ahead of time?
You sure can! The cookies themselves stay fresh for days, but I recommend adding the chocolate wraps and eyes no more than a day before serving. The candy eyes tend to get weepy if they sit too long. My Halloween-eve routine? Bake cookies after dinner, then let the kids decorate them in the morning!
No candy eyes – any substitutions?
Get creative! Mini chocolate chips pointy-side up make great beady eyes. Or pipe little dots of icing – they’ll look like mummies peering through thick bandages. One year I used sliced almonds for a skeletal look (those disappeared first at the party!).
Why do my cookies spread too much?
Chances are your butter was too soft or the dough needed chilling. Next time, try refrigerating the shaped cookies for 15 minutes before baking. And always use a cool baking sheet – rotating between two pans prevents spread from residual heat. Your mummies will stay perfectly wrapped!
Nutritional Information
Each mummy wrapped cookie clocks in at about 120 calories – give or take, depending on how generously you drizzle that chocolate! Remember, these values are estimates; your ingredients may vary slightly. Now go enjoy your spooky treats guilt-free – it’s Halloween, after all!
Share Your Spooky Creations!
Nothing makes my Halloween happier than seeing your cookie mummies come to life! My kitchen walls are covered with photos of readers’ creations – from perfectly wrapped professional-looking mummies to adorable toddler-drizzled blobs (those are my favorites). If you snap a picture of your spooky treats, I’d squeal like a ghost to see them – find me @SpookyBaker on Instagram where I share the most creative mummy transformations each year. Who knows – your cookies might inspire next year’s batch!
Print
Spooky 24 Mummy Wrapped Cookies Kids Love to Make
- Total Time: 32 mins
- Yield: 12 cookies 1x
- Diet: Vegetarian
Description
Fun and spooky Halloween cookies shaped like mummies, perfect for parties.
Ingredients
- 1 cup all-purpose flour
- 1/2 cup unsalted butter, softened
- 1/4 cup granulated sugar
- 1 egg yolk
- 1 tsp vanilla extract
- 1/4 tsp salt
- 1/2 cup white chocolate, melted
- Candy eyes for decoration
Instructions
- Preheat oven to 350°F (175°C).
- Mix flour, butter, sugar, egg yolk, vanilla, and salt in a bowl.
- Roll dough into small balls and flatten into cookie shapes.
- Bake for 10-12 minutes until edges are golden.
- Let cookies cool completely.
- Drizzle melted white chocolate in zigzag lines to create mummy wraps.
- Add candy eyes while chocolate is still soft.
- Let chocolate set before serving.
Notes
- Chill dough for 30 minutes if too sticky.
- Use a piping bag for neat chocolate lines.
- Store in an airtight container for up to 3 days.
- Prep Time: 20 mins
- Cook Time: 12 mins
- Category: Dessert
- Method: Baking
- Cuisine: American
Nutrition
- Serving Size: 1 cookie
- Calories: 120
- Sugar: 8g
- Sodium: 50mg
- Fat: 6g
- Saturated Fat: 3.5g
- Unsaturated Fat: 2g
- Trans Fat: 0g
- Carbohydrates: 15g
- Fiber: 0.5g
- Protein: 1.5g
- Cholesterol: 25mg