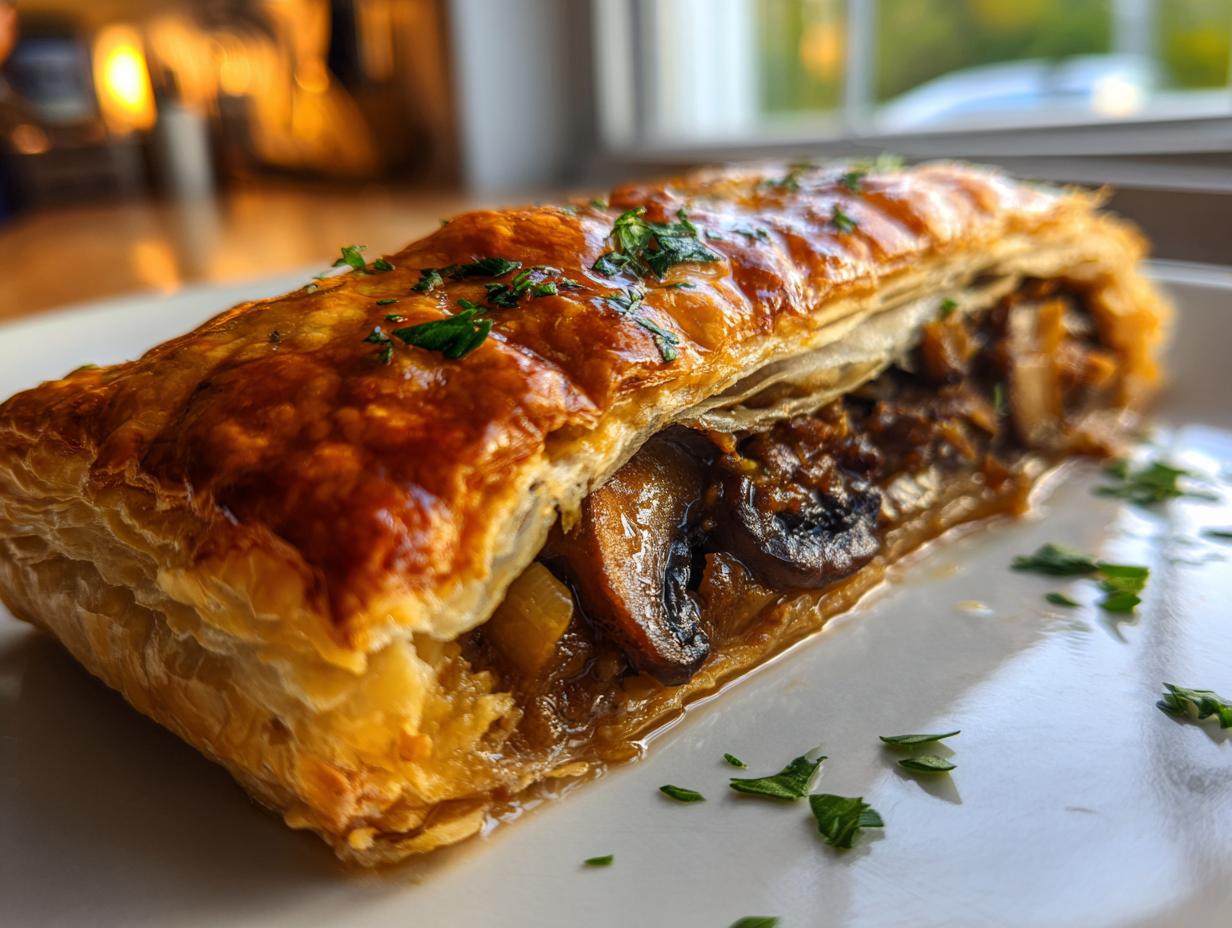
Oh my goodness, let me tell you about the first time I tried Mushroom Wellington – it was love at first bite! My aunt served it at Christmas dinner years ago, and I still remember how everyone’s eyes lit up when she brought out this golden, flaky masterpiece. The puff pastry cracked perfectly under my fork, revealing that incredible mushroom filling packed with earthy, savory goodness. Honestly, I couldn’t believe something vegetarian could taste so rich and satisfying!
Now it’s my go-to showstopper dish when I want to impress guests (or just treat myself). There’s something magical about how simple ingredients – mushrooms, herbs, and that buttery pastry – transform into something so elegant. Whether you’re cooking for vegetarians or meat-lovers, this Wellington never fails to wow. And the best part? It’s way easier to make than it looks!
Why You’ll Love This Mushroom Wellington
Trust me, this isn’t just another vegetarian dish – it’s a total game changer! Here’s why it’s become my signature recipe:
- Looks fancy but secretly easy – That golden puff pastry crust makes everyone think you spent hours in the kitchen
- Umami bomb – The mushroom filling delivers such deep, savory flavor even meat-lovers go crazy for it
- Perfect for special occasions – Slicing into that flaky pastry never fails to impress dinner guests
- Customizable – Play with different mushroom mixes and herbs to make it your own
Seriously, once you try this, you’ll understand why I make it at least once a month!
Ingredients for Mushroom Wellington
Okay, here’s the beautiful part – you probably have most of these ingredients already! But let me share exactly what makes my version special. After testing this recipe dozens of times, I’ve learned which little details make all the difference.
- 500g mixed mushrooms – I love using cremini, shiitake, and oyster for depth (but plain button mushrooms work too!)
- 1 sheet puff pastry – Thawed overnight in the fridge – trust me, don’t rush this!
- 1 large onion, diced – The yellow ones caramelize beautifully
- 2 cloves garlic, minced – Fresh is best, none of that jarred stuff
- 1 tbsp olive oil – Plus extra for brushing if needed
- 1 tsp each thyme & rosemary – Fresh if you’ve got it, dried works in a pinch
- Salt & pepper – To taste, but be generous!
- 1 egg, beaten – For that gorgeous golden sheen
Pro tip: Measure everything before you start – once that pastry comes out, you’ll want to move quickly!
How to Make Mushroom Wellington
Alright, let’s get to the fun part! Making this Wellington is like assembling a delicious little present – and I promise, it’s easier than you think. Just follow these steps, and you’ll have a golden, flaky masterpiece in no time.
Preparing the Mushroom Filling
First, grab your biggest skillet – seriously, mushrooms shrink but start out bulky! Heat the olive oil over medium and toss in those diced onions. Cook them until they’re soft and just starting to caramelize, about 5 minutes. Now add the garlic (your kitchen will smell amazing!) and cook for another minute until fragrant.
Here’s the key: add your mushrooms in batches if your pan isn’t huge. Crowding them makes them steam instead of brown. Stir in the thyme, rosemary, salt, and pepper, then let everything cook down until the mushrooms release their liquid and it evaporates – about 10-12 minutes. You want a thick, almost paste-like consistency. Let this cool slightly while you prep the pastry.

Assembling the Wellington
Roll out your puff pastry on a lightly floured surface until it’s about 12×16 inches. Spread the mushroom mixture down the center, leaving a 2-inch border all around. Now comes the fun part – fold those edges up and over the filling like you’re wrapping a gift!
Use a fork to crimp the edges really well – this prevents leaks. I like to give it a quick chill in the fridge for 10 minutes at this point (helps keep its shape). Then brush the whole thing with beaten egg for that gorgeous golden color. If you’re feeling fancy, you can even score a little pattern on top with a knife!

Baking Your Mushroom Wellington
Pop it in the preheated oven (middle rack is best) and bake for 25-30 minutes. You’ll know it’s done when it’s puffed up and beautifully golden brown – like a little edible work of art! Here’s my secret: let it rest for 5 minutes before slicing. I know it’s hard to wait, but this helps the filling set so you get perfect slices.
Tips for Perfect Mushroom Wellington
After making this recipe more times than I can count, I’ve learned all the little tricks that take it from good to restaurant-quality! Here’s my hard-earned wisdom:
Dry those mushrooms! After washing, pat them thoroughly with paper towels – any extra moisture makes the pastry soggy. And don’t skip chilling the assembled Wellington before baking – just 10 minutes in the fridge helps the pastry hold its shape beautifully.
When slicing, use the sharpest knife you own and saw gently – this keeps those flaky layers intact. Oh, and if your edges start browning too fast? Just tent them with foil while the center finishes baking. Simple stuff, but it makes all the difference!
Mushroom Wellington Variations
One of my favorite things about this recipe is how easily you can make it your own! Here are some delicious twists I’ve tried over the years:
- Add spinach – Stir in a handful of wilted spinach with the mushrooms for extra color and nutrients
- Crunchy walnuts – Toast some chopped walnuts and mix them into the filling for wonderful texture
- Cheesy goodness – Sprinkle vegan or regular cheese over the mushroom mixture before folding
- Gluten-free option – Use gluten-free puff pastry (most major brands make one now!)
The possibilities are endless – I’ve even added caramelized onions or roasted garlic when feeling fancy. Don’t be afraid to experiment!
Serving Suggestions for Mushroom Wellington
Oh, slicing into that golden pastry is just the beginning of the fun! I love serving my Mushroom Wellington with simple sides that complement its rich flavors. Garlic mashed potatoes make the perfect cozy pairing – their creaminess balances the earthy mushrooms beautifully. For something lighter, a crisp green salad with tangy vinaigrette works wonders.
If you’re feeling fancy (which you totally should!), roasted seasonal veggies add gorgeous color to the plate. And here’s my little secret: a glass of Pinot Noir takes this meal to the next level. The wine’s subtle earthiness dances perfectly with the mushrooms. Now that’s what I call a proper feast!

Storing and Reheating Mushroom Wellington
Here’s the great news – this Wellington keeps beautifully! Let it cool completely, then wrap it tightly in foil or store in an airtight container in the fridge for up to 3 days. For longer storage, slice it before freezing (trust me, this makes life easier) and freeze for up to 2 months.
When you’re ready to enjoy it again, skip the microwave! Reheat slices in a 350°F (180°C) oven for about 10 minutes until warmed through. This brings back that wonderful crispness to the pastry. I sometimes give it a quick extra brush of egg wash before reheating for that fresh-from-the-oven glow!
Mushroom Wellington Nutritional Information
Now, I’m no nutritionist, but here’s the scoop on what’s in each delicious slice! Keep in mind these are estimates – your exact numbers might vary depending on your specific ingredients and portion sizes.
Per serving (about 1/4 of the Wellington):
- 320 calories – Not bad for such a satisfying dish!
- 18g fat – Mostly from that glorious puff pastry
- 8g protein – Thank you, mighty mushrooms!
- 30g carbs – Mostly complex carbs from the veggies
- 4g fiber – Mushrooms and onions doing their thing
Not too shabby for something that tastes this indulgent, right? And remember – it’s packed with all those wonderful nutrients from fresh mushrooms and herbs!
Mushroom Wellington FAQs
Okay, I get asked these questions ALL the time, so let me save you some trouble with my tried-and-true answers!
Can I make Mushroom Wellington ahead? Absolutely! Prepare it up to the baking step, wrap tightly in plastic, and refrigerate overnight. Just add 5 extra minutes to the bake time since it’ll be cold. I do this for dinner parties all the time!
How do I prevent soggy pastry? Two words: dry mushrooms. After washing, pat them like you’re mad at them! Also, cook the filling until nearly all liquid evaporates. A quick chill before baking helps too.
Can I freeze it? You bet – bake first, cool completely, then freeze slices separately. Reheat from frozen at 350°F for 15-20 minutes. The pastry stays surprisingly crisp!
What if my pastry tears? No panic! Just press it back together or patch with leftover dough. Once baked, no one will notice – promise!


Irresistible Mushroom Wellington Recipe in Just 30 Minutes
- Total Time: 45 mins
- Yield: 4 servings 1x
- Diet: Vegetarian
Description
A savory vegetarian dish featuring mushrooms wrapped in puff pastry.
Ingredients
- 500g mushrooms, sliced
- 1 sheet puff pastry
- 1 onion, diced
- 2 cloves garlic, minced
- 1 tbsp olive oil
- 1 tsp thyme
- 1 tsp rosemary
- Salt and pepper to taste
- 1 egg, beaten (for glaze)
Instructions
- Preheat oven to 200°C (400°F).
- Sauté onions and garlic in olive oil until soft.
- Add mushrooms, thyme, rosemary, salt, and pepper. Cook until mushrooms release moisture.
- Roll out puff pastry and spread mushroom mixture in the center.
- Fold pastry over the filling, sealing edges with beaten egg.
- Brush top with remaining egg.
- Bake for 25-30 minutes until golden brown.
Notes
- Use a mix of mushrooms for deeper flavor.
- Let the Wellington rest for 5 minutes before slicing.
- Prep Time: 15 mins
- Cook Time: 30 mins
- Category: Main Dish
- Method: Baking
- Cuisine: British
Nutrition
- Serving Size: 1 slice
- Calories: 320
- Sugar: 3g
- Sodium: 250mg
- Fat: 18g
- Saturated Fat: 5g
- Unsaturated Fat: 10g
- Trans Fat: 0g
- Carbohydrates: 30g
- Fiber: 4g
- Protein: 8g
- Cholesterol: 45mg