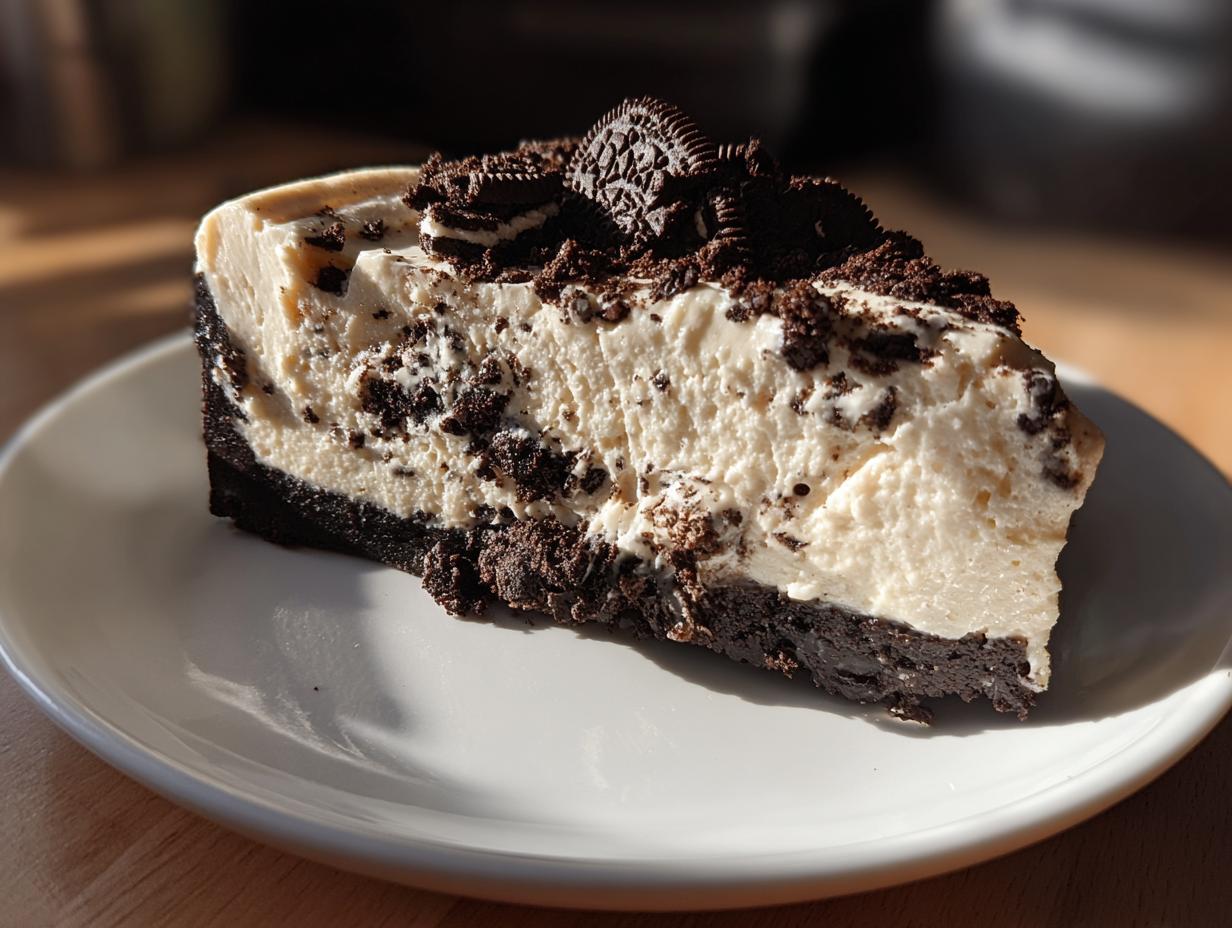
Let me tell you about my secret weapon for last-minute desserts – this ridiculously easy No Bake Oreo Cheesecake. I discovered it during one of those “oh no, guests are coming in two hours!” panic moments, and now it’s my go-to for every potluck, birthday, or “I just need chocolate” emergency. The best part? You probably have most of the ingredients already. No oven, no fuss – just creamy, dreamy Oreo goodness that sets up in the fridge while you relax. My kids think I’m a baking genius every time I make it (little do they know it’s simpler than making toast!).

Why You’ll Love This No Bake Oreo Cheesecake
Let me count the ways this cheesecake will become your new best friend:
- No oven required – Perfect for hot summer days or when your oven’s occupied
- Ready in minutes (plus chilling time) – Faster than running to the bakery
- Foolproof – Even my most baking-challenged friends nail this one
- Crowd-pleaser – Kids and adults alike go crazy for that Oreo crunch
- Customizable – Add extra cookies, drizzle chocolate, or mix in peanut butter
Seriously, it’s like cheating at dessert – but totally legal!
Ingredients for No Bake Oreo Cheesecake
Here’s what you’ll need to raid from your pantry (or make a quick grocery run for):
- 24 Oreo cookies – These get crushed into crumbs for that perfect chocolatey crust
- 4 tbsp melted butter – The glue that holds our crust together
- 16 oz cream cheese, softened – Full-fat works best here, and softened means no lumps!
- 1 cup powdered sugar – Sift it if you’re feeling fancy
- 2 tsp vanilla extract – The secret flavor booster
- 1 cup heavy whipping cream – Cold right from the fridge
- 12 Oreo cookies, crushed – Keep some chunks for texture
Pro tip: Buy an extra pack of Oreos – you’ll want to snack while you bake!
Equipment You’ll Need
Don’t worry – you won’t need any fancy gadgets for this no-bake wonder! Here’s what I always grab:
- 9-inch springform pan – The removable sides make serving a breeze
- Electric mixer – A hand mixer works great for whipping cream
- Rubber spatula – For folding in those Oreo chunks gently
- Food processor or ziplock bag – To crush cookies without making a mess
- Measuring cups/spoons – Because eyeballing powdered sugar never ends well!
That’s it! No special tools required – just basic kitchen essentials you probably already own.
How to Make No Bake Oreo Cheesecake
Okay, let’s get to the fun part – making this dreamy dessert come together! I promise it’s easier than you think. Just follow these simple steps, and you’ll have a showstopper cheesecake that looks like you spent hours on it (your secret’s safe with me).
Step 1: Prepare the Crust
First, grab those Oreos and get ready to release some stress! I usually toss them in a ziplock bag and whack them with a rolling pin (therapeutic AND productive). You want fine crumbs with just a few small chunks for texture. Mix these with melted butter until it looks like wet sand – that’s your sign it’s perfect.
Now, press this magical mixture firmly into the bottom of your springform pan. I use the bottom of a measuring cup to really pack it down evenly. Pop it in the fridge for 10 minutes while you work on the filling – this helps the crust set so it won’t crumble when you slice it later.
Step 2: Make the Filling
Here’s where the magic happens! Beat your softened cream cheese until it’s completely smooth – no lumps allowed! Then add the powdered sugar and vanilla, mixing until fluffy. Pro tip: scrape down the sides of the bowl often to make sure everything gets incorporated evenly.
In another bowl, whip that cold heavy cream until stiff peaks form. This is crucial – you want it thick enough to hold its shape when you lift the beaters. Now gently fold the whipped cream into the cream cheese mixture using a rubber spatula. Be patient here – we want to keep all that air in the whipped cream for the lightest texture possible.
Finally, stir in those crushed Oreos. I like to reserve a handful to sprinkle on top later for extra crunch!

Step 3: Assemble and Chill
Take your chilled crust from the fridge and pour in that luscious filling. Smooth the top with your spatula – don’t worry about making it perfect, those rustic swirls look gorgeous! If you saved some Oreo crumbs, now’s the time to sprinkle them on top.
Here’s the hardest part – patience! Refrigerate your masterpiece for at least 4 hours, but overnight is even better. The wait is torture, I know, but trust me – it makes all the difference in getting that perfect sliceable texture. When you’re ready to serve, just run a knife around the edge and release the springform sides. Voila – professional-looking dessert with minimal effort!
Tips for the Perfect No Bake Oreo Cheesecake
After making this cheesecake more times than I can count (okay fine, I’ve lost track because I make it weekly), here are my hard-earned secrets:
- Room temp cream cheese is non-negotiable – Leave it out for 2 hours, or microwave in 10-second bursts if you’re impatient like me
- Chill your mixing bowl – I pop mine in the freezer for 10 minutes before whipping cream – it makes peaks form faster
- Fold, don’t stir – Gentle folding motions keep the filling light and airy
- Crush Oreos unevenly – Some fine crumbs mixed with quarter-sized chunks gives amazing texture
- Resist peeking! – That fridge door stays shut for at least 4 hours – no cheating!
Follow these, and you’ll get that Instagram-perfect slice every single time!
Ingredient Substitutions & Notes
Ran out of something? No worries – here’s how to adapt without sacrificing flavor:
- Cream cheese alternatives: Full-fat Greek yogurt works in a pinch (use 3/4 cup per 8oz cream cheese), but the texture will be slightly tangier
- Gluten-free option: Swap regular Oreos for gluten-free chocolate sandwich cookies – they work beautifully!
- Heavy cream substitute: Well-chilled coconut cream whips up nicely for a dairy-free version
- Butter emergency: If you’re out, coconut oil makes a decent crust binder
Remember – substitutions change the final texture slightly, but the cheesecake will still taste amazing!
Serving Suggestions for No Bake Oreo Cheesecake
Oh, the fun part – dressing up your masterpiece! I love piling extra Oreo crumbs on top right before serving for that bakery-worthy look. A dollop of whipped cream never hurts, and for grown-up parties, try drizzling with caramel sauce. My kids insist this pairs perfectly with ice-cold milk, while I swear by strong coffee to cut through the richness. Want to get fancy? Chocolate shavings or fresh berries add gorgeous contrast against all that black-and-white deliciousness! For another great dessert idea, check out this churro cheesecake bars recipe.
Storage & Reheating
Here’s the beautiful thing about this cheesecake – it actually gets better after a day in the fridge! Just cover it tightly with plastic wrap (I press it right against the surface to prevent drying) and it’ll stay dreamy for 3-4 days. Want to save some for later? Freeze individual slices wrapped in parchment paper for up to a month – no reheating needed, just let them thaw in the fridge overnight. Pro tip: hide a slice behind the frozen peas for emergency chocolate cravings!
Nutritional Information
Okay, let’s be real – we’re not eating cheesecake for the health benefits! But since you asked, here’s the scoop (per slice, based on 8 servings):
- Calories: About 450 (worth every single one!)
- Fat: 32g (mostly from that dreamy cream cheese)
- Sugar: 30g (blame the Oreos and powdered sugar)
- Protein: 5g (surprise bonus!)
Remember, these are estimates – your exact numbers might vary based on specific ingredients. But honestly? Just enjoy every creamy, chocolaty bite guilt-free! If you are interested in learning more about food safety and storage, you can check out resources from the FDA.
FAQs About No Bake Oreo Cheesecake
I’ve gotten so many questions about this recipe over the years – here are the ones that pop up most often:
Can I freeze this cheesecake? Absolutely! It freezes beautifully for up to a month. Just wrap individual slices tightly in plastic wrap, then foil. Thaw overnight in the fridge when your sweet tooth strikes.
Will low-fat cream cheese work? Technically yes, but I don’t recommend it. Full-fat gives that luxuriously creamy texture we all love. Low-fat versions can make the filling grainy or too soft.
Help! My filling is runny – what now? Don’t panic! Pop the whole cheesecake in the freezer for 30 minutes to help it set. Next time, make sure your whipped cream reaches stiff peaks and your cream cheese is properly softened.
Can I make this ahead? That’s the beauty of it! This cheesecake actually tastes better after chilling overnight. Perfect for stress-free entertaining. For more make-ahead dessert ideas, see this easy tiramisu recipe.
Why springform pan? The removable sides make serving a breeze without wrecking your beautiful crust. If you must use a regular pan, line it with parchment paper hanging over the edges.
Did I miss your burning question? Drop it in the comments below – I love hearing how your cheesecakes turn out! And if you make this, tag me on Instagram so I can see your Oreo masterpieces!
Print
8 Irresistible No Bake Oreo Cheesecake Secrets Revealed
- Total Time: 4 hours 20 minutes
- Yield: 8 servings 1x
- Diet: Vegetarian
Description
A simple and delicious no-bake Oreo cheesecake that requires minimal effort and no oven.
Ingredients
- 24 Oreo cookies
- 4 tbsp melted butter
- 16 oz cream cheese, softened
- 1 cup powdered sugar
- 2 tsp vanilla extract
- 1 cup heavy whipping cream
- 12 Oreo cookies, crushed
Instructions
- Crush 24 Oreo cookies into fine crumbs and mix with melted butter.
- Press the mixture into the bottom of a 9-inch springform pan to form the crust.
- Refrigerate the crust for 10 minutes.
- Beat the cream cheese until smooth, then add powdered sugar and vanilla extract.
- In a separate bowl, whip the heavy cream until stiff peaks form.
- Fold the whipped cream into the cream cheese mixture.
- Gently stir in the crushed Oreo cookies.
- Spread the filling over the chilled crust.
- Refrigerate for at least 4 hours or overnight.
- Serve chilled, garnished with extra Oreo crumbs if desired.
Notes
- Use full-fat cream cheese for best results.
- Ensure the cream cheese is softened to avoid lumps.
- Chill the cheesecake thoroughly before serving.
- Prep Time: 20 minutes
- Cook Time: 0 minutes
- Category: Dessert
- Method: No Bake
- Cuisine: American
Nutrition
- Serving Size: 1 slice
- Calories: 450
- Sugar: 30g
- Sodium: 300mg
- Fat: 32g
- Saturated Fat: 18g
- Unsaturated Fat: 10g
- Trans Fat: 0g
- Carbohydrates: 40g
- Fiber: 1g
- Protein: 5g
- Cholesterol: 80mg