There’s something magical about Halloween baking – the spooky shapes, the rich flavors, and that perfect excuse to go all out with chocolate. My Peanut Butter and Chocolate Spider Web Layer Cake became a family tradition after my youngest declared it “the coolest cake ever” at her first Halloween party. Picture this: moist chocolate layers hugging a creamy peanut butter filling, all wrapped in dark chocolate with a white chocolate web that looks fancy but is secretly simple to make. It’s the kind of dessert that makes both kids and adults sneak seconds when they think no one’s looking. Every October, my kitchen smells like cocoa and giggles as we drizzle the “spider silk” across the cake – messy fingers and happy faces guaranteed.

Why You’ll Love This Peanut Butter and Chocolate Spider Web Layer Cake
This cake isn’t just delicious—it’s a Halloween showstopper that’s easier than it looks. Here’s why it’s a must-bake:
- Decadent combo: Rich chocolate cake meets creamy peanut butter filling—like your favorite candy in cake form
- WOW-factor decorating: The spider web design looks professional but takes minutes to create (trust me, I’ve messed it up and it still looks cool)
- Perfect for parties: Kids go wild for the spooky theme, while adults sneak extra slices for the flavor
- Simple assembly: Uses basic techniques—no fancy skills needed, just enthusiasm and a sweet tooth
Ingredients for Peanut Butter and Chocolate Spider Web Layer Cake
Gathering the right ingredients is half the magic! Here’s everything you’ll need, grouped by cake layers, filling, and that gorgeous spider web decoration. Pro tip: Measure everything before starting—it makes the process so much smoother when you’re in the baking zone.
For the Chocolate Cake Layers:
- 2 cups all-purpose flour (spooned and leveled—no packing!)
- 1 1/2 cups granulated sugar
- 1/2 cup unsweetened cocoa powder (I use dark cocoa for extra richness)
- 1 1/2 tsp baking powder
- 1/2 tsp baking soda
- 1/2 tsp fine sea salt
- 1 cup whole milk (room temperature)
- 1/2 cup vegetable oil
- 2 large eggs (lightly beaten)
- 2 tsp pure vanilla extract
- 1 cup boiling water (yes, really—it makes the crumb extra tender)
For the Peanut Butter Filling:
- 1 cup creamy peanut butter (must be room temperature—cold PB won’t blend smoothly)
- 1/2 cup powdered sugar (sifted to avoid lumps)
- 1/4 cup heavy cream (add slowly—you might not need it all)
For the Spider Web Decoration:
- 1 cup dark chocolate chips (quality matters here—I prefer 60% cacao)
- 1/2 cup white chocolate chips (not candy melts—real chocolate melts better)

Equipment You’ll Need
No fancy gadgets required—just these basics from your kitchen (and maybe a quick hunt through that “baking stuff” drawer):
- Two 9-inch cake pans (I swear by the non-stick kind, but grease them anyway)
- Mixing bowls (one big, one medium—glass is great for seeing if you’ve scraped the bottom)
- Electric mixer (handheld works fine, but stand mixers let you sneak tastes while it runs)
- Offset spatula (the secret weapon for smooth frosting—worth buying if you don’t have one)
- Piping bag or ziplock (snip a tiny corner for the spider web—no fancy tips needed)
That’s it! Well, plus spoons, measuring cups, and the usual suspects. Now let’s make some magic.
How to Make Peanut Butter and Chocolate Spider Web Layer Cake
Alright, let’s get to the fun part! This cake comes together in three main acts: baking those dreamy chocolate layers, whipping up the peanut butter cloud filling, and creating the spider web magic. The key? Patience between steps – I know it’s hard when your kitchen smells like a chocolate factory, but trust me, cooling time is your friend here.
Baking the Chocolate Cake Layers
First things first – preheat that oven to 350°F (175°C) and grease your pans like you mean it. I rub butter all over and dust with cocoa powder instead of flour – no white specks on our gorgeous chocolate cake!
Now, the dry team: whisk together flour, sugar, cocoa powder, baking powder, baking soda, and salt in your biggest bowl. Get out all those little cocoa lumps – they’re sneaky! In another bowl (or just a big measuring cup), mix the milk, oil, eggs, and vanilla until they’re best friends.
Here’s where the magic happens: pour the wet ingredients into the dry and mix just until combined. The batter will be thick – that’s perfect. Now the secret weapon: slowly stir in that boiling water. Yes, it’ll look crazy thin and watery, but this is what gives the cake its incredible moist texture. Just 30 seconds of gentle mixing, then divide the batter between your pans (a kitchen scale helps for perfect twins).
Bake for 30-35 minutes until a toothpick comes out with moist crumbs (not wet batter). Let them cool in the pans for 10 minutes – this prevents crumbling – then flip onto a rack to cool completely. No cheating – warm cake melts the filling into a sad puddle!
Preparing the Peanut Butter Filling
While the cakes cool, let’s make that dreamy filling. Room temperature peanut butter is non-negotiable – cold PB will clump up like a grumpy toddler. Beat it with powdered sugar until it looks like cookie dough crumbs, then drizzle in the heavy cream a tablespoon at a time. Stop when it’s fluffy like peanut butter mousse – you might not need all the cream.
Pro tip: If it gets too thin, add a bit more powdered sugar. Too thick? More cream. Easy fixes! Cover and set aside while we prep the decorations.
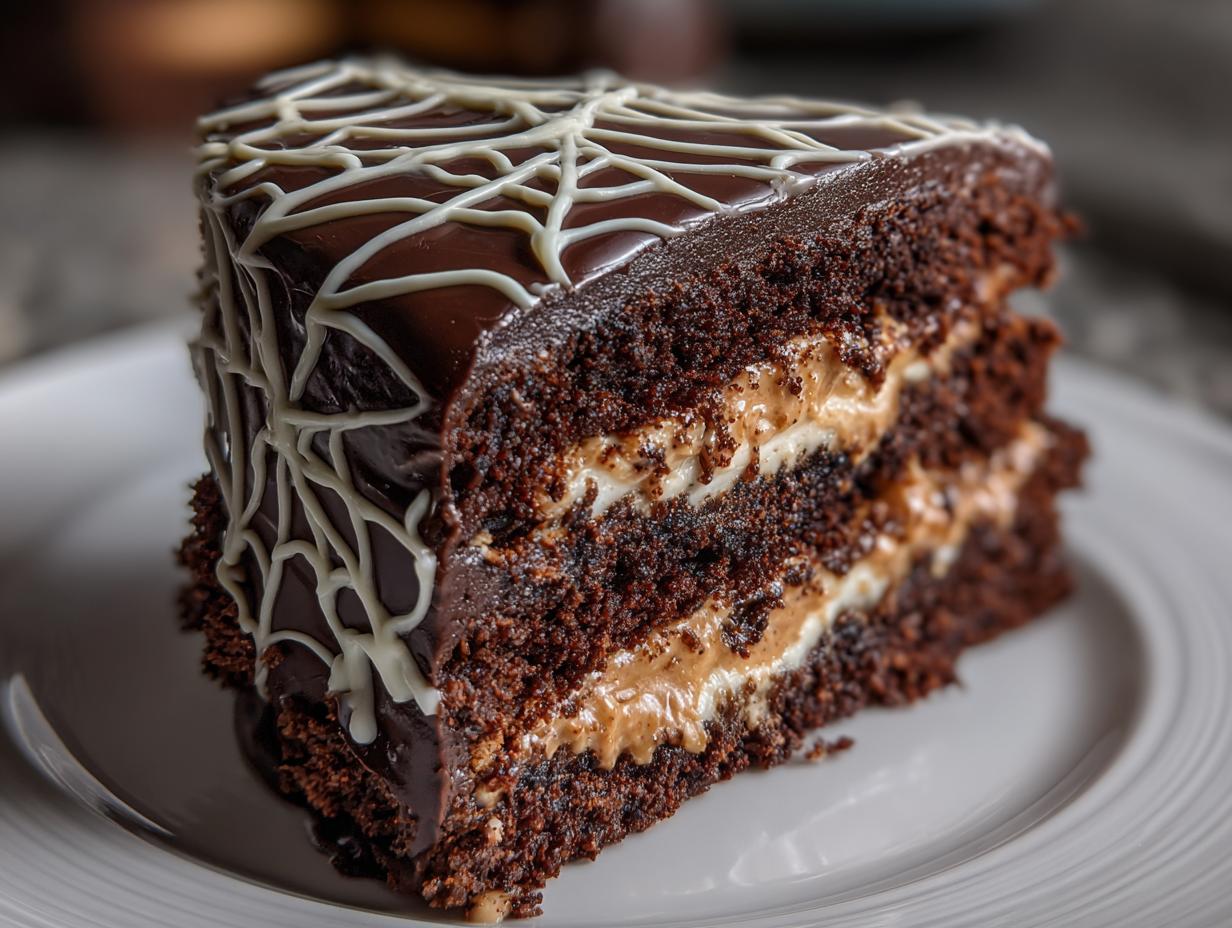
Assembling and Decorating the Spider Web
Place your first cake layer on a plate or cake stand (put parchment strips under the edges to catch drips – your future self will thank you). Spread all that peanut butter goodness evenly across the top – I like using an offset spatula to make it smooth. Top with the second layer.
Now the fun begins: melt the dark chocolate in 30-second bursts in the microwave, stirring between each. Pour it over the top and use your spatula to nudge it gently over the sides. Don’t stress about perfection – the web will steal the show! Pop it in the fridge for 15 minutes to set.
For the web, melt white chocolate the same way. Transfer to a piping bag or ziplock with a tiny corner snipped off. Pipe 3-4 concentric circles on the cake (like a bullseye), then immediately drag a toothpick or knife from the center outwards to create the web strands. Watch the magic happen! Chill another 10 minutes before slicing – if you can wait that long.

Tips for the Perfect Peanut Butter and Chocolate Spider Web Layer Cake
After making this cake more times than I can count (and learning from all my mistakes), here are my golden rules for spooky-season success:
- Chill like it’s Halloween: That 15-minute fridge break after the dark chocolate layer? Non-negotiable! It gives the white chocolate web something to grip onto without smudging.
- Chocolate matters: Cheap chocolate chips can seize up – splurge on good-quality dark and white chocolate. It melts smoother and tastes infinitely better.
- Room temp is key: Cold peanut butter fights back. Let it soften naturally – microwaving makes it oily and weird.
- Web wisdom: Work fast once the white chocolate circles are piped – it sets quickly! If it hardens, just gently rewarm your piping bag.
Follow these, and you’ll have a cake that’s both delicious and terrifyingly good-looking!
Variations and Substitutions
Want to mix things up? This cake is surprisingly flexible! Swap peanut butter for almond butter (just add a pinch of salt to balance the sweetness) or sunflower seed butter for nut-free parties. Gluten-free? Use your favorite 1:1 flour blend – I’ve had great results with Bob’s Red Mill. No heavy cream? Whole milk works in the filling, just add it slower. And if you’re out of white chocolate, try thin royal icing lines for a ghostly web effect. The spooky spirit stays alive no matter what!
Serving and Storage
This cake is best served slightly chilled—the peanut butter filling firms up perfectly, making each slice neat and dreamy. Store any leftovers (ha!) covered in the fridge for up to 3 days. The flavors actually get better overnight as the chocolate and peanut butter become best friends. Just let slices sit at room temperature for 10 minutes before serving to take the fridge chill off.
Nutritional Information
Nutrition varies based on brands, but here’s the estimate per generous slice: about 480 calories, 24g fat (7g saturated), 58g carbs (3g fiber, 32g sugar), and 9g protein. Remember, Halloween calories don’t count!
Frequently Asked Questions
Can I make this cake ahead of time?
Absolutely! Bake the chocolate layers up to 2 days in advance—wrap them tightly in plastic once cooled and store at room temp. The assembled cake keeps beautifully in the fridge for 24 hours before serving (just add the spider web decoration the day of for maximum wow factor).
Help! My peanut butter filling is too runny—what do I do?
No panic needed! Just mix in more powdered sugar a tablespoon at a time until it firms up. If it’s really loose, pop it in the fridge for 15 minutes—the peanut butter fats will harden slightly. Been there, fixed that!
Can I use natural peanut butter?
I’d stick with regular creamy PB for this recipe—natural varieties often separate and can make the filling oily. If you must use natural, drain off any excess oil first and give it a good stir before measuring.
Why does the cake batter look so thin?
That boiling water works magic! The batter will seem alarmingly liquid at first, but it bakes up into the moistest chocolate cake you’ll ever taste. Just trust the process (and your oven timer).
Any tips for piping a neater spider web?
Practice on parchment first! Pipe your white chocolate circles, then immediately drag a toothpick from center to edge in straight lines. Wipe the toothpick clean between drags for crisp web strands. Messed up? Smooth the chocolate with a spatula and try again—it’s very forgiving.


Spooky Peanut Butter and Chocolate Spider Web Cake Delight
- Total Time: 1 hour
- Yield: 10 servings 1x
- Diet: Vegetarian
Description
A rich and festive cake with layers of peanut butter and chocolate, decorated with a spider web design for Halloween.
Ingredients
- 2 cups all-purpose flour
- 1 1/2 cups sugar
- 1/2 cup cocoa powder
- 1 1/2 tsp baking powder
- 1/2 tsp baking soda
- 1/2 tsp salt
- 1 cup milk
- 1/2 cup vegetable oil
- 2 large eggs
- 2 tsp vanilla extract
- 1 cup boiling water
- 1 cup creamy peanut butter
- 1/2 cup powdered sugar
- 1/4 cup heavy cream
- 1 cup dark chocolate chips
- 1/2 cup white chocolate chips
Instructions
- Preheat oven to 350°F (175°C). Grease and line two 9-inch cake pans.
- In a bowl, whisk flour, sugar, cocoa, baking powder, baking soda, and salt.
- Add milk, oil, eggs, and vanilla. Mix until smooth.
- Gradually stir in boiling water. The batter will be thin.
- Divide batter between pans. Bake for 30-35 minutes. Cool completely.
- Beat peanut butter, powdered sugar, and cream until fluffy.
- Spread peanut butter filling between cake layers.
- Melt dark chocolate. Cover cake with a smooth layer.
- Melt white chocolate. Pipe concentric circles on top. Drag a knife from center outwards to create web effect.
Notes
- Let cakes cool completely before frosting.
- Use room-temperature peanut butter for easier mixing.
- For a neater web, chill cake briefly after applying dark chocolate.
- Prep Time: 25 minutes
- Cook Time: 35 minutes
- Category: Dessert
- Method: Baking
- Cuisine: American
Nutrition
- Serving Size: 1 slice
- Calories: 480
- Sugar: 32g
- Sodium: 280mg
- Fat: 24g
- Saturated Fat: 7g
- Unsaturated Fat: 14g
- Trans Fat: 0g
- Carbohydrates: 58g
- Fiber: 3g
- Protein: 9g
- Cholesterol: 45mg