Halloween just wouldn’t be complete without some spooky-sweet treats, and these Peanut Butter Cup Witch Hats are my absolute favorite to whip up! They’re ridiculously easy—no baking required—and always steal the show at parties. Seriously, I’ve seen grown-ups fight over the last one. The best part? You probably already have most of the ingredients in your pantry. I started making these years ago for my niece’s Halloween party, and now they’re a non-negotiable tradition. Just wait until you see how something as simple as a peanut butter cup and a cookie transforms into the cutest little witch hats!
Ingredients for Peanut Butter Cup Witch Hats
Okay, let’s talk ingredients! The beauty of these witch hats is how simple they are—just four main components, but each one plays a crucial role. Here’s what you’ll need to gather before the magic happens:
- 24 chocolate sandwich cookies (you’ll separate them carefully, keeping the cream side intact—more on that later)
- 24 mini peanut butter cups (unwrapped, of course—pro tip: buy extra because someone will inevitably “quality test” a few)
- 1/2 cup orange or black icing (for piping—I like using the store-bought tubes when I’m in a hurry)
- 24 yellow or white candy stars (for that perfect witch hat tip—trust me, these make all the difference)
That’s it! See? I told you this was easy. Now, if you’re feeling fancy, you could swap the orange icing for purple or green—Halloween is all about creativity. Just make sure your peanut butter cups are at room temperature so they don’t fight you when you’re assembling everything.
How to Make Peanut Butter Cup Witch Hats
Alright, let’s get to the fun part—turning these simple ingredients into adorable witch hats! I promise it’s easier than it looks, and the best part is you don’t even need to turn on the oven. Follow these steps, and you’ll have a whole coven of sweet little hats ready in no time.
Step 1: Prepare the Cookies
First things first—those chocolate sandwich cookies need a little prep work. Gently twist them apart, keeping the cream side intact on one half. (Pro tip: If a cookie breaks, don’t panic! Just smoosh the cream back on—no one will notice once the hats are assembled.) Set aside the plain cookie halves (snack on those later—chef’s privilege!). The cream side will act as our “glue” for the peanut butter cups, so handle them with care.
Step 2: Assemble the Witch Hats
Now for the magic! Take your mini peanut butter cups and place them upside down right in the center of each cream-topped cookie. The flat side of the peanut butter cup should be facing up—this becomes the pointy tip of our witch hat. I like to give each one a little press to make sure it’s securely attached to the cream before moving on. If any peanut butter cups are being stubborn, just warm them between your fingers for a few seconds to soften slightly.

Step 3: Secure with Icing
Here’s where we make sure these hats stay put through all the Halloween chaos! Using your orange or black icing, pipe a neat ring around the base of each peanut butter cup where it meets the cookie. This creates both extra adhesion and that classic witch hat brim look. If you don’t have a piping bag, no worries—just snip a tiny corner off a ziplock bag. The icing doesn’t need to be perfect (witches aren’t known for being tidy!), but try to keep it relatively even so all your hats look uniform.
Step 4: Add the Finishing Touch
The final flourish! Place a yellow or white candy star on the very tip of each peanut butter cup—this becomes the decorative buckle on our witch hats. If you’re feeling extra festive, mix and match star colors or even add some edible glitter. Then comes the hardest part—letting the icing set for about 15 minutes before serving. I know, the temptation is real, but trust me, it’s worth the wait for picture-perfect hats that won’t fall apart!

Tips for Perfect Peanut Butter Cup Witch Hats
After making these adorable witch hats more times than I can count (and yes, eating plenty of “test batches”), I’ve picked up some tricks that’ll make your Halloween treats foolproof. Here are my absolute must-know tips:
- Store them properly – These little hats hate humidity! Keep them in an airtight container at room temperature. If you stack them, place parchment paper between layers so the icing doesn’t smudge.
- Pre-made icing is your friend – When I’m rushing to get these done before a party, those store-bought icing tubes save my life. Just make sure to get the kind with a fine tip for cleaner piping.
- Play with colors – Black icing looks classic, but purple or green makes them pop! Last year I did ombre hats with different shades – the kids went wild for them.
- Warm hands? Chill your peanut butter cups for 10 minutes if they’re getting too soft while you work. Cold hands help too – I sometimes run mine under cool water before handling.
Oh! One more thing – if your stars won’t stick to the peanut butter cups, just dab a tiny bit of icing on them first. Works like a charm every time. Now go make some magic!
Variations for Peanut Butter Cup Witch Hats
Once you’ve mastered the basic witch hats (and trust me, you’ll want to make them every Halloween!), it’s time to get creative with some fun twists. Here are my favorite ways to mix things up—because why settle for just one kind of magic when you can have a whole spellbook of options?
- Cookie switcheroo – Instead of chocolate sandwich cookies, try using:
• Golden Oreos for a “good witch” vibe
• Mint cookies for a cool flavor surprise
• Gluten-free cookies to make them allergy-friendly - Chocolate drizzle magic – Melt some white or dark chocolate and zigzag it over the hats for extra decoration. Bonus points if you make it look like lightning bolts!
- Peanut butter alternatives – Not a peanut butter fan? Use:
• Mini Reese’s Pieces for colorful tips
• Caramel cups for a sweet twist
• Dark chocolate cups for a more grown-up version - Crunchy additions – Roll the icing edges in:
• Crushed pretzels for a salty-sweet combo
• Sprinkles for extra festive flair
• Crushed candy corn bits (because it’s Halloween!)
My personal favorite variation? Last year I made “witch hat cupcakes” by placing these little hats right on top of frosted cupcakes—instant Halloween showstopper! The beauty of this recipe is how easily it adapts. Whether you’re making them for a classroom party or an adults-only gathering, there’s always room to add your own spooky spin.

Serving and Storing Peanut Butter Cup Witch Hats
Okay, here’s the deal—these little witch hats are best enjoyed after the icing has fully set (about 15-20 minutes), but let’s be real, I’ve definitely “tested” one or two before they were ready. If you can resist, though, waiting means your hats won’t lose their shape when you pick them up. I like to arrange them on a spooky platter with some orange and black sprinkles scattered around for extra Halloween vibes.
Now, about storing them—these treats are pretty low-maintenance, but they do have a few preferences. Keep them in an airtight container at room temperature, and whatever you do, don’t refrigerate them! The moisture will make the cookies soggy (learned that one the hard way). If you’re stacking them, slide a piece of parchment paper between layers so the icing doesn’t stick to the hat above it.
They’ll stay fresh for about 2-3 days, though in my house they never last that long. Pro tip: If you’re making them ahead for a party, assemble everything except the stars—add those right before serving so they stay nice and bright. And if you’re transporting them? Nestle them gently in a cupcake tin with some tissue paper—each hat gets its own little cubby that way!
Nutritional Information for Peanut Butter Cup Witch Hats
Now, let’s be honest—you’re not eating witch hats for their health benefits! But since I know some folks like to keep track (or need to for dietary reasons), here’s the scoop on what you’re getting in each adorable little hat. Just remember: Nutritional values are estimates and vary based on ingredients used. My numbers are based on standard chocolate sandwich cookies and regular mini peanut butter cups.
- Calories: About 80 per witch hat (perfect for when you want “just a bite” of something sweet)
- Fat: 4g (that rich, delicious peanut butter and chocolate combo at work!)
- Carbohydrates: 10g (mostly from the cookie and icing—worth every gram if you ask me)
- Sugar: 6g (hey, it’s a treat—let’s not overthink it)
- Protein: 1g (surprise! A tiny protein boost from the peanut butter)
If you’re watching specific dietary needs, you can easily tweak these numbers—use sugar-free cookies or icing, opt for dark chocolate peanut butter cups, or go for gluten-free cookies. But personally? I say enjoy them as-is for Halloween—magic tastes better without math!
Frequently Asked Questions
I’ve gotten so many questions about these adorable Peanut Butter Cup Witch Hats over the years—here are the ones that pop up most often! Trust me, if you’re wondering something, chances are someone else has too. Let’s tackle those burning witch hat questions!
Can I Make These Ahead of Time?
Absolutely! These little hats hold up surprisingly well. You can assemble them up to 2 days before your Halloween bash—just store them in an airtight container at room temperature (no fridge!). The icing might soften slightly over time, so I recommend adding the candy stars right before serving to keep them looking fresh. Pro tip: If you’re super organized, you can even prep all the components separately (unwrap those peanut butter cups, separate the cookies) a few days early, then assemble everything the morning of your event.
Are There Nut-Free Alternatives?
You bet! While peanut butter cups are classic, I’ve had great success with sunflower butter cups (they taste remarkably similar!) or even plain chocolate kisses for the nut-allergic crowd. For school parties where nuts are a no-go, vegan chocolates work beautifully too. Just make sure whatever you use has that same dome shape—flat chocolates won’t give you that perfect witch hat silhouette. The rest of the recipe stays exactly the same!
Can I Use Regular-Sized Peanut Butter Cups?
Technically yes, but they’ll be more like wizard hats than witch hats! The mini cups give that perfect proportion where the “brim” (cookie) and “hat” (peanut butter cup) balance each other. If you only have regular-sized cups, try using larger cookies like the family-size Oreos—just know you’ll get fewer hats from your batch. And fair warning: Bigger hats mean bigger temptation to eat them all yourself!
What If My Icing Won’t Stick?
Ah, the classic icing rebellion! If your icing isn’t adhering properly, try these tricks: First, make sure your peanut butter cups are completely dry (no condensation from being refrigerated). Second, give the base of each cup a quick wipe with a paper towel to remove any chocolate dust. Lastly, if all else fails, pipe a tiny dot of icing on the cookie first, then place the peanut butter cup on top—instant edible glue! Works every time.

Share Your Creations
Nothing makes me happier than seeing all the creative ways you bring these Peanut Butter Cup Witch Hats to life! Every year, I’m blown away by the clever twists you come up with—the rainbow sprinkles, the glow-in-the-dark icing, that one genius who turned them into a witch hat cake topper (mind. blown.). So please, snap a photo of your spooky-sweet creations and tag me—I’ll be cheering you on from my kitchen, probably with peanut butter cup crumbs on my shirt.
Trust me, your witch hats will be the talk of the Halloween party. Whether you went classic black and orange or invented some wild new color scheme, I want to see them all. And who knows? Your brilliant idea might just become next year’s must-try variation! Now get out there and make some magic—I can’t wait to see what you conjure up.
Print
25 Irresistible Peanut Butter Cup Witch Hats to Make Now
- Total Time: 15 minutes
- Yield: 24 witch hats 1x
- Diet: Vegetarian
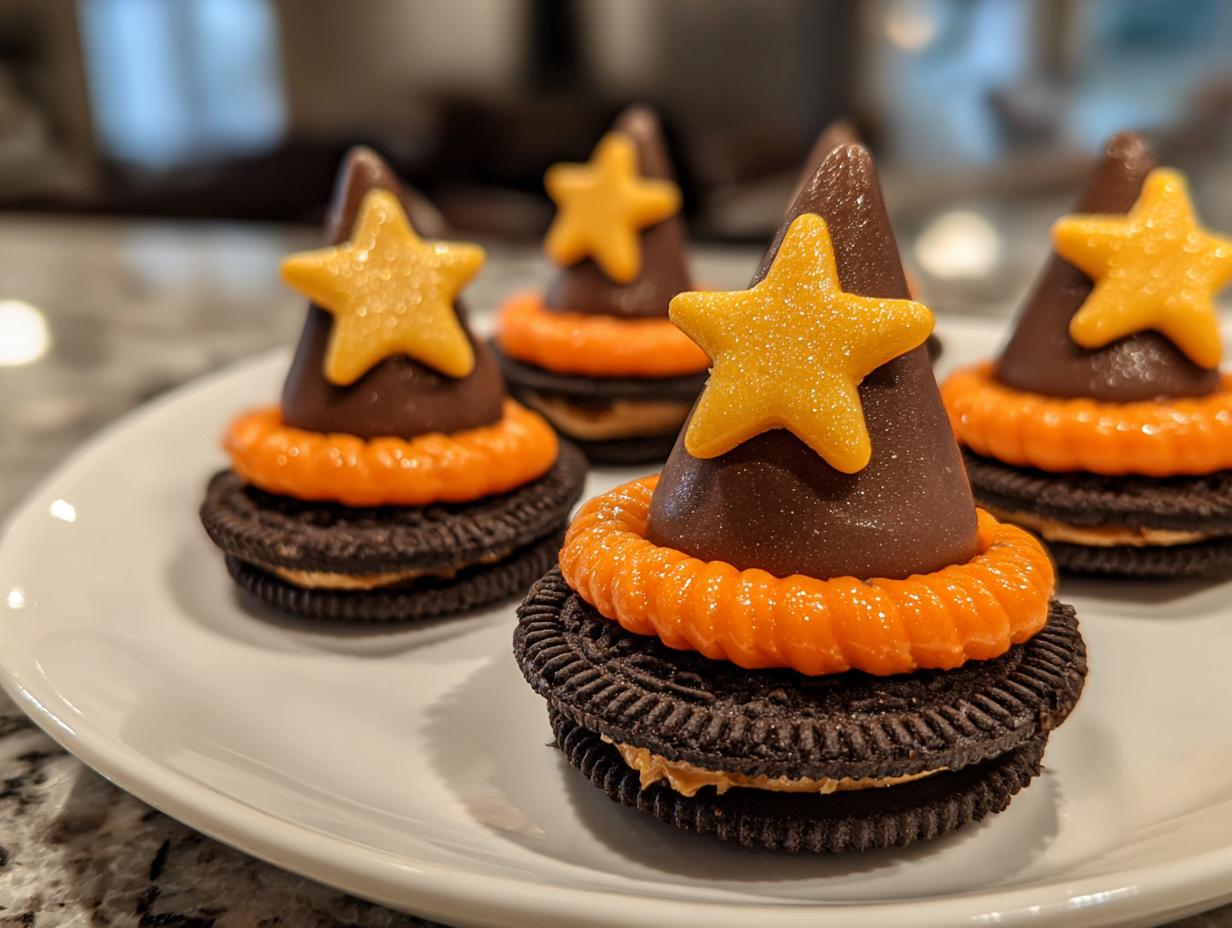
Description
Fun and festive Halloween treats shaped like witch hats, made with peanut butter cups and cookies.
Ingredients
- 24 chocolate sandwich cookies
- 24 mini peanut butter cups
- 1/2 cup orange or black icing
- 24 yellow or white candy stars
Instructions
- Separate the chocolate sandwich cookies, keeping the cream side intact.
- Place a mini peanut butter cup upside down on the cream side of each cookie.
- Pipe a ring of icing around the base of the peanut butter cup to secure it.
- Add a candy star to the tip of each peanut butter cup for decoration.
- Let the icing set before serving.
Notes
- Store in an airtight container to keep fresh.
- Use different colored icing for variety.
- For a quicker option, use pre-made icing tubes.
- Prep Time: 15 minutes
- Cook Time: 0 minutes
- Category: Dessert
- Method: No-Bake
- Cuisine: American
Nutrition
- Serving Size: 1 witch hat
- Calories: 80
- Sugar: 6g
- Sodium: 45mg
- Fat: 4g
- Saturated Fat: 1.5g
- Unsaturated Fat: 2g
- Trans Fat: 0g
- Carbohydrates: 10g
- Fiber: 0.5g
- Protein: 1g
- Cholesterol: 0mg