Remember those boring PB&J sandwiches we all grew up with? Let me tell you how I turned mine into the most peanut butter & jelly sushi rolls that even my pickiest niece DEVOURS! It all started last summer when my nephew declared war on “regular sandwiches” – until I rolled his lunch up like sushi and suddenly he couldn’t get enough. The best part? These take just 5 minutes to make with no cooking required. Just bread, peanut butter, and jelly transformed into bite-sized rolls that look fancy but couldn’t be simpler. Perfect for lunchboxes, playdates, or when you need a happy little snack surprise!

Why You’ll Love These Peanut Butter & Jelly Sushi Rolls
Trust me, these rolls will become your new go-to because:
- They’re ridiculously easy – just roll and slice (no cooking!)
- The sushi presentation makes kids go wild with excitement
- You can customize endlessly with different jellies or nut butters
- Perfect for lunchboxes – no messy sandwich halves falling apart
- Even picky eaters think they’re getting a special treat
I mean, who knew PB&J could be this fun? The first time I made these, my kitchen turned into a sushi restaurant – complete with kids yelling “Roll me another!”
Ingredients for Peanut Butter & Jelly Sushi Rolls
Here’s all you need to make these magical rolls happen:
- 2 slices of bread – fresh white or whole wheat works best (trust me, stale bread won’t roll properly!)
- 2 tablespoons peanut butter – creamy or crunchy, whatever you prefer (just make sure it’s spreadable)
- 1 tablespoon jelly or jam – strawberry is classic, but grape or raspberry make fun colorful swirls
That’s it! Three ingredients you probably already have in your pantry. Now let’s turn them into something extraordinary.
How to Make Peanut Butter & Jelly Sushi Rolls
Okay, let’s roll up our sleeves (literally!) and transform that bread into adorable sushi rolls. I’ll walk you through each step – it’s so simple you’ll be amazed at how professional these look!
Step 1: Prep the Bread
First, grab your freshest, softest bread slices. The secret? Trim those crusts off completely – they’ll just get in the way of our perfect rolls. Now here’s my favorite trick: use a rolling pin (or even a smooth glass bottle) to gently flatten each slice until it’s about half its original thickness. No rolling pin? No problem! Just press firmly with your hands – the warmth actually makes the bread more pliable. You want the bread nice and thin but not tearing apart.

Step 2: Spread Fillings
Now for the good stuff! Spread peanut butter evenly across each flattened slice, leaving about a 1/4-inch border at the top (this helps prevent messy spillage when rolling). Here’s where the magic happens: using a spoon or butter knife, make a thin line of jelly along the bottom edge of each slice – think pencil-thin, not globby. Too much jelly makes the rolls soggy and harder to slice cleanly. Pro tip: if your peanut butter is thick, warm it slightly for easier spreading!
Step 3: Roll and Slice
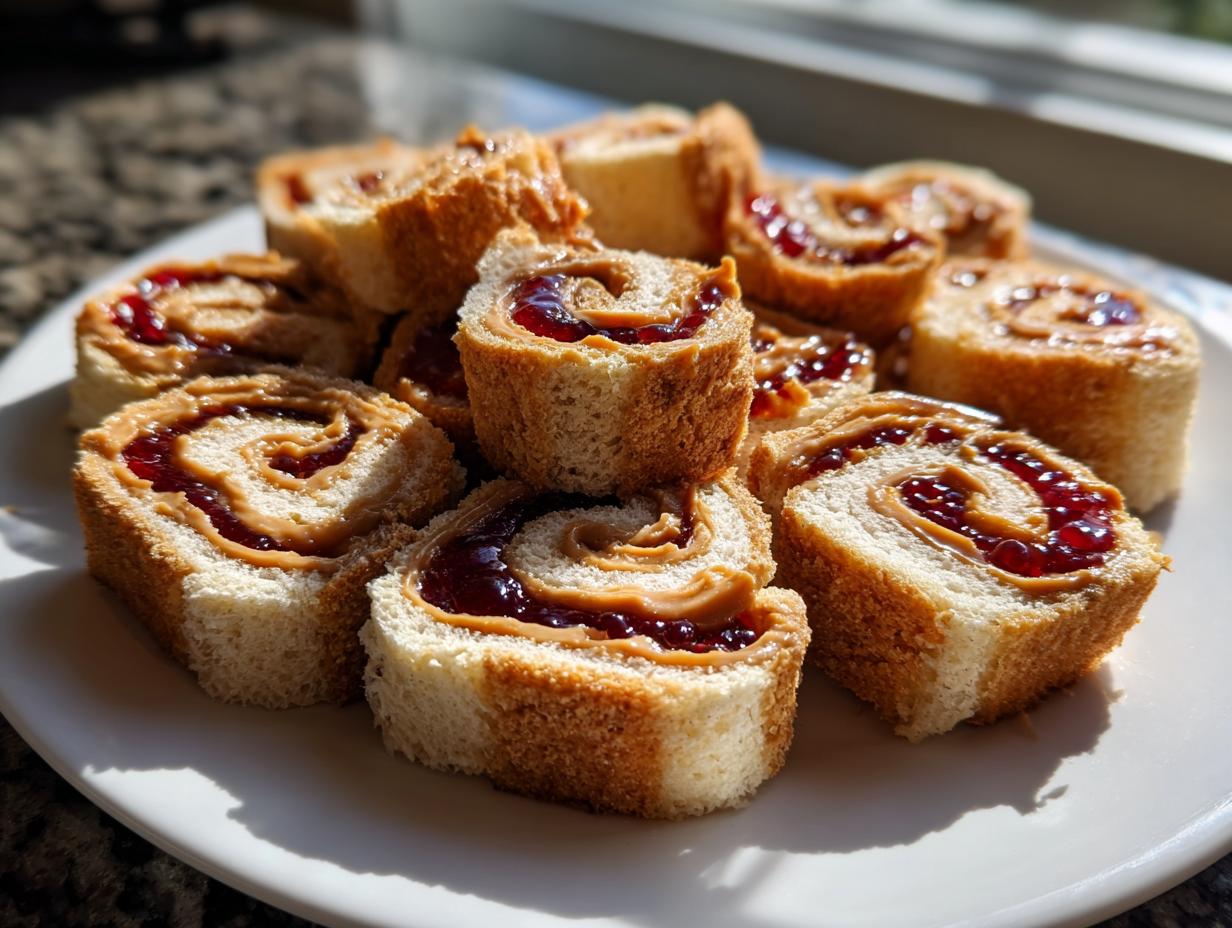
Starting from the jelly side, roll the bread up tightly like a sleeping bag. Apply gentle pressure as you go – you want those swirls compact but not squished. Once rolled, let them rest seam-side down for a minute (this helps them hold shape). Now for the sushi effect! Using a sharp knife (serrated works wonders), slice each roll into 4-5 pieces. Chilling for 10 minutes first makes cleaner cuts, but I’m usually too impatient to wait! Arrange your pieces spiral-side up and watch how they disappear faster than you can say “PB&J sushi roll!”

See? Told you it was easy! The whole process takes less time than arguing with kids about eating their lunch. Now let me share some pro tips to take your rolls from good to absolutely irresistible…
Tips for Perfect Peanut Butter & Jelly Sushi Rolls
Here’s what I’ve learned after making hundreds of these rolls (yes, really!): fresh bread is non-negotiable. Day-old bread cracks when rolled, while fresh-from-the-bag slices flex beautifully. If someone has nut allergies, sunflower seed butter works like a charm – it spreads just like peanut butter but keeps everyone safe. Want to make these extra special? Try arranging the rolls on a platter with a little bowl of extra jelly for dipping, or sprinkle with colorful sprinkles before serving. Little hands love helping with this recipe too – my niece insists on being the official “jelly line painter” every time!
Peanut Butter & Jelly Sushi Roll Variations
The fun doesn’t stop with classic PB&J! Once you’ve mastered the basic roll, try these delicious twists:
- Chocolate lovers: Swap jelly for Nutella and add thin banana slices
- Breakfast roll: Use honey instead of jelly and sprinkle with granola
- Tropical vibe: Coconut butter with mango or pineapple jam
- Crunch factor: Add crushed pretzel bits or rice crispies
My personal favorite? Cream cheese and strawberry jam – tastes just like cheesecake! The possibilities are endless, so get creative and make it your own.
Serving and Storing Peanut Butter & Jelly Sushi Rolls
These adorable rolls are best served fresh when the bread is still soft and the jelly hasn’t soaked in too much. If you’re packing them for lunch (which I do at least twice a week!), here’s my foolproof method: place the rolls in a single layer separated by wax paper or parchment squares to prevent sticking. They’ll stay neat until lunchtime! While you can refrigerate leftovers, the bread tends to dry out – honestly, they’re so quick to make, I just whip up a fresh batch.
Peanut Butter & Jelly Sushi Rolls FAQs
I get asked about these rolls all the time – here are the most common questions with my tried-and-true answers:
Can I use gluten-free bread for these sushi rolls?
Absolutely! Just make sure it’s fresh and pliable. Gluten-free bread can sometimes be more fragile, so roll gently. I’ve had great success with the soft, sandwich-style GF loaves – they behave just like regular bread when flattened.
How long do peanut butter & jelly sushi rolls last?
Honestly, they’re best eaten within a few hours of making them. The jelly starts softening the bread after that. But if you must store them, keep them in an airtight container at room temperature for up to 4 hours, or refrigerate for a day (though the texture won’t be quite as perfect).
Can I freeze these rolls for later?
I don’t recommend it – freezing makes the bread weirdly spongy when thawed. These are so quick to make fresh, it’s better to just whip up a new batch when the craving hits!
What’s the trick to keeping them from unrolling?
Make sure you roll tightly and let them sit seam-side down before slicing. If they’re being stubborn, you can secure the end with a tiny dab of peanut butter as “glue.”
Nutritional Information for Peanut Butter & Jelly Sushi Rolls
Here’s the scoop on these rolls – each serving (about 2 pieces) comes in around 200 calories, but exact numbers depend on your bread and spread choices. My advice? Enjoy the fun factor and don’t stress the numbers too much!
Share Your Peanut Butter & Jelly Sushi Rolls
I’d love to see your sushi roll creations! Tag me @[YourHandle] when you post photos – nothing makes me happier than seeing kids (and adults!) grinning over their PB&J masterpieces!
Print
5-Ingredient Peanut Butter & Jelly Sushi Rolls Kids Crave
- Total Time: 5 minutes
- Yield: 8-10 pieces 1x
- Diet: Vegetarian
Description
A fun twist on the classic peanut butter and jelly sandwich, rolled up like sushi for a playful snack or lunch.
Ingredients
- 2 slices of bread (white or whole wheat)
- 2 tablespoons peanut butter
- 1 tablespoon jelly or jam (any flavor)
Instructions
- Trim the crusts off the bread slices.
- Flatten each slice with a rolling pin.
- Spread peanut butter evenly over each slice.
- Add a thin line of jelly along one edge of each slice.
- Roll the bread tightly from the jelly side.
- Slice each roll into 4-5 pieces.
- Serve immediately or pack for lunch.
Notes
- Use fresh, soft bread for easy rolling.
- Chill rolls for 10 minutes before slicing for cleaner cuts.
- Substitute almond butter or sunflower seed butter for allergies.
- Prep Time: 5 minutes
- Cook Time: 0 minutes
- Category: Snack
- Method: No-Cook
- Cuisine: American
Nutrition
- Serving Size: 2 rolls
- Calories: 200
- Sugar: 10g
- Sodium: 150mg
- Fat: 8g
- Saturated Fat: 1.5g
- Unsaturated Fat: 5g
- Trans Fat: 0g
- Carbohydrates: 25g
- Fiber: 2g
- Protein: 6g
- Cholesterol: 0mg