I still remember the first time I made these red velvet ghost cupcakes for a Halloween party. My kitchen looked like a crime scene with all that red batter splattered everywhere, but oh, was it worth it! These little spooky treats disappeared faster than a ghost in the night. There’s something magical about that rich red velvet paired with fluffy cream cheese ghosts – scary cute and seriously delicious.
What I love most is how these cupcakes bring people together. Last year, my nephew refused to eat anything “haunted” until he took one bite… then he snuck three more when he thought no one was looking. That’s the power of these red velvet ghost cupcakes – they turn even the toughest skeptics into believers with just one taste of their moist crumb and tangy frosting. Perfect for Halloween parties or just when you want to make an ordinary Tuesday feel a little more spirited!

Why You’ll Love These Red Velvet Ghost Cupcakes
Trust me, these aren’t your average cupcakes – they’re little bites of Halloween magic! Here’s why they’ll become your new seasonal obsession:
- Festive & fun – Those adorable ghost tops make everyone smile (even grown-ups pretending they’re too cool for cute food)
- Surprisingly easy – The batter comes together in minutes, and the decorating is way simpler than it looks
- Moist as can be – The buttermilk and oil keep them tender for days (if they last that long!)
- Perfect Halloween vibe – That deep red color screams spooky season without being overly sweet
Seriously, one batch and you’ll be hooked – they’re that good!
Ingredients for Red Velvet Ghost Cupcakes
Okay, let’s talk ingredients – because trust me, using the right stuff makes ALL the difference with these cupcakes. I’ve learned the hard way that substitutions can turn your cute ghosts into scary disasters (and not the good Halloween kind). Here’s exactly what you’ll need:
- 1 1/2 cups all-purpose flour – spooned and leveled, don’t pack it!
- 1 cup granulated sugar – regular white sugar works perfectly
- 1/4 cup unsweetened cocoa powder – the secret behind that rich red velvet flavor
- 1 tsp baking soda – fresh is best for maximum rise
- 1/2 tsp salt – just enough to balance the sweetness
- 1 cup buttermilk (room temperature) – non-negotiable for moisture!
- 1/2 cup vegetable oil – keeps them crazy tender
- 1 large egg – also at room temp please
- 1 tbsp red food coloring (gel-based) – liquid just won’t give you that spooky vibrant red
- 1 tsp vanilla extract – pure vanilla if you’ve got it
- 1 tsp white vinegar – sounds weird but makes the cake extra fluffy
For our adorable little ghosts:
- 2 cups cream cheese frosting – homemade or store-bought both work
- Black icing gel – for those essential ghost eyes (trust me, piping eyes with frosting is WAY harder)
See? Nothing too crazy – just good quality ingredients treated right. Now let’s make some magic!
Equipment You’ll Need
Don’t worry – you won’t need any fancy ghost-hunting gear for these cupcakes! Just grab these basics from your kitchen:
- Muffin tin – standard 12-cup does the trick
- Cupcake liners – festive Halloween ones if you’re feeling extra
- 2 mixing bowls – one for dry, one for wet ingredients
- Whisk & spatula – my trusty batter-scraping sidekicks
- Piping bag with round tip (#12 works great for ghost shapes)
- Cooling rack – patience is key before frosting!
That’s it! Now let’s make some spooky magic happen.
How to Make Red Velvet Ghost Cupcakes
Okay, let’s get spooky! Follow these steps for the most adorable (and delicious) ghost cupcakes you’ve ever seen. I promise it’s easier than it looks – even if you’re usually more of a “store-bought cupcakes” kind of baker.
Making the Cupcake Batter
First things first – preheat that oven to 350°F and line your muffin tin with those cute liners. Now let’s make magic happen:
- In a large bowl, whisk together the flour, sugar, cocoa powder, baking soda and salt. Really get those dry ingredients friendly with each other – no lumps allowed!
- In another bowl, whisk the buttermilk, oil, egg, food coloring, vanilla and vinegar until smooth. That vinegar might smell funky now, but it’s the secret to getting that perfect fluffy texture – trust me on this.
- Now slowly add the wet ingredients to the dry ingredients. Here’s the important part: mix just until combined! Overmixing is the enemy of tender cupcakes. A few small lumps are totally fine – they’ll disappear in the oven.

Baking and Cooling
Time to bring these little guys to life:
- Fill each cupcake liner about 2/3 full. I use an ice cream scoop for perfect portions – no messy pouring!
- Bake for 18-20 minutes. They’re done when a toothpick comes out with just a few moist crumbs (no wet batter).
- Let them cool in the pan for 5 minutes, then transfer to a wire rack. This is crucial – if you frost warm cupcakes, you’ll end up with ghost puddles instead of cute floating spirits!
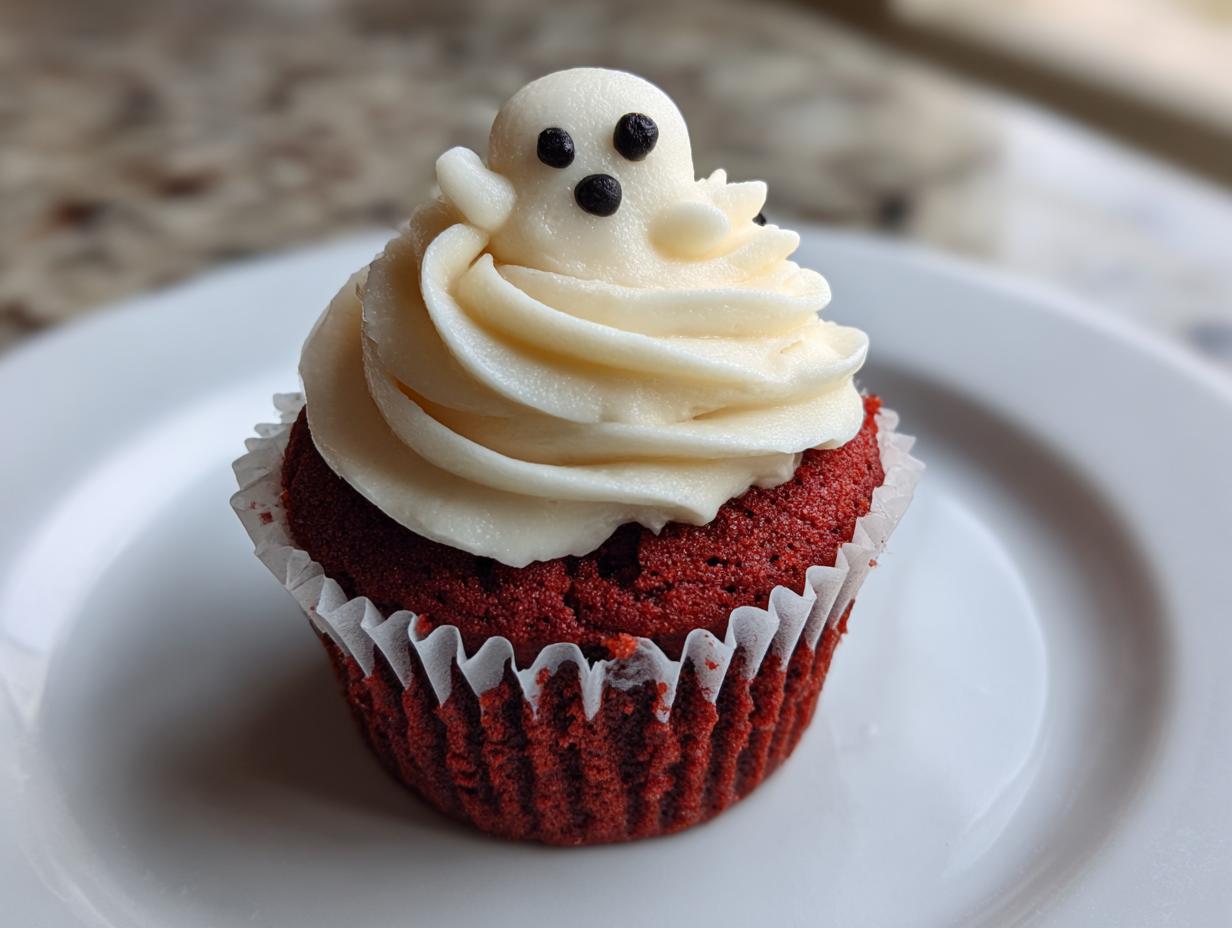
Decorating Your Ghost Cupcakes
The fun part! Here’s how to create those adorable ghost tops:
- Make sure your frosting is stiff enough to hold shape. If it’s too soft, pop it in the fridge for 15 minutes.
- Using a piping bag with a round tip (I like #12), start at the center of the cupcake and pipe a tall mound of frosting, pulling upwards to create a ghostly peak.
- Add two small black icing gel dots for eyes. Pro tip: do this while the frosting is still slightly soft so the eyes don’t crack when they set.

And voila! You’ve just created the cutest little edible ghosts this side of the graveyard. Now try not to eat them all before your party starts!
Tips for Perfect Red Velvet Ghost Cupcakes
After making these ghost cupcakes more times than I can count (and eating way too many “test” batches), I’ve picked up some foolproof tricks:
- Chill your frosting for 15 minutes before piping – it holds those ghost shapes like a dream!
- Gel food coloring is a must – liquid makes the batter too thin and gives you sad pink ghosts instead of vibrant red.
- Room temp ingredients make for smoother batter – take that egg and buttermilk out early!
- Pipe ghosts on cooled cupcakes – warm cakes turn your spooky friends into melting blobs.
- Practice piping on a plate first – ghost shapes are easier than they look once you get the motion down.
Follow these tips and your cupcakes will be the talk of the Halloween party – guaranteed!
Ingredient Substitutions & Notes
Life happens, and sometimes you’re staring at your pantry realizing you’re missing an ingredient. Don’t panic! Here are my tried-and-true swaps that won’t sacrifice those adorable ghostly results:
When buttermilk plays ghost on you:
No buttermilk? No problem! Mix 1 cup milk with 1 tablespoon lemon juice or white vinegar and let it sit for 5 minutes until slightly curdled. Greek yogurt thinned with a bit of milk works too – just use 3/4 cup yogurt + 1/4 cup milk. Both options keep that essential tang and moisture.
The great food coloring debate:
If you’re avoiding artificial dyes, 1 tablespoon beet powder mixed with 2 teaspoons water gives a lovely natural red (though slightly more muted). For vegan friends, gel colors are usually plant-based – just check labels. And whatever you do, don’t use liquid food coloring unless you enjoy pastel pink “ghosts”! For more on natural food coloring, check out this guide to natural food coloring.
Oil alternatives that work:
Ran out of vegetable oil? Melted coconut oil (measure after melting) makes a great substitute, just know it might make the cupcakes slightly denser. Applesauce can work in a pinch too – use 1/2 cup unsweetened applesauce + 1 tablespoon extra oil to keep the texture right.
Frosting emergencies:
Store out of cream cheese? Swiss meringue buttercream holds ghost shapes beautifully and is less sweet. For dairy-free, chilled coconut cream whipped with powdered sugar does the trick. Just know your ghosts might be a bit more… translucent (which honestly makes them look extra spooky!).
Remember – baking is part science, part magic. These swaps work, but for your first batch, I’d stick to the original ingredients if possible. Once you’ve got the basic recipe down, feel free to get creative with your spooky creations!
Storing and Serving Suggestions
These ghostly treats are best friends with your fridge! Since they’re topped with cream cheese frosting, store them covered in the refrigerator for up to 3 days. Let them sit at room temp for 15 minutes before serving – cold ghosts just aren’t as tasty.
For the ultimate Halloween party spread, serve them with spiced apple cider or creamy hot chocolate (bonus points for ghost-shaped marshmallows!). Arrange them on a black platter with some candy corn “gravestones” – the kids will go absolutely batty!
Red Velvet Ghost Cupcakes Nutrition
Okay, let’s talk nutrition – because even ghosts need to watch their waistlines sometimes! (Just kidding, these cupcakes are totally worth every delicious bite.) Here’s the scoop on what’s in each spooky treat:
- Calories: 280 per cupcake
- Sugar: 22g (blame the frosting – but who’s complaining?)
- Fat: 12g (8g unsaturated, 3g saturated)
- Carbs: 38g
- Protein: 3g
- Sodium: 220mg
Important disclaimer: These numbers are estimates based on standard ingredients – your exact values might do a little haunting based on brands and portions. The ghosts might be make-believe, but these nutrition facts are as real as that food coma you’ll be in after eating three of these!
Now, if you’re looking for ways to lighten things up (without losing any flavor, promise), try these tricks:
- Use half the frosting (sacrilege, I know – but some ghosts prefer to be petite!)
- Swap 1/4 cup applesauce for half the oil
- Choose a lower-sugar cream cheese frosting
But honestly? Halloween comes once a year – enjoy your ghosts without guilt! Life’s too short not to eat the cupcake.
FAQs About Red Velvet Ghost Cupcakes
I’ve gotten so many questions about these ghostly treats over the years – here are the ones that pop up most often (along with all my hard-earned answers!):
Can I make the cupcakes ahead of time?
Absolutely! The unfrosted cupcakes keep beautifully for 2 days at room temperature in an airtight container. For longer storage, freeze them for up to 1 month – just thaw overnight before frosting. Honestly, I think the flavor gets even better after a day! The ghosts? Those I’d pipe the day of serving for the cutest presentation.
Help! My frosting is too runny for ghost shapes!
Don’t panic – we’ve all been there! Pop your frosting in the fridge for 15-20 minutes to firm up. If it’s still too soft, mix in 2-3 tablespoons powdered sugar at a time until it holds its shape. And whatever you do, make sure those cupcakes are completely cool – warm cake turns even perfect frosting into a ghostly puddle!
Can I make these without food coloring?
Of course! The cupcakes will taste just as delicious, though they’ll be more of a “velvety brown” than red. For natural color, try 1 tablespoon beet powder mixed with 2 teaspoons water. The ghosts will still steal the show with their creamy white frosting – no one will miss the red!
How do I transport these without ruining the ghosts?
I’ve learned this the hard way! Use a sturdy container with tall sides, and place a layer of parchment between cupcakes if stacking. Chill them first so the frosting firms up, and keep them cool in transit (an ice pack helps). Pro tip: pipe the eyes at your destination – they’re less likely to smudge that way!
Can kids help decorate these?
Please do! Little hands are perfect for adding those ghost eyes (with supervision if using piping gel). Let them pipe simple blobs of frosting if the ghost shape is tricky – call them “baby ghosts” and they’ll be just as adorable. Some of my favorite Halloween memories are messy kitchen sessions with flour-covered kiddos!
Print
Spooky Red Velvet Ghost Cupcakes in 45 Minutes Flat
- Total Time: 35 mins
- Yield: 12 cupcakes 1x
- Diet: Vegetarian
Description
Spooky and delicious red velvet cupcakes topped with ghost-shaped frosting, perfect for Halloween.
Ingredients
- 1 1/2 cups all-purpose flour
- 1 cup granulated sugar
- 1/4 cup unsweetened cocoa powder
- 1 tsp baking soda
- 1/2 tsp salt
- 1 cup buttermilk
- 1/2 cup vegetable oil
- 1 large egg
- 1 tbsp red food coloring
- 1 tsp vanilla extract
- 1 tsp white vinegar
- 2 cups cream cheese frosting
- Black icing gel (for eyes)
Instructions
- Preheat oven to 350°F and line a muffin tin with cupcake liners.
- Whisk flour, sugar, cocoa powder, baking soda, and salt in a bowl.
- In another bowl, mix buttermilk, oil, egg, food coloring, vanilla, and vinegar.
- Combine wet and dry ingredients, stirring until smooth.
- Fill cupcake liners 2/3 full and bake for 18-20 minutes.
- Cool completely before frosting.
- Pipe cream cheese frosting into ghost shapes.
- Use black icing gel to add eyes.
Notes
- Store cupcakes in the fridge if not serving immediately.
- Use gel food coloring for vibrant red color.
- For stiffer frosting, chill before piping.
- Prep Time: 15 mins
- Cook Time: 20 mins
- Category: Dessert
- Method: Baking
- Cuisine: American
Nutrition
- Serving Size: 1 cupcake
- Calories: 280
- Sugar: 22g
- Sodium: 220mg
- Fat: 12g
- Saturated Fat: 3g
- Unsaturated Fat: 8g
- Trans Fat: 0g
- Carbohydrates: 38g
- Fiber: 1g
- Protein: 3g
- Cholesterol: 20mg