Oh my gosh, you HAVE to try this red velvet spider web cake! It’s my absolute favorite Halloween dessert – the deep red color against that creamy white frosting just screams spooky elegance. I’ve been making this cake for years, ever since my niece begged me to create something “cool and creepy” for her birthday party. The best part? It looks way more complicated than it actually is. That striking spider web design? Just a simple toothpick trick I’ll show you. Trust me, when you bring this beauty to your next Halloween gathering, people will think you’re some kind of cake wizard!

Why You’ll Love This Red Velvet Spider Web Cake
This cake is pure Halloween magic! Here’s why it’s become my go-to spooky season showstopper:
- Easier than it looks – That fancy spider web? Just frosting and a toothpick!
- Moist, velvety texture – The buttermilk and oil keep it crazy tender
- Instant wow factor – The deep red against white frosting stops people in their tracks
- Perfect for parties – Kids go nuts for the creepy-cool design
- Great make-ahead – Tastes even better the next day (if it lasts that long!)
Seriously, this cake checks all the boxes – delicious, dramatic, and downright fun to make!
Ingredients for Red Velvet Spider Web Cake
Okay, let’s gather our goodies! Here’s everything you’ll need for that perfect spooky red velvet base and gorgeous web decoration:
- 2 1/2 cups all-purpose flour – spooned and leveled, please!
- 1 1/2 cups granulated sugar – the regular white kind
- 1 tsp baking soda – make sure it’s fresh
- 1 tsp salt – just regular table salt
- 1 tsp cocoa powder – the secret behind that signature red velvet flavor
- 1 1/2 cups vegetable oil – I use canola, but any neutral oil works
- 1 cup buttermilk – room temp is best
- 2 large eggs – yep, they’ve gotta be large
- 2 tbsp red food coloring – gel works better than liquid
- 1 tsp vanilla extract – the good stuff, not imitation
- 1 tsp white vinegar – helps activate the baking soda
- 16 oz cream cheese frosting – homemade or store-bought
- Black gel icing – for that perfect spider web
Ingredient Notes & Substitutions
Baking emergencies happen! Here’s how to adapt if you’re missing something:
No buttermilk? No panic! Mix 1 cup milk with 1 tbsp lemon juice or vinegar and let it sit for 5 minutes. Boom – instant buttermilk substitute.
Gluten-free? Swap the all-purpose flour with your favorite 1:1 gluten-free blend. I’ve had great results with Bob’s Red Mill.
Want deeper red color? Add an extra tablespoon of food coloring – gel works best for vibrant color without thinning the batter.
Out of black gel icing? Melt some dark chocolate with a tiny bit of oil, let it cool slightly, then use a piping bag.
Eggs not room temp? No worries – just pop them in warm water for 5 minutes before using.
Remember, baking is part science and part magic – don’t stress too much about perfect substitutions!
Equipment You’ll Need
Don’t worry, you won’t need any fancy gadgets for this spider web masterpiece! Here’s what I always grab from my kitchen:
- Two 9-inch round cake pans – the classic size for perfect layers
- Mixing bowls – one big one for dry ingredients, another for wet
- Whisk and spatula – my trusty mixing duo
- Toothpicks – the secret weapon for that spider web design!
- Piping bag or plastic bag – for those clean black web lines
- Cooling rack – essential for perfect cake layers
- Cake stand or plate – gotta show off that gorgeous web!
See? Nothing too crazy. If you’re missing something, improvise – that’s half the fun of baking!
How to Make Red Velvet Spider Web Cake
Alright, let’s get baking! This spider web beauty comes together in just a few simple steps. I’ll walk you through everything from mixing the batter to creating that showstopping web design. Just follow along – you’ve got this!
Baking the Cake Layers
First things first – preheat that oven to 350°F (175°C). Trust me, starting with the right temperature makes all the difference. While it’s heating up, let’s mix our batter:
- Whisk dry ingredients: In your biggest bowl, combine the flour, sugar, baking soda, salt, and cocoa powder. Give it a good whisk – we want everything evenly distributed.
- Mix wet ingredients: In another bowl, whisk together the oil, buttermilk, eggs, food coloring, vanilla, and vinegar until smooth. That vinegar might smell strong, but it works magic with the baking soda!
- Combine everything: Pour the wet ingredients into the dry ingredients. Mix just until combined – overmixing makes tough cake, and we want that signature red velvet tenderness.
- Divide and bake: Pour the batter evenly into your prepared pans. Slide them into the oven and set your timer for 25 minutes. Check with a toothpick – it should come out with just a few moist crumbs.
- Cool completely: Let the cakes cool in their pans for 10 minutes, then flip them onto a cooling rack. This patience is crucial – frosting warm cakes is a messy disaster waiting to happen!

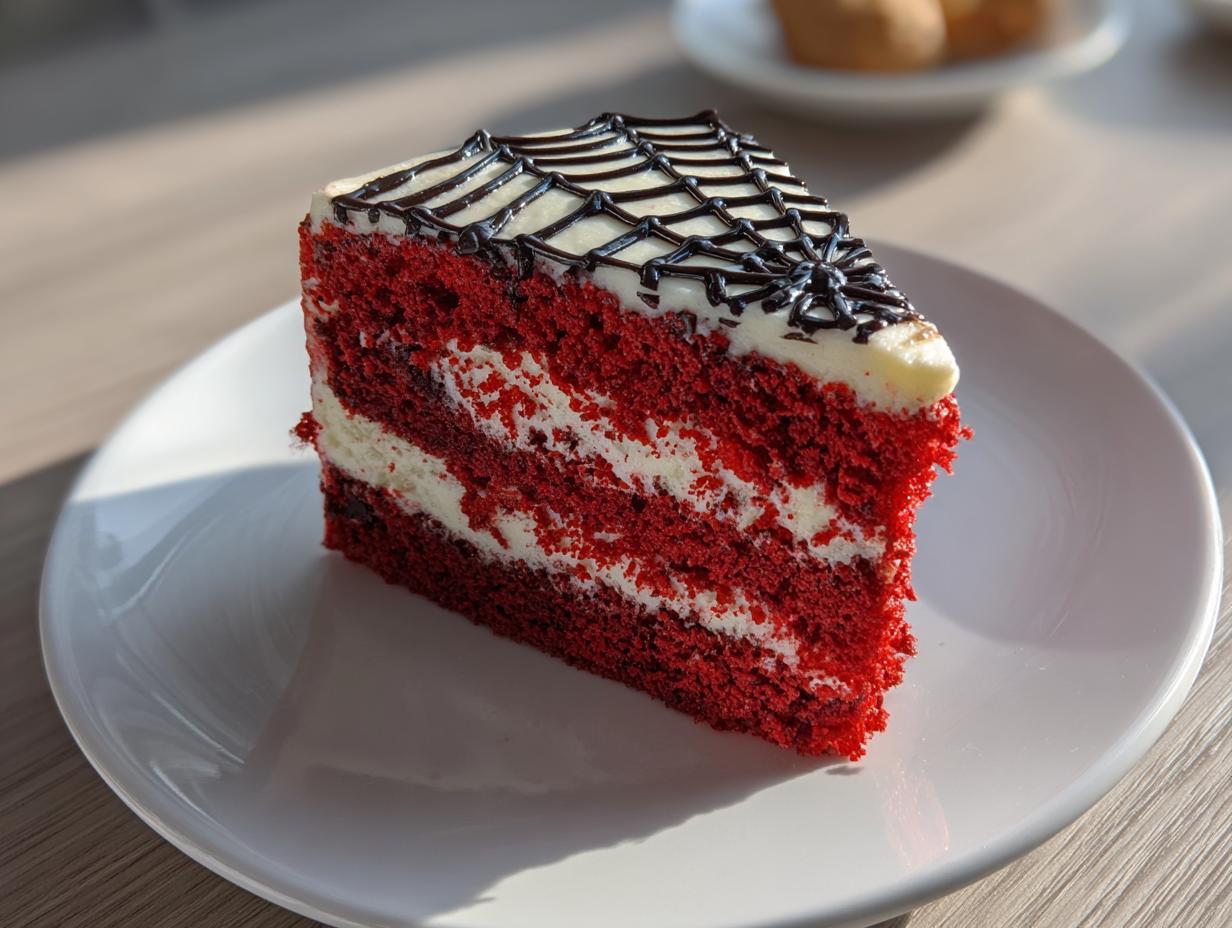
Decorating the Spider Web
Now for the fun part! Once your cakes are completely cool, it’s time to create that spooky spider web magic:
- Frost the cake: Spread a nice, even layer of cream cheese frosting over the top and sides. Don’t worry about perfection – we’re covering most of it!
- Draw concentric circles: Fill your piping bag (or plastic bag with corner snipped) with black gel icing. Starting from the center, pipe 4-5 evenly spaced circles on top of the frosted cake.
- Create the web: Here’s the magic! Take a toothpick and gently drag it from the center outward through the circles, wiping the toothpick clean between each line. Do this about 8 times around the cake to form the web pattern.
- Add finishing touches: For extra creep factor, pipe a little spider in one corner using the same black icing. Or sprinkle some edible glitter for a spooky sparkle!
Pro tip: If your lines aren’t perfect, don’t stress! Imperfections make it look more authentically web-like. Just have fun with it – that’s what Halloween baking is all about!
Tips for Perfect Red Velvet Spider Web Cake
After making this cake more times than I can count (seriously, my neighbors start asking for it in September!), I’ve picked up some foolproof tricks to guarantee spider web success every time:
Chill before decorating: Pop your cooled cake layers in the fridge for 30 minutes before frosting. Cold cakes won’t crumble as much, and that frosting will glide on like a dream. I learned this the hard way after my first attempt turned into a red velvet landslide!
Gel food coloring is your BFF: Those little bottles of liquid coloring? Forget ’em! Gel gives you that deep, blood-red color without watering down your batter. I use Americolor Super Red – just one tablespoon gives me that perfect Halloween crimson.
Pipe your web lines thin: When drawing those concentric circles, go thinner than you think you should. The toothpick drag will spread them out beautifully. My first cake looked like someone dropped a tire on it because I went too thick!
Work fast with the toothpick: Once you’ve piped your black lines, don’t dawdle! The icing starts to set quickly, and fresh lines make cleaner web strands. I like to do one quarter of the cake at a time for perfect results.
Extra cocoa for flavor depth: Want that signature red velvet taste to really shine? Add an extra teaspoon of cocoa powder to the dry ingredients. It won’t affect the color, but it gives that subtle chocolatey background flavor that makes people go “Wow, what IS that?”
Room temp ingredients matter: I know, I know – who has time to wait for eggs to warm up? But trust me, cold buttermilk and eggs don’t incorporate as well. If I’m in a hurry, I put my eggs in warm water for 5 minutes and microwave the buttermilk for 15 seconds.
Remember – even if your spider web isn’t picture-perfect, it’ll still taste amazing and look fantastic to everyone who didn’t see the Pinterest version you were aiming for! The best Halloween treats always have a little personality anyway.

Serving & Storing Red Velvet Spider Web Cake
Okay, let’s talk about the best ways to serve and keep your gorgeous spider web cake looking and tasting fresh! I’ve made this cake for everything from Halloween parties to neighborhood potlucks, and here’s what I’ve learned:
For serving: This cake is absolute perfection when served slightly chilled. About 30 minutes out of the fridge lets the flavors bloom while keeping that cream cheese frosting firm enough to hold those beautiful web lines. If you’re transporting it (to a party, a friend’s house, or… you know… secretly to your own bedroom), pop it in a cake carrier with some non-slip shelf liner underneath to prevent sliding.
Storage tips: Leftovers? Ha! Just kidding – I know sometimes there are miraculously leftovers. Store any remaining cake in an airtight container at room temperature for up to 3 days. The fridge can dry out red velvet cakes, so I only refrigerate if my kitchen is super warm. If you must refrigerate, let it come to room temp before serving – cold red velvet just isn’t the same!
Make-ahead magic: Want to bake ahead? You’re smart! The cake layers actually taste better after resting overnight. Bake them, let them cool completely, then wrap tightly in plastic wrap and store at room temp for up to 2 days before frosting. The frosting can be made a day ahead too – just keep it refrigerated and give it a quick whip before using.
Freezing option: Yes, you can freeze this cake! Wrap unfrosted layers individually in plastic wrap, then foil, and freeze for up to 3 months. Thaw overnight in the fridge, then bring to room temp before decorating. The black web design doesn’t freeze well though, so always add that fresh before serving.
Pro tip: If your cake does dry out a bit (hey, it happens to the best of us!), a quick microwave zap for 10 seconds brings back that moist, velvety texture. Just don’t tell anyone I told you to microwave cake – my grandma would roll over in her grave!
Red Velvet Spider Web Cake FAQs
I get so many questions about this cake every Halloween season! Here are the ones that pop up most often – with all my hard-earned answers from years of spider web cake experiments (and yes, a few disasters!):
Can I use boxed red velvet cake mix? Absolutely! I won’t judge – we’ve all got those busy days. Use two boxes for a nice tall cake, and add an extra teaspoon of cocoa powder to amp up the flavor. The decorating technique works exactly the same. Just promise me you’ll still use real cream cheese frosting – that’s non-negotiable!
Help! My frosting is too runny. How do I fix it? Oh honey, I’ve been there. If your cream cheese frosting is sliding right off the cake, pop the bowl in the fridge for 20 minutes to firm up. Too thin after chilling? Add powdered sugar 1/4 cup at a time until it’s spreadable but not stiff. Pro tip: Always start with cold butter and cream cheese – it makes all the difference!
What’s the best food coloring brand for that deep red color? Hands down, Americolor Super Red gel coloring is my go-to. One tablespoon gives you that perfect blood-red shade without any weird aftertaste. The liquid stuff from the grocery store? Bless its heart, but it’ll never give you that rich Halloween-worthy crimson we’re after.
My spider web lines keep smearing. What am I doing wrong? Two things: 1) Make sure your base frosting is completely set (chill the frosted cake for 30 minutes first), and 2) Don’t overload your piping bag – too much pressure makes thick lines that smear easily. And remember – slightly messy webs look more realistic anyway!
Can I make this dairy-free? You sure can! Swap the buttermilk for almond milk + 1 tbsp lemon juice, use dairy-free cream cheese for the frosting (Kite Hill works great), and choose a plant-based butter alternative. The texture might be slightly different, but it’ll still be deliciously spooky!
Nutritional Information
Okay, let’s be real – nobody eats Halloween cake for the health benefits! But since you asked (or maybe your diet-conscious friend is side-eyeing that second slice), here’s the nutritional breakdown for this glorious red velvet spider web cake. Just remember – these are estimates and may vary based on your specific ingredients. Life’s too short to stress over exact numbers when there’s cream cheese frosting involved!
Per serving (1 slice, about 1/12 of cake):
- Calories: 450 (worth every single one)
- Fat: 25g (that’s what makes it so moist!)
- Saturated Fat: 6g
- Carbohydrates: 55g
- Sugar: 30g (it’s a celebration cake, after all)
- Protein: 5g
- Sodium: 350mg
Now, if you’re feeling guilty (which you absolutely shouldn’t), just remember that carrots are vegetables, and vegetables are healthy. Therefore, by my completely sound baking logic, this is basically a salad. You’re welcome.
Final Thoughts
Well my fellow Halloween bakers, we’ve reached the end of our spooky cake adventure together! I hope you’re as excited to make this red velvet spider web cake as I am every October. There’s just something magical about slicing into that deep red velvet and revealing those perfect cream cheese layers – it’s like a little Halloween present waiting to be unwrapped.
I’d absolutely love to see your creations! Snap a pic of your spider web masterpiece and tag me on Instagram – I promise to ooh and aah over every single one. Baking fails? Share those too! Some of my best kitchen memories come from cakes that looked more like abstract art than spider webs (but tasted just as delicious).
If you try this recipe, do me a favor and leave a rating below. Your feedback helps other bakers know what to expect, and honestly, it makes my day to hear when someone has success with one of my recipes. Did you add your own twist? Swap an ingredient? I want to hear all about it!
Most importantly – have fun with it! Whether you’re baking for a Halloween party, a school event, or just because Wednesday felt like a red velvet kind of day, remember that the messiest bakes often make the best memories. Now go forth and create something spooktacular – your inner cake artist is waiting!


1 Amazing Red Velvet Spider Web Cake Recipe Perfect for Halloween
- Total Time: 50 mins
- Yield: 12 servings 1x
- Diet: Vegetarian
Description
A visually striking red velvet cake decorated with a spider web design, perfect for Halloween or themed parties.
Ingredients
- 2 1/2 cups all-purpose flour
- 1 1/2 cups granulated sugar
- 1 tsp baking soda
- 1 tsp salt
- 1 tsp cocoa powder
- 1 1/2 cups vegetable oil
- 1 cup buttermilk
- 2 large eggs
- 2 tbsp red food coloring
- 1 tsp vanilla extract
- 1 tsp white vinegar
- 16 oz cream cheese frosting
- Black gel icing for decoration
Instructions
- Preheat your oven to 350°F (175°C). Grease and flour two 9-inch round cake pans.
- In a large bowl, whisk flour, sugar, baking soda, salt, and cocoa powder.
- Add oil, buttermilk, eggs, food coloring, vanilla, and vinegar. Mix until smooth.
- Divide batter evenly between the pans. Bake for 25-30 minutes until a toothpick comes out clean.
- Cool cakes for 10 minutes in pans, then transfer to a wire rack to cool completely.
- Frost the cake with cream cheese frosting.
- Use black gel icing to draw concentric circles. Drag a toothpick from the center outward to create a spider web effect.
Notes
- For a deeper red color, add an extra tbsp of food coloring.
- Chill the cake before frosting for easier handling.
- Use a piping bag for precise spider web lines.
- Prep Time: 20 mins
- Cook Time: 30 mins
- Category: Dessert
- Method: Baking
- Cuisine: American
Nutrition
- Serving Size: 1 slice
- Calories: 450
- Sugar: 30g
- Sodium: 350mg
- Fat: 25g
- Saturated Fat: 6g
- Unsaturated Fat: 15g
- Trans Fat: 0g
- Carbohydrates: 55g
- Fiber: 1g
- Protein: 5g
- Cholesterol: 45mg