Nothing says “summer celebration” quite like a patriotic dessert, and these Red, White and Blue Cheesecake Bars have become my go-to for every backyard BBQ and Fourth of July party. I first whipped them up on a whim when my sister begged for something “festive but not complicated,” and wow – they disappeared faster than fireworks on the Fourth!
The magic is in that perfect marriage of creamy cheesecake filling and fresh berries bursting with color. Every bite gives you that rich tang from the cream cheese balanced by sweet strawberries and juicy blueberries. Trust me, once you see how easy these are to make (and how quickly they vanish from the dessert table), they’ll become your staple too.

Why You’ll Love These Red, White and Blue Cheesecake Bars
Oh, let me count the ways these beauties will steal your heart (and your guests’ attention)! First off, they’re ridiculously easy – no water baths, no fancy techniques, just simple layering that even my 10-year-old niece could handle. But here’s what really makes them special:
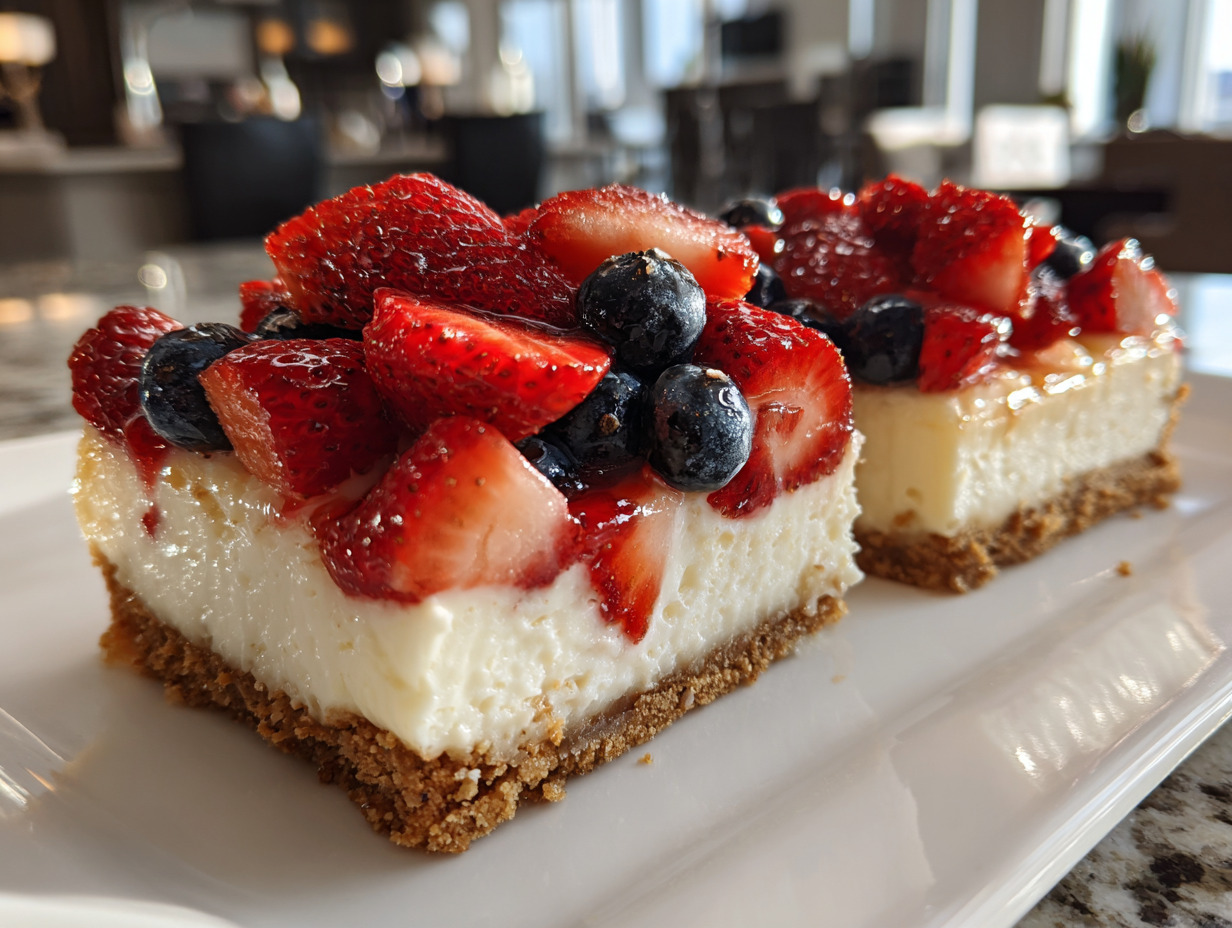
- Showstopper looks: That vibrant berry topping makes everyone think you slaved for hours when really, it’s just artful scattering (my secret: more blueberries at the edges for maximum color pop!)
- Creamy-fruity perfection: The rich cheesecake base lets the strawberries and blueberries shine without overpowering – it’s like summer vacation in every bite
- Party MVP: From Memorial Day cookouts to Labor Day potlucks, these bars scream “festive” without needing a single food dye
Bonus? They travel like a dream in their pan – no sliding layers or frosting disasters. Just cover with foil and go!
Ingredients for Red, White and Blue Cheesecake Bars
Okay, let’s talk ingredients – and I mean the good stuff! Over the years, I’ve learned that using the right ingredients (and prepping them just so) makes all the difference between “meh” and “more please!” Here’s exactly what you’ll need:
- Graham cracker crumbs: 2 cups finely crushed (I whiz mine in the food processor – no big chunks!)
- Butter: 1/2 cup melted unsalted (because we control the salt here, folks)
- Cream cheese: 16 oz (two blocks), softened to room temp – trust me, cold cream cheese lumps are the enemy!
- Sugar: 1/2 cup granulated (or swap half with brown sugar for caramel notes)
- Eggs: 2 large, room temperature (they blend smoother, promise)
- Vanilla: 1 tsp pure extract (none of that imitation stuff in Grandma’s recipe!)
- Fresh strawberries: 1 cup diced (pat ’em dry so they don’t weep on your cheesecake)
- Fresh blueberries: 1 cup (look for plump ones – they’re like little flavor bombs)
See? Nothing fancy, just quality ingredients handled right. Now let’s make some magic!
Equipment You’ll Need
Listen, I’m all for kitchen gadgets, but these cheesecake bars keep it gloriously simple. Here’s what actually earns counter space:
- 9×9 inch baking pan – My trusty square one with straight edges makes clean cuts
- Electric mixer – A hand mixer works fine (no need to dig out the stand mixer!)
- Mixing bowls – One big one for filling, another for crust
- Spatula – For scraping every last bit of that creamy filling
- Measuring cups – Dry for crumbs, liquid for melted butter
That’s it! No fancy tools – just good old-fashioned baking magic.
How to Make Red, White and Blue Cheesecake Bars
Alright, let’s get to the fun part! Making these patriotic beauties is easier than you think, but there are a few tricks I’ve learned over the years to make them absolutely perfect every time. Follow these steps, and you’ll be the star of any summer gathering!
Step 1: Prepare the Graham Cracker Crust
First things first – that buttery, crumbly base! Preheat your oven to 350°F (175°C) – don’t skip this, or your crust won’t set properly. Mix your finely crushed graham crackers with melted butter until it looks like wet sand. Here’s my secret: use the bottom of a measuring cup to press it firmly into your 9×9 pan, really packing it down so it holds together when sliced. I like to go about 1/4 inch up the sides too – it makes for a nice little crust wall!
Step 2: Make the Cheesecake Filling
Now for the creamy magic! Beat your room-temperature cream cheese first – just by itself for about 30 seconds to get it nice and smooth. Then gradually add the sugar, eggs (one at a time!), and vanilla. Don’t overmix once you add the eggs – just until everything’s incorporated, otherwise you’ll get too much air in there and risk cracks. The filling should be velvety smooth with no lumps – if you see any, keep mixing!

Step 3: Bake and Cool
Pour that luscious filling over your crust and pop it in the oven for about 25 minutes. You’re looking for set edges but a slightly jiggly center – it’ll firm up as it cools. And oh, the cooling part is crucial! Let it come to room temp before even thinking about adding fruit. I know it’s tempting, but rushing this step leads to soggy bottoms, and nobody wants that!
Step 4: Add the Red, White and Blue Toppings
The grand finale! Pat your berries dry – I mean really dry – with paper towels. Then get creative with your arrangement! I like to do stripes – strawberries on one side, blueberries on the other, with a “white” cheesecake stripe down the middle. Or go for a star pattern if you’re feeling fancy. The key is to press them in gently so they stick but don’t sink. Then chill for at least 2 hours (if you can wait that long!) before slicing into perfect little patriotic squares.

Tips for Perfect Red, White and Blue Cheesecake Bars
After making these more times than I can count (and learning from every oops moment), here are my can’t-live-without tips:
- Parchment paper is your BFF: Line that pan with an overhang – boom! Instant lifting handles for flawless removal.
- Chill like you mean it: That 2-hour wait isn’t just a suggestion. Cold cheesecake slices clean with no crumbly mess.
- Berry swaps for the win: No fresh strawberries? Use raspberries or even chopped cherries for that red pop – just adjust sugar slightly.
- Slice smart: Run your knife under hot water between cuts for picture-perfect edges every time.
- Make ahead magic: Bake the base a day early, then top with berries before serving – stress-free entertaining!
Trust me, these little tricks turn good bars into “give me the recipe!” worthy.
Storage and Serving Suggestions
Okay, here’s the deal with these beauties – they’re best enjoyed within 3 days, stored airtight in the fridge. I like to loosely tent mine with foil so the berries don’t get squished. Serve them chilled (that cheesecake needs to stay firm!), and if you’re feeling fancy, add a dollop of whipped cream right before serving. One warning though – don’t freeze them! Those gorgeous berries turn to mush when thawed, and nobody wants a patriotic puddle.
Nutritional Information
Just so you know, these numbers are ballpark estimates – your exact results might dance a little depending on your ingredient brands and how generously you top those berries! Each luscious bar comes in around 220 calories, with that perfect balance of sweet and tangy. Remember, we’re here for celebration, not calorie counting!

FAQs About Red, White and Blue Cheesecake Bars
Can I use frozen fruit instead of fresh?
Oh honey, I’ve been there when berries were out of season! Frozen will work in a pinch, but thaw and pat them bone-dry first – we’re talking multiple paper towels. Otherwise, you’ll end up with a watery mess. The texture won’t be quite as perfect, but the flavor still sings!
Help! My cheesecake cracked – how do I prevent this?
First, don’t panic! Those cracks just mean extra character (and they’ll hide under berries). To avoid them: don’t overmix after adding eggs, bake until just set (not solid), and let it cool gradually in the oven with the door cracked open for 30 minutes. Works like a charm!
Can I make these gluten-free?
Absolutely! Swap the graham crumbs for gluten-free cookie crumbs (gingersnaps are delicious) or even crushed gluten-free pretzels for a salty-sweet twist. Just keep that 2:1 crumbs-to-butter ratio, and you’re golden.
Can I prepare these the night before?
That’s actually my secret move! Bake the cheesecake base one day, then add berries a few hours before serving. The flavors meld beautifully, and you avoid last-minute stress. Just don’t top them more than 6 hours ahead, or the berries might weep.
Share Your Patriotic Dessert Creations
Nothing makes me happier than seeing your berry-topped masterpieces! Snap a pic of your cheesecake bars all dressed up in their patriotic finest – I live for those creative berry arrangements. Did you try swapping raspberries? Add a dusting of powdered sugar “stars”? Tell me all about it in the comments below!
PrintIrresistible Red, White and Blue Cheesecake Bars in 4 Easy Steps
- Total Time: 3 hours
- Yield: 16 bars 1x
- Diet: Vegetarian
Description
A patriotic dessert combining cream cheese, strawberries, and blueberries for a festive treat.
Ingredients
- 2 cups graham cracker crumbs
- 1/2 cup melted butter
- 16 oz cream cheese, softened
- 1/2 cup sugar
- 2 eggs
- 1 tsp vanilla extract
- 1 cup fresh strawberries, diced
- 1 cup fresh blueberries
Instructions
- Preheat oven to 350°F (175°C).
- Mix graham cracker crumbs with melted butter and press into a 9×9 inch pan.
- Beat cream cheese, sugar, eggs, and vanilla until smooth.
- Pour filling over crust.
- Bake for 25 minutes.
- Cool completely, then top with strawberries and blueberries.
- Chill for 2 hours before serving.
Notes
- Use room-temperature cream cheese for smoother mixing.
- Pat fruit dry before topping to prevent sogginess.
- Prep Time: 15 minutes
- Cook Time: 25 minutes
- Category: Dessert
- Method: Baking
- Cuisine: American
Nutrition
- Serving Size: 1 bar
- Calories: 220
- Sugar: 15g
- Sodium: 180mg
- Fat: 14g
- Saturated Fat: 8g
- Unsaturated Fat: 5g
- Trans Fat: 0g
- Carbohydrates: 21g
- Fiber: 1g
- Protein: 3g
- Cholesterol: 55mg