Oh, let me tell you about my absolute favorite thing to make when I want to impress guests (or just treat myself) – this incredible Rosemary Garlic Pull Apart Bread. There’s something magical about how the earthy rosemary and punchy garlic come together in warm, buttery bread that just begs to be pulled apart and devoured. I first made this for a casual dinner party years ago, and now my friends won’t let me show up without it!
What I love most is how versatile this bread is. Need an appetizer that’ll have everyone gathered around the table? Check. Want to elevate a simple bowl of soup or salad to something special? Done. Honestly, sometimes I make it just to have the house smell like a fancy Italian bakery all afternoon. The combination of fresh rosemary and roasted garlic creates this aromatic masterpiece that fills your kitchen with the coziest, most inviting scent as it bakes.

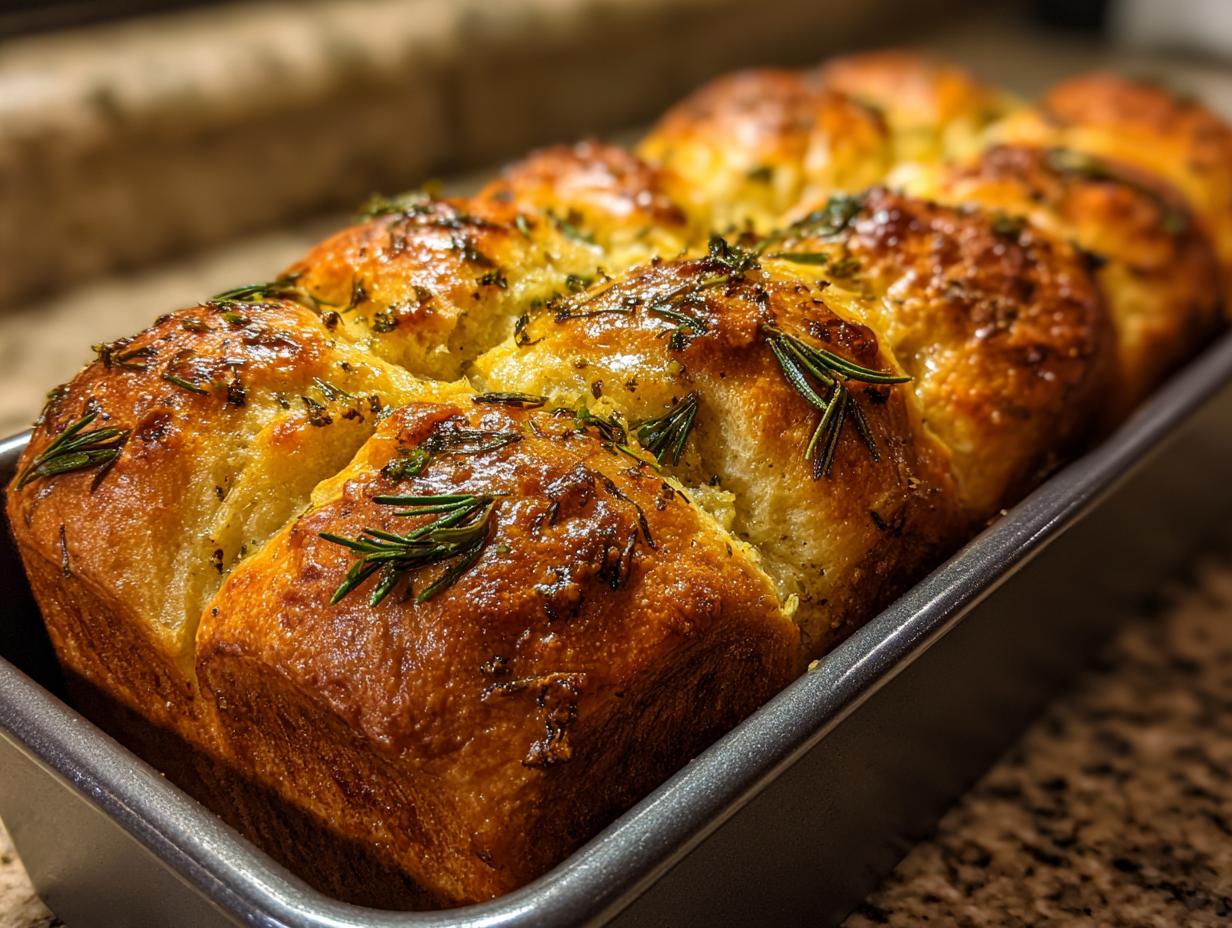
What really sets this Rosemary Garlic Pull Apart Bread apart (pun totally intended) is how the flavors infuse every bite. Unlike regular garlic bread where the toppings stay on the surface, here we’re rolling each little dough ball in the garlic-rosemary goodness so every tear reveals another burst of flavor. Trust me, once you try this, you’ll never go back to plain old dinner rolls again!
Ingredients for Rosemary Garlic Pull Apart Bread
Here’s everything you’ll need to make this irresistible bread – I promise every ingredient plays a crucial role!
- 3 cups all-purpose flour – spooned and leveled for accuracy
- 2 tsp active dry yeast – check the expiration date!
- 1 tbsp sugar – just enough to feed the yeast
- 1 tsp salt – I use fine sea salt
- 1 cup warm water (110°F) – test it on your wrist like baby’s milk
- 3 tbsp olive oil – plus extra for the bowl
- 4 cloves garlic, finely minced – fresh is best
- 2 tbsp fresh rosemary, chopped – remove those woody stems
- 2 tbsp melted butter – for that glorious final brush
How to Make Rosemary Garlic Pull Apart Bread
Preparing the Dough
First things first – let’s get that dough going! In a large mixing bowl, whisk together your flour, yeast, sugar, and salt. I always do this by hand – something about feeling the ingredients combining gets me excited for what’s coming. Now, make a little well in the center and pour in that warm water (remember, wrist-temperature) and olive oil. Stir everything together until it forms a shaggy mass – don’t worry if it looks messy at this stage.
Turn it out onto a lightly floured surface and start kneading. Here’s my trick: push the dough away with the heel of your hand, then fold it back over itself. You’ll feel it transform from sticky to smooth and elastic in about 8-10 minutes. When it’s ready, the dough should spring back when you poke it gently. Pop it into an oiled bowl, cover with a clean towel, and let it rise in a warm spot until doubled – about an hour. My favorite proofing spot? On top of the fridge where it’s nice and cozy.

Infusing the Garlic-Rosemary Mixture
While the dough rises, let’s make that magical flavor bomb. Heat a small skillet over medium-low and add a drizzle of olive oil. Toss in your minced garlic – you’ll know it’s ready when that incredible aroma hits your nose (about 30 seconds). Careful not to brown it! Transfer to a bowl and stir in your chopped rosemary. The warmth from the garlic will release the rosemary’s oils, creating this heavenly paste.
When your dough has risen, punch it down (so satisfying!) and divide it into about 20 equal pieces. Roll each into a ball, then dip and roll in the garlic-rosemary mixture until well coated. You’ll want to really massage that flavor in there – trust me, every extra second is worth it!
Baking and Finishing Touches
Time to assemble our masterpiece! Grease a standard loaf pan (I use butter for extra flavor) and start arranging your dough balls inside. Don’t stress about perfect placement – the rustic look is part of the charm. Cover and let rise again for about 30 minutes until puffy. Meanwhile, preheat your oven to 375°F (190°C).
Bake for 25-30 minutes until golden brown and sounding hollow when tapped. The hardest part? Waiting those final minutes while your kitchen fills with that incredible smell. As soon as it comes out of the oven, brush generously with melted butter – this gives it that irresistible sheen and extra layer of flavor. Let it cool just enough so you don’t burn your fingers, then dig in while it’s warm!
Why You’ll Love This Rosemary Garlic Pull Apart Bread
Let me count the ways this bread will become your new obsession:
- Explosion of flavor – Every pull-apart piece is packed with garlicky, herby goodness
- Perfect for sharing – The pull-apart design makes it ideal for gatherings (no knife required!)
- Looks fancy with zero effort – That golden, rustic loaf looks straight from a bakery
- Makes your house smell amazing – The aroma of roasting garlic and rosemary is pure comfort
- Endlessly versatile – Works as an appetizer, side dish, or even next-morning breakfast
Seriously, this bread disappears faster than I can make it – and the compliments come just as quick!
Tips for Perfect Rosemary Garlic Pull Apart Bread
After making this bread more times than I can count, here are my foolproof tricks for perfection:
- Fresh is best – That jar of dried rosemary in your pantry? Leave it there. Fresh rosemary makes all the difference in flavor.
- Dough check – If your dough feels too sticky after kneading, add flour 1 tbsp at a time – it should be tacky but not stick to your hands.
- Crispy lover? Bake an extra 5 minutes for a golden, crunchier crust (just watch it doesn’t get too dark).
- Temperature matters – Too-hot water will kill your yeast, too cold won’t activate it. Test it on your wrist – it should feel comfortably warm.
- Patience pays – Don’t rush the rises! That waiting time develops flavor and texture beautifully.
Follow these simple tips, and you’ll have bakery-worthy bread every single time!
Ingredient Substitutions and Variations
Don’t stress if you’re missing an ingredient – this Rosemary Garlic Pull Apart Bread is super adaptable! Out of fresh rosemary? Use 1 tsp dried (though the flavor won’t be quite as vibrant). Vegan? Swap the butter for olive oil or your favorite plant-based butter. Want to take it over the top? Try mixing in 1/4 cup grated Parmesan with the garlic-rosemary coating. For extra richness, brush the baked bread with garlic butter instead of plain. The possibilities are endless – that’s what makes this recipe so fun to play with!
Serving Suggestions
This Rosemary Garlic Pull Apart Bread is basically the best edible centerpiece you could ask for! I love serving it warm alongside a big bowl of creamy tomato soup – the flavors are a match made in heaven. It’s also fantastic with pasta dishes (extra points for dipping in marinara), or as part of a charcuterie board with olive oil and balsamic for dipping.
Got leftovers? They’re gold! Just wrap in foil and warm in a 350°F oven for 5-10 minutes to bring back that fresh-baked magic. My secret? Sometimes I’ll split the leftover bread horizontally and make the most incredible garlic bread sandwich with mozzarella and roasted veggies – next-level delicious!
Rosemary Garlic Pull Apart Bread Nutrition Facts
Nutritional values are estimates and vary based on ingredients. Per slice (1/20th of loaf): 180 calories, 7g fat (2g saturated), 25g carbs (1g fiber), 4g protein. Not too shabby for bread this delicious! Remember, these numbers can change slightly depending on how generous you are with the garlic-rosemary coating and butter brush.
Frequently Asked Questions
Can I use dried rosemary instead of fresh?
Absolutely, but use only 1 tsp dried rosemary since it’s more concentrated. While fresh rosemary gives the best flavor, dried works in a pinch – just crush it between your fingers before mixing to release the oils.
What’s the best way to store leftovers?
Wrap cooled bread tightly in foil and keep at room temperature for up to 2 days. For longer storage, pop it in the fridge (though the texture suffers slightly). My trick? Reheat leftovers wrapped in foil at 350°F for 5-10 minutes to restore that fresh-baked magic!
Can I freeze the dough for later?
You sure can! After the first rise, shape the dough into balls and freeze on a baking sheet. Once frozen solid, transfer to a freezer bag. When ready to bake, thaw overnight in fridge, coat with garlic-rosemary mix, and proceed with second rise. Works like a charm!
Why didn’t my dough rise properly?
Check your yeast expiration date first! Also, make sure your water was warm (not hot) – about 110°F. If your kitchen is chilly, try proofing the dough in a slightly warmed oven (turned off) or near a warm stovetop.
Can I make this bread ahead for a party?
Definitely! Bake it the morning of your event, then reheat wrapped in foil at 300°F for 10 minutes before serving. The aroma will greet your guests at the door!

Okay, now it’s your turn to experience this Rosemary Garlic Pull Apart Bread magic! I can’t wait for you to smell that heavenly garlic-rosemary aroma filling your kitchen and see everyone’s faces light up when you bring this golden beauty to the table. Don’t be surprised if they start pulling pieces off before you even get to sit down – it’s that irresistible!
Tell me all about your baking adventure in the comments below – did you stick to the classic recipe or try any fun variations? I’d love to hear your twists and see photos of your creations. And if you have any questions while making it, shout out – I’m here to help you achieve pull-apart perfection. Happy baking, my friend – may your bread be fluffy, your garlic fragrant, and your rosemary forever fresh!
Print
Irresistible Rosemary Garlic Pull Apart Bread in 20 Pieces
- Total Time: 2 hours
- Yield: 1 loaf 1x
- Diet: Vegetarian
Description
A flavorful pull-apart bread infused with rosemary and garlic, perfect as a side dish or appetizer.
Ingredients
- 3 cups all-purpose flour
- 2 tsp active dry yeast
- 1 tbsp sugar
- 1 tsp salt
- 1 cup warm water
- 3 tbsp olive oil
- 4 cloves garlic, minced
- 2 tbsp fresh rosemary, chopped
- 2 tbsp melted butter
Instructions
- In a bowl, mix flour, yeast, sugar, and salt.
- Add warm water and olive oil, knead into a dough.
- Cover and let rise for 1 hour.
- Sauté garlic in olive oil until fragrant, then mix with rosemary.
- Roll dough into small balls, coat with garlic-rosemary mixture.
- Arrange balls in a greased loaf pan, let rise for 30 minutes.
- Bake at 375°F (190°C) for 25-30 minutes.
- Brush with melted butter before serving.
Notes
- Use fresh rosemary for best flavor.
- Let dough rise in a warm place.
- Serve warm for optimal taste.
- Prep Time: 1 hour 30 minutes
- Cook Time: 30 minutes
- Category: Bread
- Method: Baking
- Cuisine: Mediterranean
Nutrition
- Serving Size: 1 slice
- Calories: 180
- Sugar: 2g
- Sodium: 200mg
- Fat: 7g
- Saturated Fat: 2g
- Unsaturated Fat: 4g
- Trans Fat: 0g
- Carbohydrates: 25g
- Fiber: 1g
- Protein: 4g
- Cholesterol: 5mg