Every Halloween, my kitchen transforms into a spooky bakery, and this spider web chocolate cake always steals the show. It’s not just a dessert—it’s a centerpiece that makes kids gasp and adults sneak second slices. The rich, dark crumb stays miraculously moist thanks to my secret boiling water trick, while the white chocolate web looks fancy but takes minutes to create. I’ve been perfecting this recipe since my niece declared store-bought Halloween treats “too boring” years ago. Now it’s our tradition—mixing batter while telling ghost stories, then watching faces light up when I reveal the eerie yet delicious masterpiece.
Why You’ll Love This Spider Web Chocolate Cake
This isn’t just any chocolate cake – it’s a showstopper that’ll have everyone reaching for their phones to snap pictures before they dare take a bite. Here’s why this recipe has become my go-to Halloween tradition:
- Effortless wow factor: That spider web design looks like it took hours, but here’s my secret – it’s just melted chocolate and a toothpick! Even my most baking-challenged friends can nail this impressive decoration.
- Deep, dark chocolate bliss: The boiling water trick gives this cake an almost brownie-like richness without being overly sweet. It’s the perfect canvas for all that melty web decor.
- Halloween’s best dessert: While everyone else is bringing store-bought cookies, your spider web cake will be the talk of the party. Bonus: it pairs perfectly with witch’s brew punch!
- Always a crowd-pleaser: From skeptical teens to dessert-loving adults, this cake disappears faster than ghosts at sunrise. I always make two – one for show and one for sneaky kitchen nibbles.
- Customizable creepiness: Add plastic spiders for extra fright, or swap the dark chocolate web for orange-colored white chocolate if you want something less spooky but equally striking.
Trust me, once you see how easy it is to turn basic ingredients into this masterpiece, you’ll be making it every October – and probably finding excuses to bake it year-round too!
Ingredients for Spider Web Chocolate Cake
What I love about this recipe is how simple ingredients transform into something magical. I always pull everything out before starting – it’s my little ritual. Here’s what you’ll need:
- For the cake: 2 cups all-purpose flour (spooned and leveled – don’t pack it!), 2 cups granulated sugar, 3/4 cup unsweetened cocoa powder (I’m loyal to Dutch-process for that deep color), 2 tsp baking powder, 1.5 tsp baking soda, 1 tsp salt, 1 cup milk (whole milk makes it extra tender), 1/2 cup vegetable oil, 2 large eggs (room temperature – this matters!), 2 tsp pure vanilla extract, 1 cup boiling water
- For the spooky web: 1 cup white chocolate chips (or chopped bar chocolate – don’t use candy melts, they don’t drizzle right), 1/4 cup dark chocolate (about 60% cacao works best – chop it fine so it melts evenly)
See? Nothing fancy, just pantry staples that come together in the most spectacular way. That boiling water might seem odd, but trust me – it’s the trick to getting that fudgy texture we all crave in chocolate cake. And don’t skip the vanilla! It might not seem like much, but it rounds out all those chocolate flavors beautifully.
Equipment You’ll Need
No need for fancy gadgets here – just grab these basics from your kitchen, and you’re ready to create your spooky masterpiece:
- Two 9-inch round cake pans: I like the light-colored aluminum ones – they bake more evenly than dark pans. Don’t have two? Bake in batches and let the first layer cool while the second bakes.
- Mixing bowls: One large one for dry ingredients, another for wet. My grandma’s old yellow Pyrex bowls are my lucky charm!
- Electric mixer: A hand mixer works perfectly fine (that’s what I use), though a stand mixer makes creaming easier if you’ve got one.
- Toothpicks: The secret weapon for that perfect spider web design! I keep a handful ready – sometimes one gets chocolate-clogged mid-design.
- Squeeze bottle or piping bag: For those smooth white chocolate drizzle lines. In a pinch? A zip-top bag with the corner snipped off works too!

That’s it! Well, plus basic stuff like measuring cups and a spatula. See? No special equipment needed to make this showstopper. Now let’s get baking!
How to Make Spider Web Chocolate Cake
Ready for some kitchen magic? This recipe comes together in two fun parts – baking those luscious chocolate layers, then creating the showstopping web design. The key is patience (especially when waiting for the cake to cool – I know, torture!). Let’s break it down:
Baking the Cake Layers
First things first – preheat your oven to 350°F (175°C). While it heats up, generously grease those two 9-inch round pans. Here’s my little trick: I like to line the bottoms with parchment circles too, just to be extra sure nothing sticks. Now, let’s make some batter!
- Mix the dry goods: In your biggest bowl, whisk together the flour, sugar, cocoa powder, baking powder, baking soda, and salt. Get out any cocoa lumps – you want this silky smooth.
- Bring on the wet ingredients: In another bowl, mix the milk, oil, eggs, and vanilla. Pour this into the dry ingredients and beat with your mixer on medium for about 2 minutes. The batter will be thick and glorious.
- The boiling water secret: Here’s where the magic happens! Slowly stir in that cup of boiling water. The batter will thin out dramatically – don’t panic, this is exactly what we want for that ultra-moist crumb.
- Bake to perfection: Divide the batter evenly between your prepared pans. Slide them into the oven and bake for 30-35 minutes. You’ll know they’re done when a toothpick comes out with just a few moist crumbs (no wet batter!).

Now comes the hardest part – letting the cakes cool completely in their pans on wire racks. I know it’s tempting, but decorating a warm cake is a recipe for melty web disaster! I usually bake these in the afternoon and decorate after dinner when I can’t stand waiting anymore.
Creating the Spider Web Design
This is where we turn a delicious chocolate cake into a Halloween masterpiece! Make sure your cake is completely cooled (I wait at least 2 hours) before starting these steps:
- Prep your chocolates: Melt the white chocolate in 30-second bursts in the microwave, stirring between each. Do the same with the dark chocolate, keeping them separate. Pro tip: If they seem too thick, add just a teaspoon of vegetable oil to each to make them more drizzle-friendly.
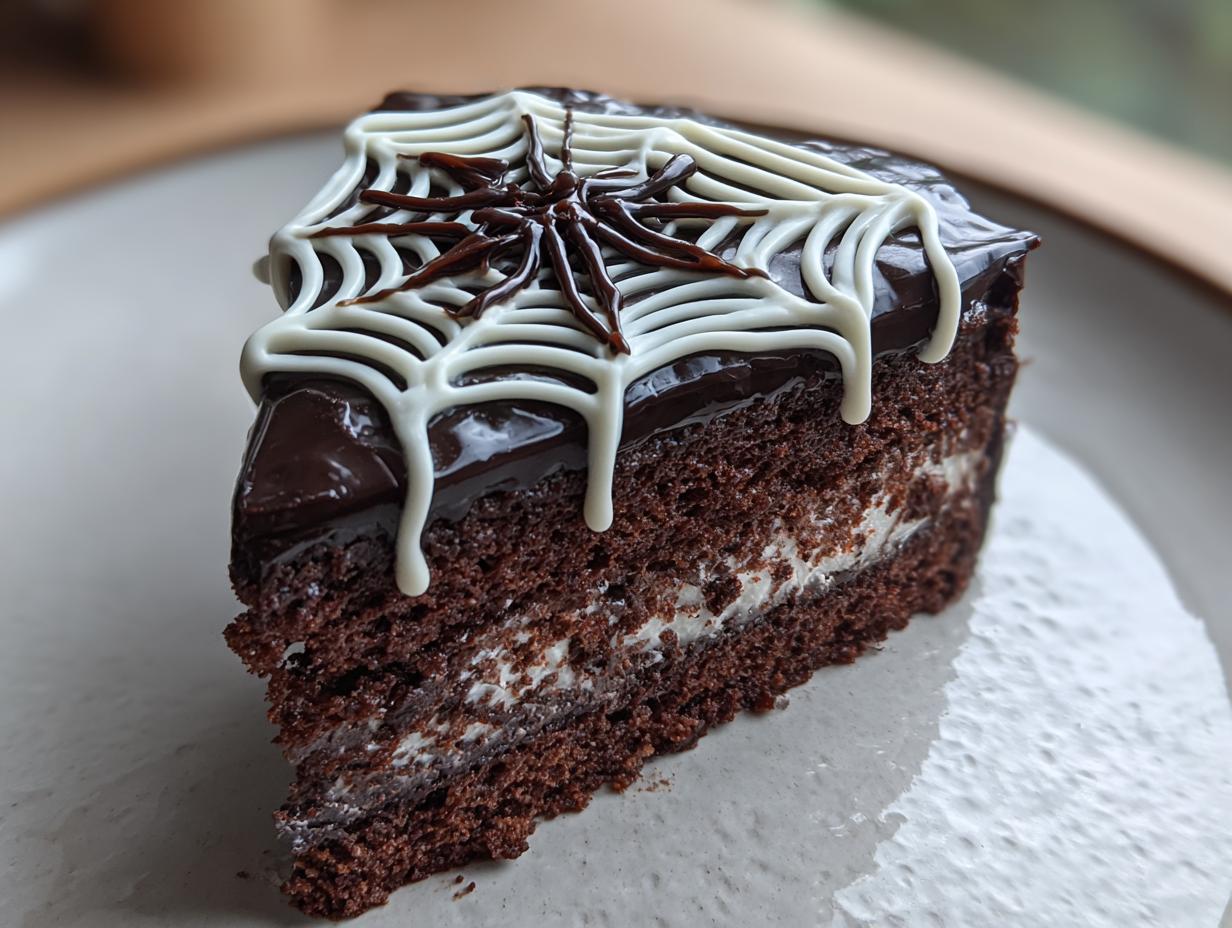
- The spiral base: Using your squeeze bottle or piping bag, start in the center of the cake and swirl the white chocolate outward in a continuous spiral. Don’t stress about perfection – organic-looking webs are creepier anyway!
- Web-making magic: Take a toothpick and, starting from the center, gently drag lines outward to the edge. Wipe the toothpick clean between strokes. Then drag lines from the edge inward between your first lines to create that classic web pattern.
- Spooky accents: Use the dark chocolate to add little “spider legs” around the edge if you’re feeling fancy. Or place plastic spiders strategically for extra fright!

Let the chocolate set for about 30 minutes before serving. Watch as your guests marvel at your spooky baking skills – then prepare for the cake to disappear as quickly as a ghost in the night!
Tips for the Perfect Spider Web Chocolate Cake
After making this cake more times than I can count (and yes, learning from a few chocolatey disasters), I’ve picked up some tricks that guarantee spider web success every time. Here are my can’t-live-without tips:
- Chill that cake! I pop my cooled layers in the fridge for about 30 minutes before decorating. A slightly cold surface helps the chocolate drizzle set faster so your web holds its shape beautifully. Bonus: It makes slicing cleaner too.
- Invest in good cocoa powder: That deep, dark color isn’t just for looks – it’s flavor! I splurge on Dutch-process cocoa for its rich taste and velvety texture. The difference is night and day compared to generic brands.
- Drizzle consistency is key: Your white chocolate should flow like warm honey – not too thick that it clumps, not so thin it runs everywhere. If it’s too thick, add a teaspoon of oil; too thin? Stir in more melted chocolate chips.
- Practice makes perfect: First-time web weaver? Try your design on parchment paper first! Pipe your spiral and practice the toothpick drags until you’re comfortable. Then just peel it off and eat your “mistakes” – purely for research, of course.
One last secret? Have fun with it! My first attempt looked more like abstract art than a spider web, but my family still devoured it. Now it’s our Halloween joke – “Is it modern art or is Auntie trying to scare us?” Either way, with these tricks up your sleeve, you’re guaranteed a cake that’s both spooky and spectacular.
Variations & Serving Suggestions
One of my favorite things about this spider web chocolate cake is how easily you can tweak it to suit any taste or occasion! Here are some of my favorite twists that keep the spooky fun while adding delicious variety:
- Minty web: Add 1/2 tsp peppermint extract to the cake batter and use green-tinted white chocolate for the web. It’s like a spooky Andes mint – my neighbor’s kids go crazy for this version!
- Pumpkin spice twist: Replace 1/2 cup of flour with pumpkin spice mix for a fall-flavored cake. I use orange candy melts for the web around Thanksgiving – looks like a harvest moon!
- Berry haunted: Sandwich raspberry jam between the layers before decorating. The red “blood” peeking through the web cracks is delightfully creepy (and delicious).
- Coffee boost: Replace the boiling water with hot brewed coffee. The chocolate flavor becomes so deep and rich – perfect for adult Halloween parties!
When it comes to serving, presentation is half the fun! Some of my go-to pairings:
- Top slices with a scoop of vanilla ice cream – the meltiness looks like ghostly ectoplasm!
- Drizzle individual plates with blackberry compote for a “spider juice” effect that tastes amazing.
- For kids, serve with “spider eggs” (chocolate-covered raisins) scattered around the plate.
- At parties, I sometimes add dry ice to the serving platter (safely elevated) for smoky, cauldron-like vibes.
The best part? Every variation still gets those oohs and ahhs when you slice into that perfect web design. Whether you stick to the classic or try one of these fun twists, this cake is guaranteed to be the life of any spooky celebration!
Storing and Freezing
Here’s the good news – this spider web chocolate cake keeps beautifully, though let’s be honest, it rarely lasts long in my house! When you do need to store it (or when you’re smart enough to make extras ahead), here’s how to keep it fresh and fabulous:
- Room temperature storage: Once the chocolate web has fully set (about 1 hour after decorating), cover the cake with an airtight container or cake dome. It’ll stay moist and delicious for up to 3 days this way. I usually keep mine on the counter because I love how the chocolate stays slightly soft.
- Refrigerator option: If your kitchen runs warm or you’re storing it longer, pop it in the fridge for up to 5 days. Just let slices come to room temp for 15 minutes before serving – cold chocolate cake isn’t nearly as dreamy!
- Freezing like a pro: You can freeze the undecorated layers for up to 1 month! Wrap each cooled layer tightly in plastic wrap, then foil. Thaw overnight in the fridge when ready to use. The decoration? Always best added fresh – I make my web the day of serving for maximum visual impact.
One quick warning – if you’ve used plastic spiders or other decorations, remove those before storing (nobody wants to bite into a frozen spider!). I learned that lesson the hard way when my nephew nearly had a heart attack finding a “surprise” in his midnight snack… Whoops!
Spider Web Chocolate Cake FAQs
Can I use milk chocolate instead of dark for the web?
Absolutely! Milk chocolate works fine, though the web won’t be as dramatic. Just melt it gently to avoid scorching – milk chocolate burns easier than dark.
Help! My white chocolate drizzle broke into clumps.
No panic! Add 1 tsp vegetable oil and microwave for 10 more seconds, stirring until smooth. Too thin? Mix in extra melted chocolate chips.
Can I make this cake gluten-free?
Yes! Swap the all-purpose flour for a 1:1 gluten-free blend. I’ve had great results with Bob’s Red Mill – just add 1/4 tsp xanthan gum if your mix doesn’t include it.
Why does my spider web design smear?
Your cake probably wasn’t cool enough. Next time, chill layers for 30 minutes first – cold surfaces set the chocolate instantly.
Can I bake this as cupcakes instead?
You bet! Fill liners 2/3 full and bake 18-20 minutes. Mini spider webs on each cupcake look adorable – use a toothpick for tiny designs!
Nutrition Information
While we don’t bake this spider web chocolate cake for its health benefits (let’s be real – it’s Halloween magic!), here’s a general idea of what you’re enjoying. Remember, these numbers are estimates and can change based on your specific ingredients and brands:
- Serving size: 1 slice (1/12 of cake)
- Calories: Approximately 320
- Sugar: About 30g (mostly from that gorgeous chocolate web!)
- Protein: Around 5g
My philosophy? Life’s too short to stress over dessert nutrition facts – especially when it’s this delicious and only comes around once a year! Just enjoy your spooky creation and maybe take an extra walk around the neighborhood trick-or-treating to balance it out.
Print
Spooky Spider Web Chocolate Cake: 2-Ingredient Decor Trick
- Total Time: 55 minutes
- Yield: 12 servings 1x
- Diet: Vegetarian
Description
A rich and decadent chocolate cake decorated with a spider web design, perfect for Halloween or themed parties.
Ingredients
- 2 cups all-purpose flour
- 2 cups granulated sugar
- 3/4 cup unsweetened cocoa powder
- 2 tsp baking powder
- 1.5 tsp baking soda
- 1 tsp salt
- 1 cup milk
- 1/2 cup vegetable oil
- 2 large eggs
- 2 tsp vanilla extract
- 1 cup boiling water
- 1 cup white chocolate (for spider web design)
- 1/4 cup dark chocolate (for spider web design)
Instructions
- Preheat your oven to 350°F (175°C) and grease two 9-inch round cake pans.
- Mix flour, sugar, cocoa powder, baking powder, baking soda, and salt in a large bowl.
- Add milk, vegetable oil, eggs, and vanilla extract. Beat on medium speed for 2 minutes.
- Stir in boiling water until the batter is smooth.
- Pour batter evenly into the prepared pans and bake for 30-35 minutes or until a toothpick inserted comes out clean.
- Let cakes cool completely before removing from pans.
- Melt white chocolate and drizzle in a spiral pattern on top of the cake.
- Melt dark chocolate and use a toothpick to draw lines from the center outward to create a spider web effect.
Notes
- Ensure the cakes are completely cool before decorating.
- For best results, use a squeeze bottle for the white chocolate drizzle.
- Store in an airtight container for up to 3 days.
- Prep Time: 20 minutes
- Cook Time: 35 minutes
- Category: Dessert
- Method: Baking
- Cuisine: American
Nutrition
- Serving Size: 1 slice
- Calories: 320
- Sugar: 30g
- Sodium: 380mg
- Fat: 12g
- Saturated Fat: 3g
- Unsaturated Fat: 7g
- Trans Fat: 0g
- Carbohydrates: 50g
- Fiber: 2g
- Protein: 5g
- Cholesterol: 35mg