Nothing screams Halloween quite like a batch of spooky spider web cupcakes staring back at you from the dessert table! I’ve been making these creepy-cute treats every October for years – they’re the first thing to disappear at parties and the recipe my nieces and nephews beg me to make. The magic happens when rich chocolate cupcakes meet that signature web design piped in white icing. It looks fancy, but trust me, even beginner bakers can nail this with my simple technique. What I love most is how these transform basic ingredients into edible Halloween magic – perfect for classroom parties, haunted house gatherings, or just surprising your family with a frightfully fun dessert!

Why You’ll Love These Spider Web Cupcakes
Oh my gosh, these spider web cupcakes are the ultimate Halloween win! Here’s why they’re always a hit:
- Easiest spooky treat ever: That fancy web design? Just circles and toothpick swipes—no artistic skills needed!
- Kid-approved magic: My little cousins go wild watching the webs “appear” when I drag the toothpick through.
- Party superstar: They look store-bought fancy but taste homemade amazing (that sour cream secret keeps them crazy moist).
- Stress-free fun: Use store-bought frosting if you’re rushed—I won’t tell! Works great with gluten-free mixes too.
Seriously, these disappear faster than ghosts at sunrise at every Halloween bash I’ve brought them to!
Ingredients for Spider Web Cupcakes
Okay, let’s gather our magical potion—er, ingredients! Here’s everything you’ll need for these wickedly delicious cupcakes:
- 1 cup all-purpose flour (spooned and leveled—no packing!)
- 1/2 cup cocoa powder (the darker, the spookier)
- 1 tsp baking powder (freshness matters—give the can a sniff!)
- 1/2 tsp baking soda
- 1/4 tsp salt (just a pinch to balance the sweetness)
- 1/2 cup unsalted butter, softened (leave it out for 30 minutes—no microwave shortcuts!)
- 1 cup granulated sugar
- 2 large eggs (room temp—they’ll blend smoother)
- 1 tsp vanilla extract (the real stuff—imitation tastes like plastic spiders)
- 1/2 cup milk (whole milk for extra richness, but any works)
- 1/2 cup sour cream (secret weapon for super-moist crumb)
- 1 cup chocolate frosting (homemade or store-bought—no judgment!)
- 1/4 cup white icing (for those dramatic webs)
Ingredient Notes & Substitutions
Allergic to dairy? Swap butter for coconut oil, milk for almond milk, and sour cream for coconut yogurt. Gluten-free? Use a 1:1 GF flour blend (I like Bob’s Red Mill). Out of sour cream? Greek yogurt works great. And if you’re in a hurry, canned frosting saves the day—just warm it slightly for easier piping!
Equipment You’ll Need
Don’t worry—no fancy gadgets required for these spooky treats! Here’s what I always grab from my baking drawer:
- 12-cup muffin pan (standard size—no mini cupcakes here!)
- Cupcake liners (black or orange for extra Halloween vibes)
- Piping bag + round tip (or a ziplock with the corner snipped off in a pinch)
- Toothpicks (your magic wand for creating webs)
- Mixing bowls + whisk (one for dry, one for wet—Grandma’s rule!)
That’s it! Now let’s get baking—those spiders won’t web themselves!
How to Make Spider Web Cupcakes
Alright, let’s dive into the fun part! Making these spider web cupcakes is like conducting a delicious science experiment – follow these steps and you’ll have perfect spooky treats in no time.
Step 1: Prep the Batter
First, whisk together all your dry ingredients – flour, cocoa powder, baking powder, baking soda, and salt. In another bowl, cream that softened butter and sugar until it’s light and fluffy (about 2 minutes). Now add eggs one at a time, mixing well after each. Splash in the vanilla, then alternate adding the milk/sour cream mixture with the dry ingredients. The batter should be thick but pourable – think melted ice cream consistency!
Step 2: Bake & Cool
Fill those cupcake liners about 2/3 full (I use an ice cream scoop for perfect portions). Pop them in your preheated 350°F oven for 18-20 minutes. When a toothpick comes out clean with just a few moist crumbs, they’re done! Resist the urge to frost them hot – let them cool completely on a rack (about 45 minutes). Hot cupcakes melt frosting into a sad puddle – learned that the hard way!

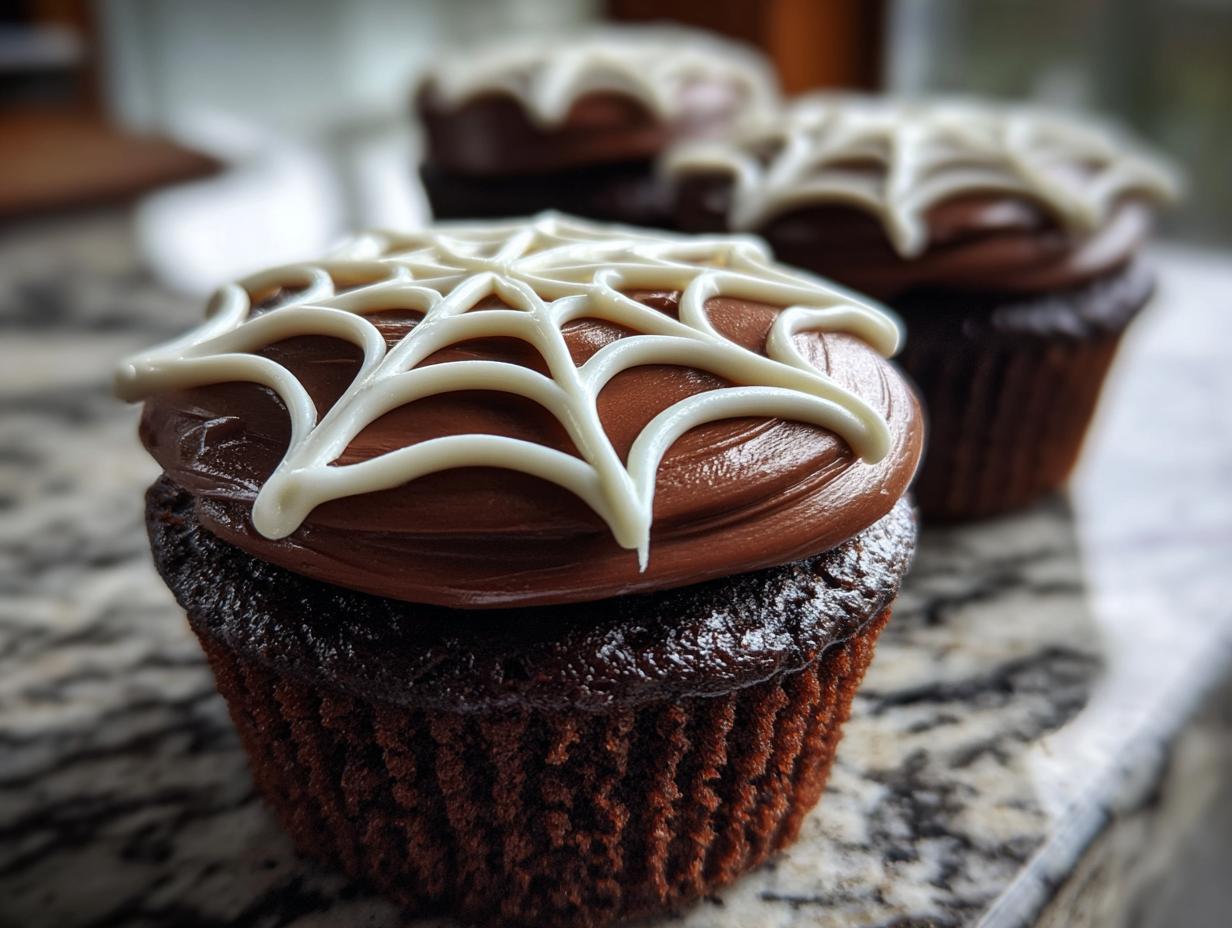
Step 3: Frost & Decorate
Now for the magic! Pipe a swirl of chocolate frosting on each cupcake (start from the outside and spiral inward). For the web, fill a piping bag with white icing and make 3-4 concentric circles on top of the frosting. Then take a toothpick and gently drag lines from the center outward – watch as the web magically appears! Pro tip: wipe the toothpick clean between each cupcake for crisp lines. Want extra spook factor? Add plastic spider rings on top for the full effect!
Tips for Perfect Spider Web Cupcakes
After baking these for years, I’ve learned all the tricks to make your spider web cupcakes absolutely perfect every time:
- Cooling is crucial: I know it’s tempting, but don’t even think about frosting until those cupcakes are completely cool – warm ones turn the web into a blob!
- Gel icing wins: Regular frosting gets too soft. Gel icing holds those web lines beautifully without bleeding.
- Light hand with the toothpick: Gentle pressure makes clean lines – no squishing the frosting underneath!
- Practice on parchment first: Try your web technique on paper before decorating the real cupcakes.
Follow these and your cupcakes will look like they came from a fancy bakery!
Serving & Storage
These spider web cupcakes taste best fresh – the chocolate is still fudgy and the web design stays crisp! If you need to store them, pop them in an airtight container at room temperature for up to 2 days. For longer storage, freeze unfrosted cupcakes wrapped tightly in plastic – thaw and decorate when ready to serve. A little secret? The web design actually holds up better if you wait to decorate until just before serving – those toothpick lines stay sharp!
Nutritional Information
Now, I’m no nutritionist, but here’s the real deal about these spider web cupcakes – they’re treats, not health food! Based on using all the ingredients listed, each cupcake has about 280 calories. They’ve got a good chocolatey punch from the cocoa, plus protein from the eggs and that lovely moist texture from the sour cream.
Important note though – these values can change depending on your specific ingredients. Using coconut sugar instead of white? Different frosting brand? Your numbers will vary. The web design icing adds minimal calories since you’re just using a tiny bit, but if you go wild with the piping (been there!), that’ll add up.
For my friends with dietary needs: gluten-free flour works great (just check your blend’s nutrition), and dairy substitutions will alter the counts too. Bottom line – these are special occasion treats meant for enjoying, not analyzing too hard!
Frequently Asked Questions
Can I use store-bought frosting?
Absolutely! I’ve used canned chocolate frosting countless times when I’m in a hurry – just give it a quick stir to soften it up before piping. The web design still works perfectly!
How do I keep my webs from smearing?
Two tricks: 1) Make sure cupcakes are completely cool, and 2) Use thicker icing (add a bit more powdered sugar if needed). Also, let the chocolate frosting set for 10 minutes before adding the web.
Can I make these ahead of time?
Yes! Bake the cupcakes up to 2 days early and store unfrosted at room temperature. Decorate the day of your event for the freshest look. The undecorated cupcakes also freeze beautifully for up to a month.
What if I don’t have a piping bag?
No worries! A ziplock bag with the corner snipped off works almost as well. Or you can spread the frosting with a knife and use a toothpick to make web lines in the surface.
Can kids help decorate these?
Oh my gosh, yes! The web technique is simple enough for little hands. Just guide them to use light pressure with the toothpick. Bonus – they’ll think it’s magic when the web appears!
Share Your Creations!
I’d absolutely love to see your spooky spider web cupcakes! Tag me @YourKitchenWitch on Instagram with your creations – nothing makes me happier than seeing your creepy-cute designs. And if you loved this recipe, drop a comment below! Your reviews help other Halloween bakers find this fun treat.


Spider Web Cupcakes: Hauntingly Delicious 3-Step Treats
- Total Time: 35 minutes
- Yield: 12 cupcakes 1x
- Diet: Vegetarian
Description
Spider Web Cupcakes are fun and spooky treats perfect for Halloween. They feature chocolate cupcakes topped with a web design made from icing.
Ingredients
- 1 cup all-purpose flour
- 1/2 cup cocoa powder
- 1 tsp baking powder
- 1/2 tsp baking soda
- 1/4 tsp salt
- 1/2 cup unsalted butter, softened
- 1 cup granulated sugar
- 2 large eggs
- 1 tsp vanilla extract
- 1/2 cup milk
- 1/2 cup sour cream
- 1 cup chocolate frosting
- 1/4 cup white icing
Instructions
- Preheat oven to 350°F (175°C) and line a cupcake pan with liners.
- Whisk flour, cocoa powder, baking powder, baking soda, and salt in a bowl.
- Cream butter and sugar until light. Add eggs one at a time, then vanilla.
- Mix in milk and sour cream. Gradually add dry ingredients.
- Fill cupcake liners 2/3 full and bake for 18-20 minutes.
- Cool cupcakes completely before frosting.
- Pipe chocolate frosting onto cupcakes.
- Use white icing to draw concentric circles for the web.
- Drag a toothpick from the center outward to create web lines.
Notes
- Store cupcakes in an airtight container for freshness.
- Use gel food coloring for bolder icing colors.
- Let cupcakes cool fully before decorating.
- Prep Time: 15 minutes
- Cook Time: 20 minutes
- Category: Dessert
- Method: Baking
- Cuisine: American
Nutrition
- Serving Size: 1 cupcake
- Calories: 280
- Sugar: 20g
- Sodium: 150mg
- Fat: 12g
- Saturated Fat: 7g
- Unsaturated Fat: 4g
- Trans Fat: 0g
- Carbohydrates: 38g
- Fiber: 2g
- Protein: 4g
- Cholesterol: 55mg