You know those nights when you’re craving something crispy, cheesy, and just a little bit decadent? That’s exactly when my waffle fry nachos come to the rescue! I first stumbled on this genius idea during a late-night football game when regular tortilla chips just wouldn’t cut it. The moment those golden waffle fries came out of the oven loaded with melty cheddar and all the fixings, I knew I’d found my new favorite game-day snack. Now it’s my go-to when friends come over – seriously, you should see how fast these disappear! The best part? They’re ridiculously easy to make, and those crispy ridges hold toppings way better than regular fries.

Why You’ll Love These Waffle Fry Nachos
Listen, these aren’t your average nachos—they’re a flavor explosion waiting to happen! Here’s why they’ve become my go-to snack for everything from game days to lazy weeknights:
- That perfect crunch: Waffle fries bake up extra crispy, with ridges that catch every bit of cheese and topping.
- Totally customizable: Swap toppings based on what’s in your fridge—it’s impossible to mess up!
- Ready in a flash: From freezer to table in under 30 minutes (perfect for sudden cravings).
- Always a hit: I’ve yet to meet anyone who can resist digging into this cheesy, loaded goodness.
Trust me, once you try them, regular nachos will seem downright boring!
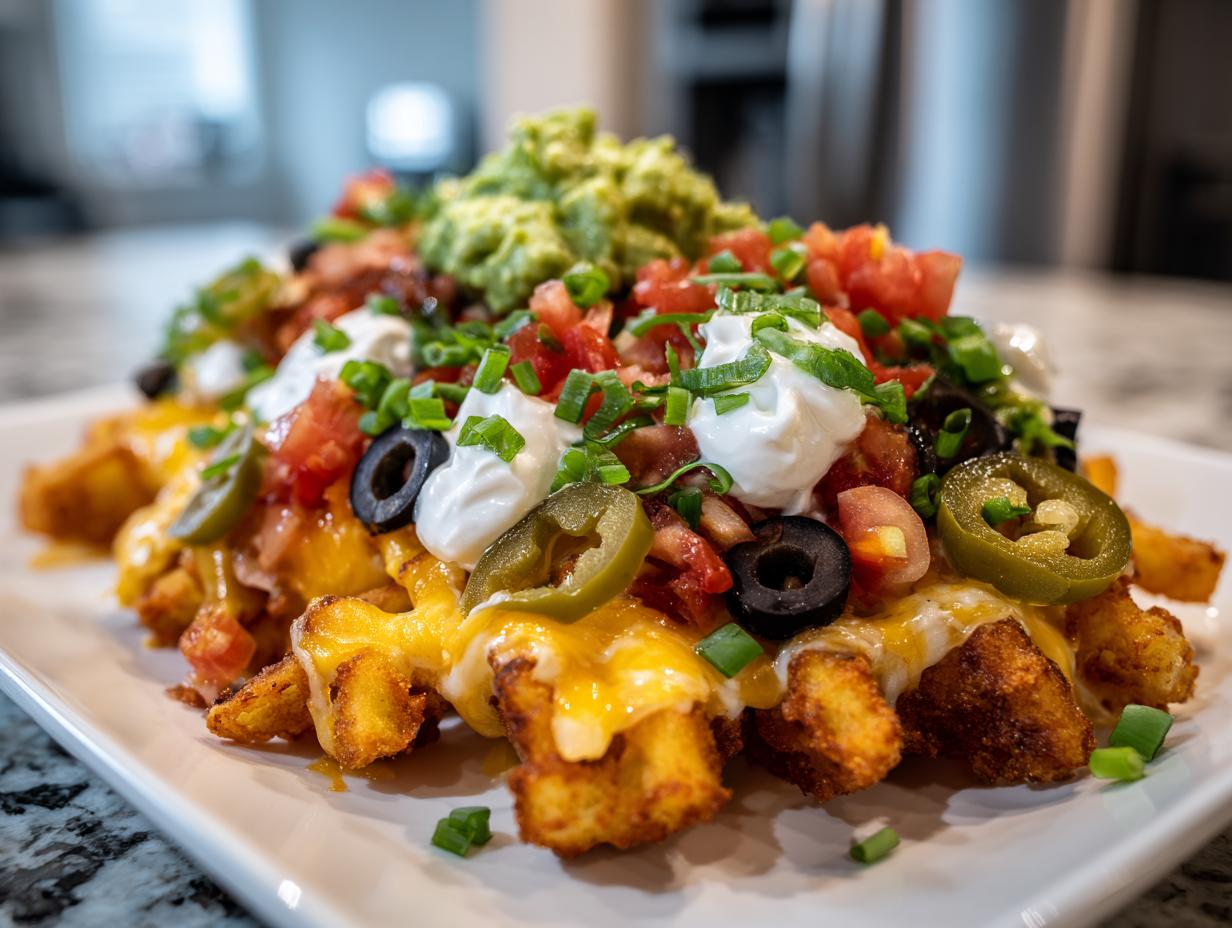
Waffle Fry Nachos Ingredients
Here’s everything you’ll need for the most epic waffle fry nachos of your life (plus some fun extras if you’re feeling fancy):
- 1 bag (20 oz) frozen waffle fries – Go for the extra crispy kind if you can find them!
- 1 cup shredded cheddar cheese (packed) – The sharper the better for that perfect melt.
- 1/2 cup diced tomatoes – I like Roma tomatoes for less watery results.
- 1/4 cup sliced jalapeños (fresh for heat or pickled for tang)
- 1/4 cup sour cream – Full fat makes it extra creamy.
- 1/4 cup guacamole – Store-bought is fine, but homemade is even better.
- 1/4 cup sliced black olives – Optional if you’re not an olive person.
- 2 tbsp chopped green onions – For that fresh pop of flavor.
Optional add-ons: Try cooked ground beef, shredded chicken, or vegan cheese to mix it up! The beauty is you can’t go wrong.
How to Make Waffle Fry Nachos
Okay, let’s get down to the good stuff! Making these waffle fry nachos is seriously simple, but I’ve learned a few tricks along the way to make them absolutely perfect every time. Just follow these easy steps and you’ll be snacking like a pro in no time.
Step 1: Bake the Waffle Fries
First things first – crank that oven to 425°F and let it get nice and hot while you prep. Spread your frozen waffle fries in a single layer on a baking sheet (no overlapping or they won’t crisp up properly!). I like to give them a quick spray with cooking oil for extra crunch. Bake for 20-25 minutes, flipping halfway through, until they’re golden and crispy. Trust me, that sizzle when you pull them out is music to your ears!

Step 2: Add Toppings and Melt Cheese
Now for the fun part! Sprinkle that shredded cheddar evenly over your hot fries – the cheese should cover every nook and cranny of those beautiful waffle ridges. Pop them back in the oven for just 2-3 minutes until the cheese is gloriously melted and bubbly. Watch them closely – nothing worse than burnt cheese! Pro tip: if you want extra browning, switch to broil for the last 30 seconds.
Step 3: Garnish and Serve
Here’s where the magic happens! Working quickly, add your tomatoes, jalapeños, and olives. Then drizzle with sour cream and dollop on that guacamole. Finish with a sprinkle of fresh green onions for color. The key is serving immediately while everything’s still hot and the fries are crispy. I like to set the baking sheet right on the table with some small plates – it makes for such a fun, communal snack that everyone can dig into!

Expert Tips for Perfect Waffle Fry Nachos
After making these more times than I can count (hey, no judgment!), I’ve picked up some foolproof tricks:
- Patience pays off: Let your fries bake until deeply golden—they’ll stay crispier under all those toppings.
- Broiler magic: For that perfect cheese pull, hit them with 30 seconds under the broiler at the end.
- Prep smart: Chop all toppings before baking so you can assemble lightning-fast when the fries come out.
- Layer wisely: Save delicate toppings like sour cream and guac for after baking—they’ll stay fresh and vibrant.
These little touches take your nachos from good to “can I have the recipe?” amazing!
Waffle Fry Nachos Variations
One of my favorite things about this recipe is how easily you can mix it up! Here are some delicious twists I’ve tried (and loved):
- Meat lover’s dream: Pile on some pulled pork or taco-seasoned ground beef – just warm it first!
- Vegan version: Swap in dairy-free cheese and top with black beans for protein.
- Buffalo kick: Toss the fries in buffalo sauce before adding toppings – perfect with blue cheese crumbles.
- Breakfast style: Top with scrambled eggs, bacon bits, and a drizzle of maple syrup (trust me on this one!).
The possibilities are endless – what’ll you try first?
Serving and Storage Tips
Here’s the golden rule: serve these waffle fry nachos piping hot right after assembling! The fries lose their crispness fast once topped (though they’ll still taste amazing). If you must store leftovers, leave off the wet toppings and refrigerate for up to 2 days. Reheat in a 350°F oven for 5-7 minutes to revive that perfect crunch.
Waffle Fry Nachos Nutrition Facts
Now, let’s talk numbers – but remember, these are estimates since your toppings might vary! For one generous serving (about a quarter of the recipe), you’re looking at roughly:
- 420 calories
- 28g fat (10g saturated)
- 35g carbs (4g fiber)
- 12g protein
And hey, if you’re watching certain macros, just adjust your toppings – more chicken means extra protein, while loading up on cheese ups the fat. It’s all about balance!
Waffle Fry Nachos FAQs
I get questions about these waffle fry nachos all the time – here are the ones that pop up most often:
Can I use fresh potatoes instead of frozen?
You totally can! Just slice potatoes into waffle shapes (a mandoline helps) and soak in cold water for 30 minutes before baking. But I’ll be honest – frozen fries give that perfect, consistent crunch with way less effort. Sometimes convenience wins!
How do I keep them crispy?
The trick is baking your fries until they’re extra golden before topping, and serving immediately. If they sit too long, the steam from hot toppings will soften them. No shame in eating straight from the baking sheet!
What’s the best melting cheese?
My golden trio: sharp cheddar for flavor, Monterey Jack for meltiness, and a sprinkle of mozzarella for that gorgeous cheese pull. Pre-shredded works, but block cheese melts smoother. Now go make some and tell me what you think!


20-Minute Cheesy Waffle Fry Nachos That’ll Steal the Show
- Total Time: 35 mins
- Yield: 4 servings 1x
- Diet: Vegetarian
Description
Crispy waffle fries topped with melted cheese, jalapeños, and your favorite nacho toppings.
Ingredients
- 1 bag (20 oz) frozen waffle fries
- 1 cup shredded cheddar cheese
- 1/2 cup diced tomatoes
- 1/4 cup sliced jalapeños
- 1/4 cup sour cream
- 1/4 cup guacamole
- 1/4 cup sliced black olives
- 2 tbsp chopped green onions
Instructions
- Preheat oven to 425°F.
- Spread waffle fries on a baking sheet in a single layer.
- Bake for 20-25 minutes until crispy.
- Sprinkle cheese evenly over the fries.
- Return to oven for 2-3 minutes until cheese melts.
- Top with tomatoes, jalapeños, olives, and green onions.
- Drizzle with sour cream and guacamole.
- Serve immediately.
Notes
- Use fresh jalapeños for extra heat.
- Add cooked ground beef or shredded chicken for protein.
- Substitute vegan cheese for a dairy-free option.
- Prep Time: 10 mins
- Cook Time: 25 mins
- Category: Appetizer
- Method: Baking
- Cuisine: American
Nutrition
- Serving Size: 1 serving
- Calories: 420
- Sugar: 3g
- Sodium: 680mg
- Fat: 28g
- Saturated Fat: 10g
- Unsaturated Fat: 15g
- Trans Fat: 0g
- Carbohydrates: 35g
- Fiber: 4g
- Protein: 12g
- Cholesterol: 40mg