Is there anything more magical than Halloween baking? Every October, my kitchen transforms into a witch’s workshop, and these adorable Witch Hat Cookies always steal the show! I still remember the first time my niece saw them – her eyes got as big as the cookie brims when she realized they were edible hats. What makes these treats special isn’t just their spooky-cute appearance (though that’s a huge part!), but how shockingly simple they are to make. With just basic cookie dough, chocolate wafers, and candy melts, you can create these festive delights that’ll have both kids and adults casting spells for seconds. The best part? No actual witchcraft required – just a love for fun Halloween treats and maybe a slightly messy chocolate-dipping session!

Why You’ll Love These Witch Hat Cookies
These adorable Witch Hat Cookies are about to become your new Halloween baking obsession, and here’s why:
- Instant Halloween magic: They transform basic ingredients into edible works of art that’ll make your dessert table the talk of the party
- Kid-approved fun: Little witches and wizards go crazy for these – my nieces always fight over who gets to add the candy melt “buckle”
- No special skills needed: If you can roll dough balls and dip things in chocolate, you’re already a cookie wizard
- Perfect for parties: They hold up well at room temperature, so no last-minute baking frenzy before guests arrive
The best part? Their cute factor is way bigger than the actual effort required – my kind of kitchen magic!
Ingredients for Witch Hat Cookies
Here’s everything you’ll need to conjure up these magical treats – I promise it’s all simple stuff you probably have already (except maybe the candy melts, but those are easy to find this time of year!):
- 1 cup all-purpose flour (spooned and leveled, please – no packing!)
- ½ cup unsalted butter, softened (that means left out for 30 minutes, not melted!)
- ¼ cup granulated sugar (regular white sugar works perfectly)
- 1 large egg yolk (save the white for breakfast – waste not!)
- 1 teaspoon pure vanilla extract (imitation just won’t cast the same spell)
- ½ cup chocolate chips, melted (I prefer semi-sweet but use what you love)
- 12 chocolate wafer cookies (Famous Chocolate Wafers are my go-to)
- 12 orange candy melts (or any spooky color you fancy)
See? Nothing too mysterious – just good pantry staples ready for a little Halloween transformation!
Equipment You’ll Need
No fancy cauldron required for these Witch Hat Cookies! Just grab these basic kitchen tools:
- Mixing bowl (any size works – mine’s usually the one that’s clean!)
- Hand mixer or sturdy wooden spoon
- Baking sheet lined with parchment paper
- Small saucepan or microwave-safe bowl for melting chocolate
- Cooling rack (though the counter works in a pinch)
That’s it! You probably have everything already except maybe the parchment paper – trust me, it’s worth grabbing to prevent any cookie catastrophes.
How to Make Witch Hat Cookies
Ready to work some kitchen magic? These Witch Hat Cookies come together faster than you can say “Abracadabra!” Just follow these simple steps – I’ve made this recipe dozens of times, so trust me when I say it’s foolproof.
Preparing the Cookie Dough
First things first – preheat that oven to 350°F (175°C). Now, let’s make the dough! In your mixing bowl, beat together the softened butter and sugar until it’s light and fluffy (about 2 minutes with a hand mixer). Add the egg yolk and vanilla, mixing until just combined. Here’s my secret: add the flour gradually – about ¼ cup at a time – to avoid that dreaded flour cloud explosion. The dough should come together nicely but still be slightly sticky – that’s perfect!
Shaping and Baking the Witch Hats
Time to create those iconic witch hat shapes! Roll the dough into 12 equal-sized balls (about 1 tablespoon each). Place them on your lined baking sheet and gently flatten with your palm to form the hat brims – don’t make them too thin or they’ll crisp up too much. Bake for 10-12 minutes until the edges just start turning golden. They’ll look underdone when you pull them out, but trust me, they’ll set as they cool on the rack.

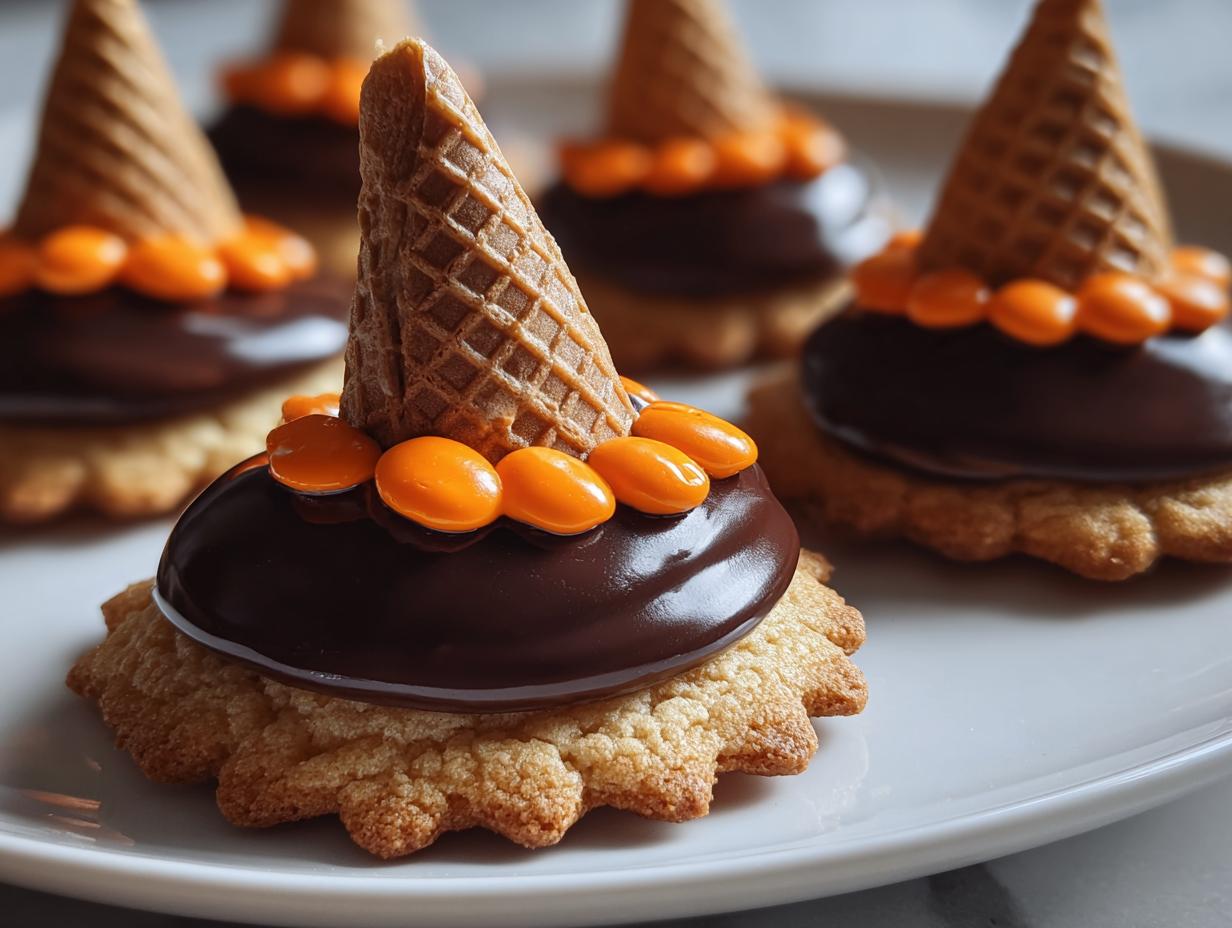
Assembling the Witch Hat Cookies
Now for the fun part! Melt your chocolate chips (30 second bursts in the microwave, stirring between each). Use about ½ teaspoon of melted chocolate to “glue” a chocolate wafer to each cookie – this becomes your hat’s cone. Then dip just the tip of each wafer in more melted chocolate and press an orange candy melt on top to create the buckle. Let them set completely before serving – if you can resist sneaking one sooner!
Tips for Perfect Witch Hat Cookies
After making dozens of batches of these Witch Hat Cookies, I’ve picked up some tricks that’ll make yours turn out spellbinding every time:
- Chill the dough for 15 minutes if it’s too sticky to handle – makes shaping those hat brims much easier
- Work quickly when assembling – melted chocolate sets fast, especially in cooler kitchens
- Get creative with decorations – add edible glitter or colored sprinkles while the chocolate’s still wet
- Use quality chocolate – it makes all the difference in both flavor and how well the hats hold together
- Let kids help! Little hands love pressing on the candy buckles (just have wipes ready for chocolatey fingers)
Remember – even “imperfect” witch hats taste delicious, so don’t stress if they’re not magazine-perfect!
Variations for Witch Hat Cookies
The beauty of these Witch Hat Cookies is how easily you can customize them! Swap orange candy melts for purple or green ones to match your party theme. Feeling extra witchy? Add black sanding sugar or edible glitter to the chocolate “hat bands” before they set. For a nutty twist, press chopped pecans into the brim edges – they look like little witch hat trims and add great texture. The spellbook’s wide open for your creativity here!
Serving and Storing Witch Hat Cookies
These Witch Hat Cookies look their absolute best when arranged on a spooky platter – I love using a black cake stand with fake cobwebs for extra drama! If you’re making them ahead (smart witch!), store them in a single layer in an airtight container at room temperature. They’ll stay fresh and delicious for up to 3 days – though in my house, they never last that long before disappearing!
Nutritional Information
While these Witch Hat Cookies are meant for festive fun more than dieting, here’s the estimated nutritional breakdown per cookie (remember, actual values may vary depending on your specific ingredients): about 150 calories, 8g fat, and 10g sugar. They’re Halloween treats after all – no guilt allowed when enjoying magical bites!
Frequently Asked Questions
I’ve gotten so many questions about these Witch Hat Cookies over the years – here are the ones that pop up most often from fellow Halloween bakers:
Can I use store-bought sugar cookies instead of making my own dough?
Absolutely! While I love the homemade dough (it’s sturdier for the hat shape), you can totally use store-bought sugar cookies in a pinch. Just look for ones about 2 inches wide – and maybe sneak a taste test before assembling to make sure they’re tasty enough for your little witches!
How long do Witch Hat Cookies stay fresh?
They’ll keep their magical charm for about 3 days in an airtight container at room temp. The chocolate “glue” helps keep everything crisp. If your kitchen runs warm, you might want to store them in the fridge – just let them come to room temp before serving so the chocolate isn’t too hard.
Can I make these Witch Hat Cookies gluten-free?
You bet! Simply swap the all-purpose flour for your favorite 1:1 gluten-free blend (I’ve had great results with Bob’s Red Mill). For the wafers, Glutino makes fantastic gluten-free chocolate ones that work perfectly as hat cones.
What if my candy melts won’t stick to the chocolate?
This happens sometimes if the chocolate starts to set too fast. My trick? Give the dipped wafer tip a quick second dip right before adding the candy melt – the fresh chocolate acts like edible glue. If all else fails, a tiny dab of extra melted chocolate on the back of the candy melt does the trick!

Magical Witch Hat Cookies: 12 Spellbinding Treats You’ll Love
- Total Time: 32 minutes
- Yield: 12 cookies 1x
- Diet: Vegetarian
Description
Delicious cookies shaped like witch hats, perfect for Halloween.
Ingredients
- 1 cup all-purpose flour
- 1/2 cup unsalted butter, softened
- 1/4 cup sugar
- 1 egg yolk
- 1 tsp vanilla extract
- 1/2 cup chocolate chips, melted
- 12 chocolate wafer cookies
- 12 orange candy melts
Instructions
- Preheat oven to 350°F (175°C).
- Mix flour, butter, sugar, egg yolk, and vanilla to form dough.
- Roll dough into small balls and flatten slightly to form hat brims.
- Bake for 10-12 minutes until edges are golden.
- Cool cookies completely.
- Attach chocolate wafer cookies to baked cookies using melted chocolate.
- Dip wafer tips in melted chocolate and place an orange candy melt on top.
- Let set before serving.
Notes
- Store in an airtight container for up to 3 days.
- For extra decoration, add sprinkles before chocolate sets.
- Prep Time: 20 minutes
- Cook Time: 12 minutes
- Category: Dessert
- Method: Baking
- Cuisine: American
Nutrition
- Serving Size: 1 cookie
- Calories: 150
- Sugar: 10g
- Sodium: 20mg
- Fat: 8g
- Saturated Fat: 5g
- Unsaturated Fat: 2g
- Trans Fat: 0g
- Carbohydrates: 18g
- Fiber: 1g
- Protein: 2g
- Cholesterol: 25mg