Oh my gosh, you guys – Halloween baking is my absolute favorite time of year! There’s something so fun about turning ordinary treats into spooky masterpieces. My Zombie Brain Cookies have been the star of our Halloween parties ever since my niece dared me to make “the grossest dessert possible.”
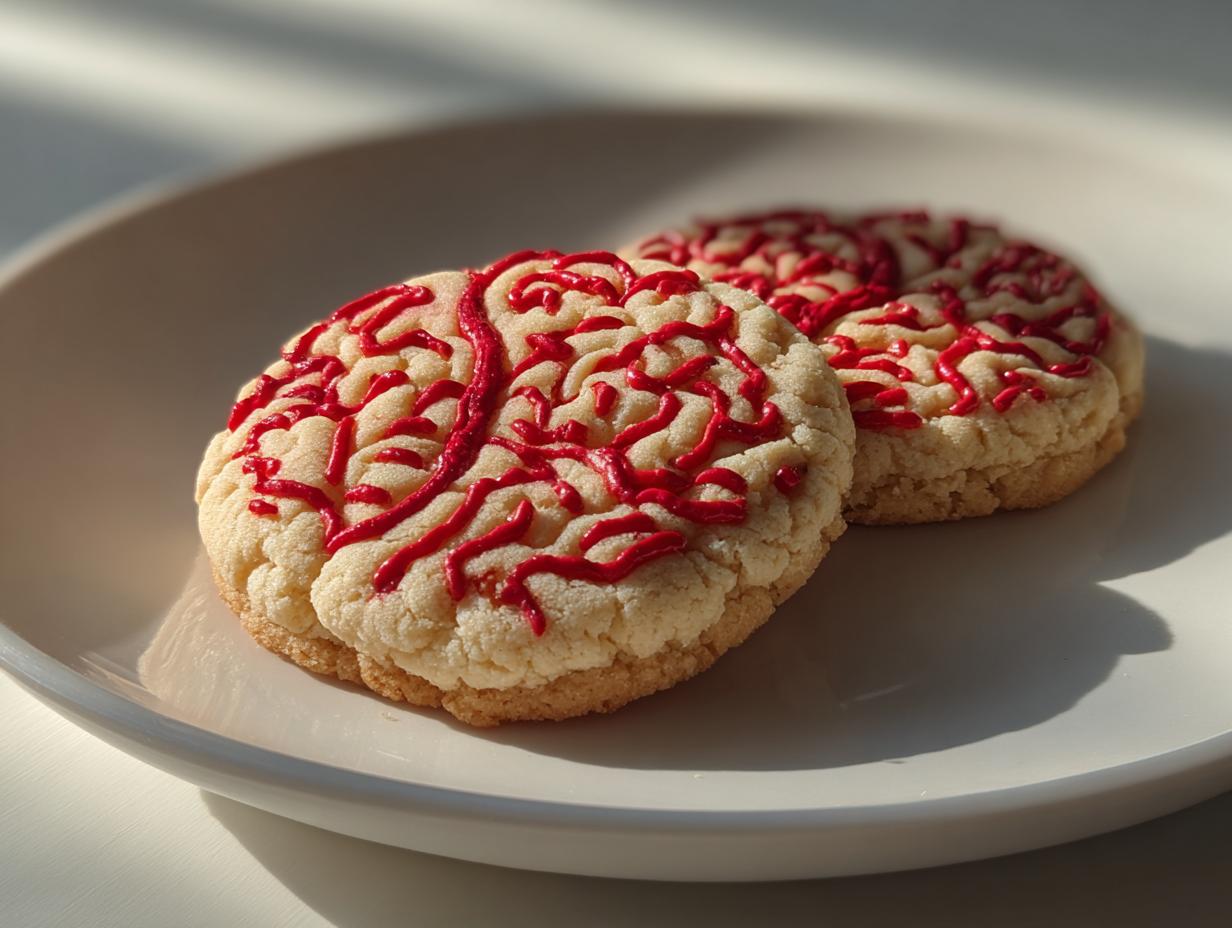
Picture this: soft, buttery sugar cookies transformed into creepy edible brains with just a few swirls of red icing. The first time I made them, my husband walked in the kitchen and actually jumped back – mission accomplished! Now they’re our must-make Halloween tradition.
What I love most is how simple they are – no fancy decorating skills needed. Just pipe some wiggly lines and boom! Instant zombie snack that’ll have everyone screaming (with delight, of course). Perfect for parties, classroom treats, or just freaking out your family on a lazy October afternoon.
Why You’ll Love These Zombie Brain Cookies
These cookies are seriously the most fun you’ll have baking all October. Here’s why they’re a must-make:
- Spooky-good looks: That creepy brain design gets reactions every time – kids and adults go wild for them!
- Super simple: Just basic cookie dough + easy piping – no professional decorating skills needed.
- Party perfect: They disappear fast at Halloween gatherings (usually right after the screams and giggles).
- Total crowd-pleaser: Even people who “don’t like scary stuff” can’t resist buttery sugar cookies in disguise.
Ingredients for Zombie Brain Cookies
Okay, let’s gather our zombie-making supplies! You probably have most of these in your pantry already – that’s the beauty of this recipe. My one non-negotiable? Real butter (none of that margarine stuff – it changes the texture completely). Here’s what you’ll need:
- 1 cup (2 sticks) unsalted butter, softened – Leave it out for about 30 minutes until it gives slightly when pressed
- 1 cup granulated sugar – Regular white sugar works perfectly here
- 1 large egg – Straight from the fridge is fine, it’ll mix right in
- 1 tsp vanilla extract – The good stuff makes all the difference
- 2 1/2 cups all-purpose flour – Spoon and level it, don’t scoop!
- 1/2 tsp salt – Balances the sweetness beautifully
- 1/2 tsp baking powder – Our little rising helper
- Red gel food coloring – Gel gives that perfect bloody color without thinning the icing
- 1 cup powdered sugar – For our “brain matter” icing
- 2 tbsp milk – Any kind works, even almond milk in a pinch
How to Make Zombie Brain Cookies
Alright, let’s get messy! These cookies come together in three simple phases – dough, baking, and the best part: making them look deliciously disgusting. Don’t worry if you’re not a piping pro – wobbly lines actually make them look more authentically brain-like!
Preparing the Dough
First things first – preheat that oven to 350°F (175°C). While it’s heating up, grab your trusty mixer and let’s cream together the softened butter and sugar until it’s light and fluffy. This takes about 2-3 minutes – you’ll know it’s ready when it looks almost like pale yellow clouds.
Crack in that egg and splash of vanilla, mixing just until combined. Now, in a separate bowl, whisk together your flour, salt, and baking powder. Gradually add the dry ingredients to the wet mixture – I do it in three batches to prevent flour explosions (learned that the hard way!). Mix until just combined – overmixing makes tough cookies, and zombie brains should be tender!
If the dough feels sticky, pop it in the fridge for 20-30 minutes. Cold dough = easier handling.
Baking the Cookies
Time to shape our brains! Roll the dough into 12 equal balls (about 2 tbsp each). Place them on a parchment-lined baking sheet and gently flatten each one slightly – brains aren’t perfectly round, after all!
Bake for 10-12 minutes until the edges get that perfect golden halo. The centers might still look soft – that’s good! They’ll firm up as they cool. Let them rest on the baking sheet for 5 minutes before transferring to a wire rack. Cool completely before decorating – warm cookies make runny icing (and trust me, you don’t want melty brains!).
Decorating Like Brains
Now for the fun part! Whisk together powdered sugar and milk until smooth. Add red gel food coloring drop by drop until you get that perfect bloody shade – I usually use about 10 drops.
Transfer to a piping bag fitted with a small round tip (#3 works great). Pipe squiggly lines back and forth across each cookie to mimic brain folds. Pro tip: look at a picture of a real brain for inspiration (yes, I googled “brain anatomy” while eating lunch once).
Let the icing set for at least 30 minutes before serving – unless you want fingerprint smears in your zombie brains!
Tips for Perfect Zombie Brain Cookies
After making these creepy cookies more times than I can count (and cleaning up plenty of icing mishaps!), here are my hard-earned secrets:
- Chill that dough: If it sticks to your hands, wrap it in plastic and pop it in the fridge for 20 minutes. Cold dough holds its shape better when baking.
- Piping practice: Test your icing technique on a plate first. Too thick? Add a teaspoon of milk. Too thin? More powdered sugar.
- Messy is better: Don’t stress about perfect lines – brains are naturally lumpy! Wobbly piping actually looks more realistic.
- Storage smarts: Layer cookies between parchment paper in an airtight container. They’ll stay fresh for 3 days (if they last that long!).
Pro tip: Make extra icing – you’ll always need more red than you think for properly gruesome brains!
Ingredient Substitutions & Notes
Listen, I get it – sometimes you’re halfway through a recipe and realize you’re out of something! Here’s how to adapt these zombie brains without losing their creepy charm:
- Butter swap: Vegan butter works surprisingly well – just make sure it’s the stick kind, not the spreadable tub version.
- Flour fix: Need gluten-free? Use a 1:1 GF flour blend (I like the ones with xanthan gum already added).
- Egg alternative: For vegan cookies, try 1 tbsp ground flaxseed + 3 tbsp water (let it sit for 5 minutes first).
- Red alert: Gel food coloring gives that perfect bloody shade without thinning the icing. Liquid works in a pinch, but you’ll need way more (and your icing might get runny).
One non-negotiable? Real vanilla extract – imitation just tastes… well, brainless.
Serving & Storing Zombie Brain Cookies
These cookies steal the show at any Halloween party! I love arranging them on a black platter with plastic spiders crawling between them – the gasps are priceless. For classroom treats, pack them in clear cellophane bags tied with orange ribbon.
Store leftovers (ha!) in an airtight container at room temperature. They’ll stay fresh for 3 days – if you can resist eating them all at once! The icing holds up beautifully, so no worries about smudged brains.
Zombie Brain Cookies Nutritional Information
Okay, I’m no nutritionist, but here’s the scoop on what’s in these creepy cookies! Values are estimates per cookie and will vary based on your exact ingredients. Each deliciously gross brain contains about:
- 180 calories – Not bad for a hauntingly good treat!
- 12g sugar – Sweet enough to satisfy your inner zombie
- 8g fat (5g saturated) – Thank that glorious butter for the perfect texture
- 25g carbs – Brain food, literally!
Remember, nutrition facts change if you tweak ingredients – these are just ballpark figures to ease your spooky snacking conscience!
FAQ About Zombie Brain Cookies
Over the years, I’ve gotten tons of questions about these ghoulish goodies! Here are the answers to the most common brain-baking dilemmas:
Can I freeze Zombie Brain Cookies?
Absolutely! Freeze undecorated cookies for up to 2 months in an airtight container. Thaw at room temperature before icing. The dough balls freeze well too – just add 1-2 minutes to the baking time.
Help! My icing is too runny – how do I thicken it?
Easy fix! Add more powdered sugar 1 tablespoon at a time until it reaches toothpaste consistency. If it gets too thick? A few drops of milk will smooth it right out.
What’s the best food coloring for the blood-red icing?
Hands down, gel food coloring wins! I prefer Americolor Super Red – it gives that perfect gruesome shade without altering the icing texture. Liquid works too, but you’ll need way more.
Can I make these cookies ahead of time?
You bet! Bake the cookies up to 2 days early (store airtight at room temp) and decorate the day of your event. The icing stays vibrant for about 24 hours after piping.
Now go unleash your inner mad scientist – I can’t wait to see your terrifying cookie creations! Tag me in your spooky photos!
Print
12 Spooky Zombie Brain Cookies That Will Haunt Your Taste Buds
- Total Time: 32 minutes
- Yield: 12 cookies 1x
- Diet: Vegetarian
Description
Zombie Brain Cookies are a fun and spooky treat perfect for Halloween. These cookies look like brains with their intricate red icing design.
Ingredients
- 1 cup unsalted butter, softened
- 1 cup granulated sugar
- 1 large egg
- 1 tsp vanilla extract
- 2 1/2 cups all-purpose flour
- 1/2 tsp salt
- 1/2 tsp baking powder
- Red gel food coloring
- 1 cup powdered sugar
- 2 tbsp milk
Instructions
- Preheat oven to 350°F (175°C).
- Cream butter and sugar until fluffy.
- Add egg and vanilla, mix well.
- Combine flour, salt, and baking powder in a separate bowl.
- Gradually add dry ingredients to the wet mixture.
- Divide dough into 12 pieces and roll into balls.
- Flatten slightly and place on a baking sheet.
- Bake for 10-12 minutes until edges are golden.
- Let cool completely.
- Mix powdered sugar, milk, and red food coloring to make icing.
- Pipe brain-like lines onto each cookie.
- Let icing set before serving.
Notes
- Chill dough for 30 minutes if too sticky.
- Use a piping bag with a small tip for best results.
- Store in an airtight container for up to 3 days.
- Prep Time: 20 minutes
- Cook Time: 12 minutes
- Category: Dessert
- Method: Baking
- Cuisine: American
Nutrition
- Serving Size: 1 cookie
- Calories: 180
- Sugar: 12g
- Sodium: 50mg
- Fat: 8g
- Saturated Fat: 5g
- Unsaturated Fat: 2g
- Trans Fat: 0g
- Carbohydrates: 25g
- Fiber: 0.5g
- Protein: 2g
- Cholesterol: 30mg