
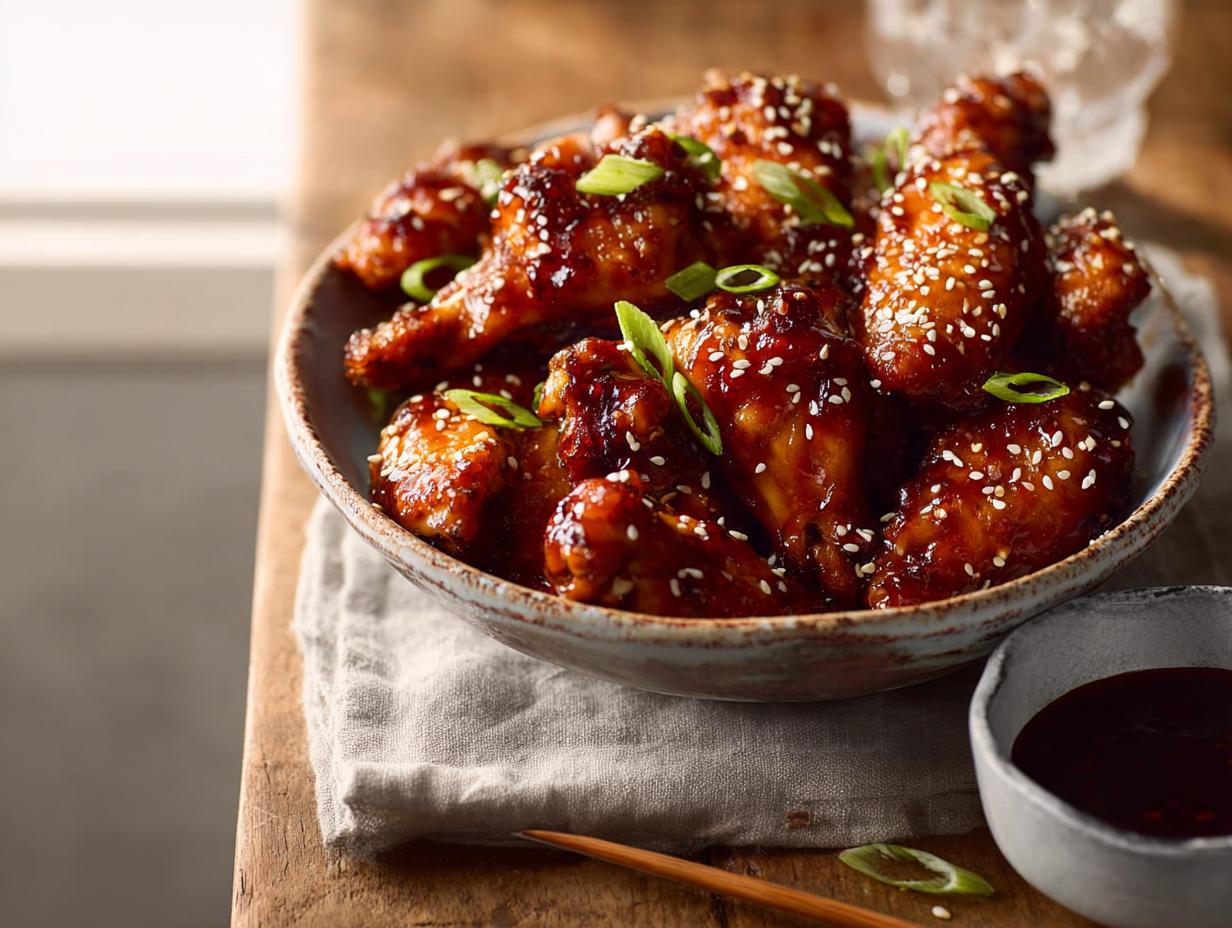
I don’t know about you, but there are nights when only sticky, saucy chicken wings will do—and I’m not about to haul out a deep fryer just to get that crave-worthy crunch. These Baked Teriyaki Wings saved my last game day: they come out perfectly crispy, thanks to a simple oven trick, and the sweet-savory glaze tastes just like takeout. Best part? The whole thing comes together in about an hour with pantry staples you probably already have.
Why You’ll Love This Baked Teriyaki Wings Recipe
Let me tell you why I keep coming back to this recipe—it honestly checks every box. No deep fryer, no mess, and the wings come out shatteringly crisp on the outside while staying juicy inside. Here’s what you’re getting:
- No deep-frying. You get that irresistible crunch from the oven—baking powder does the magic.
- Simple pantry staples. Just a handful of everyday ingredients you probably already have.
- Gluten-free friendly. By using tamari instead of soy sauce, this recipe works for anyone avoiding gluten.
- Sweet-savory perfection. The homemade teriyaki glaze is sticky, glossy, and packed with flavor—way better than bottled stuff.
- Incredible texture. Think golden, crispy skin coated in a thick, finger-licking sauce. It’s the best of both worlds.
Ingredients for Baked Teriyaki Wings
Alright, let’s talk ingredients. I’ve tested this one plenty of times, so trust me when I say every single one here pulls its weight. The list looks long, but it’s really just two simple parts: the wings and the homemade sauce. I’ll break it down so you know exactly what you’re grabbing.
For the Chicken Wings
You only need a few things for the wings themselves, but they’re the foundation of that amazing crispy texture. You’ll want 2 pounds of chicken wings, and I mean the whole wings separated into drumettes and flats. Don’t skimp on the 1 tablespoon baking powder—and yes, it must be baking powder, not baking soda. That’s the secret to getting the skin shatteringly crisp without a deep fryer. You’ll also need 1 teaspoon salt and 1/2 teaspoon black pepper. The key step? Pat those wings completely dry with paper towels before you toss them with the seasonings. It makes all the difference.
- 2 pounds chicken wings (drumettes and flats)
- 1 tablespoon baking powder (not baking soda)
- 1 teaspoon salt
- 1/2 teaspoon black pepper
For the Homemade Teriyaki Sauce
This sauce is where the magic happens—it’s sweet, savory, sticky, and way better than anything from a bottle. I use 1/3 cup tamari instead of regular soy sauce to keep things gluten-free, but it also just tastes cleaner. Then you’ve got 1/4 cup honey for sweetness, 2 tablespoons rice vinegar for a little tang, and 1 tablespoon sesame oil for that nutty depth. Freshly minced 2 cloves garlic and 1 teaspoon grated ginger bring the warmth. And don’t forget the cornstarch slurry—that’s 1 tablespoon cornstarch mixed with 2 tablespoons water—which thickens everything into a glossy, finger-licking glaze.
- 1/3 cup tamari (gluten-free soy sauce)
- 1/4 cup honey
- 2 tablespoons rice vinegar
- 1 tablespoon sesame oil
- 2 cloves garlic, minced
- 1 teaspoon grated fresh ginger
- 1 tablespoon cornstarch mixed with 2 tablespoons water (slurry)
- 1 tablespoon toasted sesame seeds (optional, for garnish)
- 2 green onions, sliced (optional, for garnish)
Equipment You’ll Need to Make Baked Teriyaki Wings
You don’t need anything fancy, but a few key tools make all the difference. The most important one? A wire rack. It lets air circulate all around the wings, so they crisp up evenly instead of sitting in their own juices. Trust me, that’s the secret to crunchy skin without deep frying. Here’s what you’ll want to have on hand:
- Baking sheet
- Wire rack (fits inside the baking sheet)
- Aluminum foil
- Large bowl
- Small saucepan
- Whisk
- Paper towels
Ingredient Notes and Substitutions for Teriyaki Wings
I love this recipe as written, but I know we don’t always have every single thing on hand. The good news? These swaps work beautifully without messing up the flavor. If gluten isn’t a concern, you can absolutely swap the tamari for low-sodium soy sauce—I’ve done it plenty of times, and it tastes just as good. For the honey, maple syrup or brown sugar both work great. I actually tried brown sugar one time when I was out of honey, and it gave the sauce a deeper, almost caramel-like sweetness. And if you don’t have rice vinegar, apple cider vinegar steps in perfectly—it adds a similar tang that keeps the sauce balanced. Just keep the amounts the same, and you’re golden.
How to Make Baked Teriyaki Wings: Step-by-Step Instructions
Alright, let’s get into the nitty-gritty. I’ve broken this down into clear steps so you won’t miss a thing. The whole process is pretty straightforward—you’re basically prepping the wings, making the sauce, and then bringing it all together. Just follow along, and you’ll have crispy, sticky wings that’ll make you forget takeout exists.
- Preheat your oven to 400°F (200°C). Line a baking sheet with foil and place a wire rack on top. Give the rack a good spray with nonstick cooking spray—this stops the wings from sticking later.
- Pat the chicken wings bone-dry with paper towels. In a large bowl, whisk together the baking powder, salt, and pepper. Add the wings and toss until every piece is evenly coated. Don’t skip drying them—moisture is the enemy of crispiness.
- Arrange the wings in a single layer on the wire rack. Bake for 45 minutes, flipping them once halfway through, until they’re deep golden and super crispy.
- While the wings bake, make the teriyaki sauce. In a small saucepan, combine the tamari, honey, rice vinegar, sesame oil, garlic, and ginger. Bring to a simmer over medium heat.
- Whisk in the cornstarch slurry (cornstarch mixed with water). Keep stirring for 1–2 minutes until the sauce thickens to a glossy, syrupy consistency. Remove from heat.
- When the wings are done, transfer them to a large bowl. Pour the sauce over them and toss gently to coat every wing evenly.
- Return the coated wings to the wire rack and bake for another 5 minutes. That last little bake sets the glaze so it’s sticky but not dripping. Sprinkle with sesame seeds and green onions if you like, and serve immediately.
Preparing the Chicken Wings for Baking
First things first: dry those wings like your life depends on it. Grab a stack of paper towels and pat each wing completely dry—any leftover moisture will steam the skin instead of crisping it. Then, in a big bowl, stir together the baking powder, salt, and pepper. Toss in the wings and use your hands (or a spatula) to coat every nook and cranny. Don’t forget to set up your wire rack over a foil-lined baking sheet and give it a quick spritz of nonstick spray. That rack is key for air circulation, so the wings get crispy all around.
Making the Teriyaki Glaze on the Stovetop
This sauce comes together in minutes, and it smells incredible. In a small saucepan, combine the tamari, honey, rice vinegar, sesame oil, minced garlic, and grated ginger. Set it over medium heat and bring it to a gentle simmer—you’ll see little bubbles around the edges. Now, give your cornstarch slurry a quick stir (it settles fast), then pour it into the pan while whisking constantly. Keep whisking for about 1 to 2 minutes. You’ll notice the sauce go from thin to thick and glossy, like a beautiful syrup. Once it’s there, pull it off the heat and set it aside. It’ll continue to thicken a little as it cools.
Baking and Glazing the Teriyaki Wings
Here’s where the magic happens. Pop those seasoned wings into your preheated oven and bake them for 45 minutes, flipping them once at the 22-minute mark. You’re looking for a deep golden color and a crisp, almost crackly skin. When they’re done, carefully transfer the hot wings to a large bowl. Pour the teriyaki sauce over the top and toss gently—use two spoons or your hands (with gloves!) to coat every wing. Then, return the glazed wings to the wire rack and bake for another 5 minutes. That final blast sets the glaze so it’s sticky and finger-licking good. Sprinkle with sesame seeds and sliced green onions, and serve right away while they’re still hot.
Tips for Perfect Baked Teriyaki Wings Every Time
I’ve made these wings more times than I can count, and I’ve learned a few things the hard way so you don’t have to. Here are my best tips for getting that crispy, sticky perfection every single time:
- Pat those wings bone-dry. I cannot stress this enough—any moisture left on the skin will steam instead of crisp. Grab a fresh stack of paper towels and really press them dry.
- Baking powder, not baking soda. This is non-negotiable. Baking soda will leave a weird metallic taste, while baking powder creates those tiny bubbles that give you shatteringly crispy skin.
- Always use a wire rack. It lifts the wings up so hot air can circulate underneath. Without it, you’ll end up with soggy bottoms that never get that golden crunch.
- Don’t overcrowd the sheet. Give each wing a little breathing room. If they’re too close together, they’ll trap steam and turn soft instead of crisp.
- Let the sauce simmer a bit longer for a thicker glaze. If you want that super sticky, almost candy-like coating, just let the sauce bubble away for an extra minute or two after adding the slurry.
- Use a meat thermometer to be sure. I always check the thickest part of a wing—if it hits 165°F, you’re good to go. It’s a small step that gives you total peace of mind.
Variations and Serving Suggestions for Teriyaki Wings
One of the best things about this recipe is how easy it is to switch things up. I’ve played around with it plenty, and these little tweaks keep it from ever getting boring. Want a little heat? Toss in some red pepper flakes while the sauce simmers. Craving something sweeter? A sprinkle of crushed pineapple right before the final bake adds a tropical twist that’s honestly amazing. For garnishes, try swapping the green onions for pickled ginger or a few chili threads—they look gorgeous and add a pop of brightness. As for serving, I love these wings as a party appetizer (they disappear fast), but they also work great as a main course over steamed rice with a simple veggie on the side.
Spice It Up: Adding Heat to Your Wings
If you’re like me and love a little kick, just stir 1/2 teaspoon of red pepper flakes into the sauce while it simmers. Or, for a quick fix, drizzle sriracha over the finished wings right before serving. I’ve also served them with a side of chili oil for dipping—it’s a total game changer.
What to Serve with Baked Teriyaki Wings
These wings are amazing on their own, but they really shine alongside steamed jasmine rice and a crisp cucumber salad. I also love stir-fried bok choy with a little garlic. And don’t waste that extra sauce—drizzle it over the rice for an extra flavor bomb.
How to Store and Reheat Leftover Teriyaki Wings
If you somehow end up with leftovers (which, let’s be honest, is pretty rare in my house), here’s exactly how to store and reheat them. Let the wings cool completely, then pop them into an airtight container and stick them in the fridge—they’ll stay good for up to 3 days. Just a heads up: the glaze will thicken up quite a bit when it’s cold, but that’s totally normal.
When you’re ready for round two, the best way to bring them back is in the oven or an air fryer at 350°F for about 5-8 minutes. It perfectly restores that crispy, sticky texture. Please, whatever you do, skip the microwave—it’ll turn those beautiful wings into a sad, soggy mess. A quick reheat, and they’re just as good as the first time.
Frequently Asked Questions About Baked Teriyaki Wings
I get a lot of questions about these wings, so let me clear up the most common ones. Whether you’re worried about crispiness, gluten, or prepping ahead, I’ve got you covered.
Can I Use Frozen Chicken Wings for This Recipe?
You can, but you’ll need to thaw them completely first—ideally in the fridge overnight. Once they’re thawed, pat them bone-dry with paper towels to remove all that extra moisture before seasoning.
Why Are My Baked Wings Not Crispy?
A few things could be going wrong. The most common culprits are not drying the wings thoroughly, skipping the wire rack, or overcrowding the baking sheet. Also, double-check that you used baking powder, not baking soda—that’s the real secret to crispy baked chicken wings.
Is This Teriyaki Wings Recipe Gluten-Free?
Yes, it is! By using tamari instead of regular soy sauce, this recipe is naturally gluten-free. Just be sure to check the labels on your other ingredients, like the cornstarch, to make sure they’re certified gluten-free if that’s a concern.
Can I Make the Teriyaki Sauce Ahead of Time?
Absolutely. You can make the sauce 2 to 3 days in advance and store it in an airtight container in the fridge. When you’re ready to use it, just reheat it gently on the stovetop or in the microwave, and give it a quick stir before tossing with the wings.
Estimated Nutritional Information for Baked Teriyaki Wings
I always like to know what’s in my food, so here’s the breakdown for a serving of two wings. You’re looking at about 290 calories, 16g of fat, 22g of protein, and 14g of carbs (12g of which are sugar). There’s also 780mg of sodium and 95mg of cholesterol. Just keep in mind that these numbers are rough estimates—they’ll shift a bit depending on the exact brands and sizes of your ingredients. I’m sharing this for informational purposes only, so don’t treat it as medical advice. But if you’re tracking, it’s a solid ballpark to work with.
Ready to Make Your New Favorite Appetizer?
I really hope you give these wings a try—they’re the kind of recipe that turns a regular weeknight into something special. When you do, I’d love to hear how they turn out! Drop a comment below or leave a star rating—it honestly makes my day. And if you share them on social media, tag me so I can see your crispy, sticky creations. Happy baking, friend!
Print
Best Baked Teriyaki Wings in 45 Minutes
- Total Time: 1 hour 5 minutes
- Yield: 4 servings (about 2-3 wings per person) 1x
- Diet: Gluten Free
Description
Crispy baked chicken wings coated in a sweet and savory homemade teriyaki sauce. This recipe uses no alcohol, bacon, ham, or pork.
Ingredients
- 2 pounds chicken wings (drumettes and flats)
- 1 tablespoon baking powder
- 1 teaspoon salt
- 1/2 teaspoon black pepper
- 1/3 cup tamari (gluten-free soy sauce)
- 1/4 cup honey
- 2 tablespoons rice vinegar
- 1 tablespoon sesame oil
- 2 cloves garlic, minced
- 1 teaspoon grated fresh ginger
- 1 tablespoon cornstarch mixed with 2 tablespoons water (slurry)
- 1 tablespoon toasted sesame seeds (optional)
- 2 green onions, sliced (optional)
Instructions
- Preheat your oven to 400°F (200°C). Line a baking sheet with aluminum foil and place a wire rack on top. Spray the rack with nonstick spray.
- Pat the chicken wings dry with paper towels. In a large bowl, mix the baking powder, salt, and pepper. Add the wings and toss to coat evenly.
- Arrange the wings in a single layer on the wire rack. Bake for 45 minutes, flipping once halfway through, until golden and crispy.
- While the wings bake, make the teriyaki sauce. In a small saucepan, combine tamari, honey, rice vinegar, sesame oil, garlic, and ginger. Bring to a simmer over medium heat.
- Whisk in the cornstarch slurry. Cook for 1-2 minutes, stirring constantly, until the sauce thickens. Remove from heat.
- When the wings are done, transfer them to a large bowl. Pour the teriyaki sauce over the wings and toss to coat evenly.
- Return the coated wings to the wire rack and bake for an additional 5 minutes to set the glaze. Garnish with sesame seeds and green onions if desired.
Notes
- Patting the wings dry removes excess moisture and helps them crisp up.
- Baking powder (not baking soda) is the key to crispy skin without deep frying.
- Use tamari instead of regular soy sauce to keep the recipe gluten free.
- For a spicier version, add 1/2 teaspoon red pepper flakes to the sauce.
- Prep Time: 15 minutes
- Cook Time: 50 minutes
- Category: Appetizer
- Method: Bake
- Cuisine: Japanese
Nutrition
- Serving Size: 2 wings
- Calories: 290
- Sugar: 12 g
- Sodium: 780 mg
- Fat: 16 g
- Saturated Fat: 4.5 g
- Unsaturated Fat: 10 g
- Trans Fat: 0 g
- Carbohydrates: 14 g
- Fiber: 0 g
- Protein: 22 g
- Cholesterol: 95 mg