
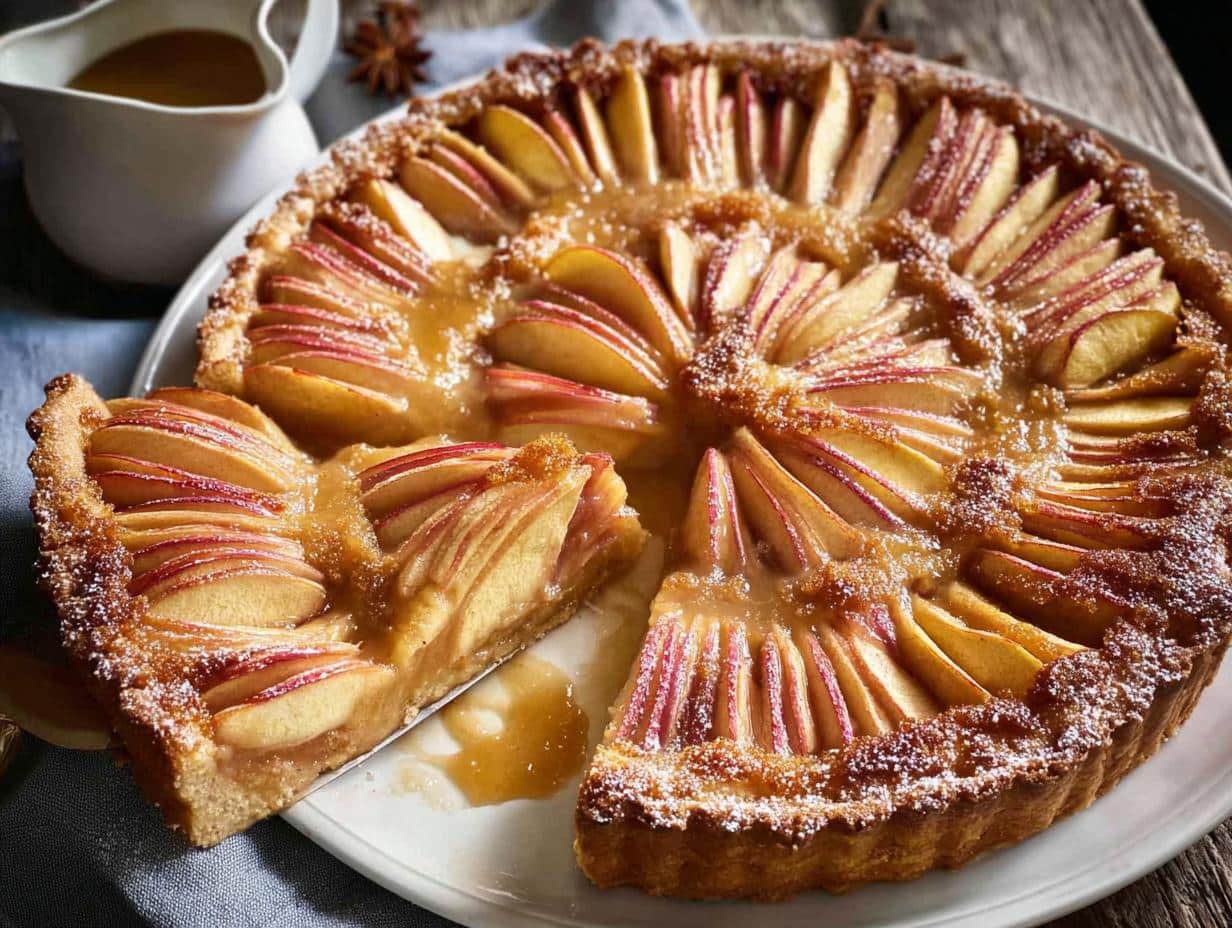
The smell of a buttery crust and spiced apples baking together is basically fall in a pan, and this Caramel Apple Tart is my favorite way to capture that feeling. I first made it for a casual get-together with friends, thinking I’d be clever, and it disappeared so fast I barely got a slice. After a few tries, I learned the hard way that skipping the chill time on the dough makes it shrink in the pan—so trust me, don’t rush it. The reward is a tender, flaky crust, a layer of rich caramel, and perfectly soft apples. I promise, this recipe is straightforward and totally worth the little effort.
Why You’ll Love This Caramel Apple Tart
- You get a buttery, from-scratch crust in minutes – no rolling pin needed, just press it into the pan. The Caramel Apple Tart comes together faster than you’d think.
- Only 30 minutes of active prep time – the oven does most of the work, so you can enjoy the cozy fall aromas while it bakes.
- The sweet-tart balance is spot-on – rich caramel meets spiced, tangy Granny Smith apples. And yes, it’s vegetarian-friendly, so everyone can dig in.
Ingredients for Caramel Apple Tart
Here’s what you’ll need for this Caramel Apple Tart. It’s a short, honest list—no weird stuff. For the crust: 1 1/2 cups all-purpose flour, spooned and leveled (don’t scoop straight from the bag or you’ll pack it too tight), 1/4 cup granulated sugar, a pinch of salt, and 1/2 cup unsalted butter, cold and cubed. Add 3-4 tablespoons ice water, one tablespoon at a time.
For the filling: 4 medium apples (I’m a die-hard Granny Smith fan—they hold their shape beautifully and their tartness cuts right through the sweet caramel), 1/2 cup caramel sauce (store-bought is totally fine, no shame in that game), 2 tablespoons brown sugar, 1 teaspoon cinnamon, 1/4 teaspoon nutmeg, and a squeeze of lemon juice. Finally, a beaten egg for the wash. That’s it—simple and perfect.
Equipment Needed
You don’t need a fancy kitchen to pull this off. Grab a 9-inch tart pan with a removable bottom (makes slicing so much easier), a mixing bowl, a pastry cutter or fork to cut in the butter, and a baking sheet to catch any drips. A pastry brush is handy for the egg wash, and you can skip the rolling pin if you’re pressing the dough in—I almost always do.
How to Make Caramel Apple Tart Step by Step
Alright, let’s get baking! This Caramel Apple Tart comes together in three simple stages. Just follow along—I’ll walk you through every step. Oh, and go ahead and preheat your oven to 375°F now, so it’s ready when you are.
Prepare the Buttery Crust
Start by whisking your flour, sugar, and salt together in a mixing bowl. Drop in those cold, cubed butter pieces and use a pastry cutter (or two forks) to cut them in until the mixture looks like coarse crumbs with some pea-sized butter bits still visible—that’s good, it means flaky. Drizzle in the ice water one tablespoon at a time, tossing with a fork after each addition. You might not need all 4 tablespoons; the dough should just hold together when you squeeze it. Turn it into your tart pan and press it evenly into the bottom and up the sides—don’t overwork it, just gently press. Prick the bottom all over with a fork, then pop it in the fridge for 15 minutes. Bake for 12 minutes until lightly golden, then set it aside to cool.
Assemble the Apple Filling and Caramel Layer
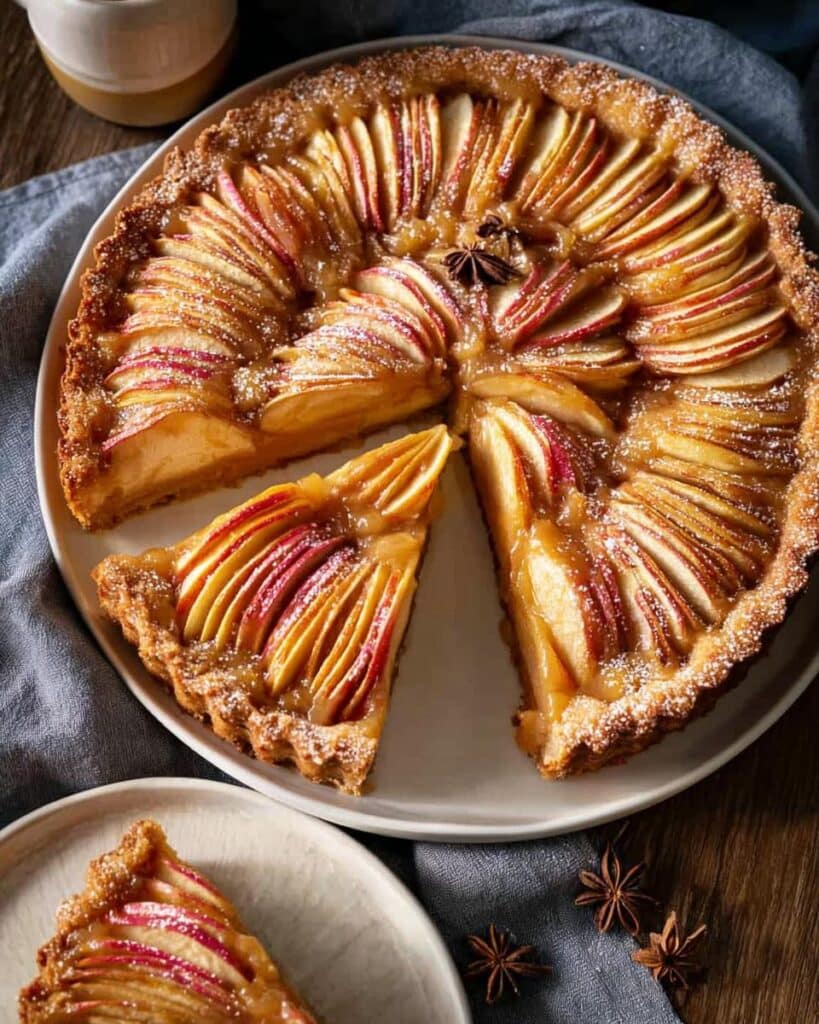
Once the crust is cool, spread that luscious caramel sauce all over the bottom in an even layer—don’t be shy, but don’t drown it either. In the same bowl you used for the crust, toss your apple slices with brown sugar, cinnamon, nutmeg, and lemon juice until every slice is coated. Now arrange the apples over the caramel in a pretty circular pattern, overlapping them slightly—it looks gorgeous and they’ll settle as they bake. Brush the exposed crust edges with beaten egg for that golden shine.
Bake and Cool the Tart
Slide the tart onto a baking sheet (just in case any caramel bubbles over) and bake for 35-40 minutes. You’ll know it’s done when the apples are tender when poked with a knife and the edges are deep golden brown. If the crust starts browning too quickly, just tent it loosely with foil for the last 10 minutes. Let it cool in the pan for 15 minutes before slicing—this helps the caramel set a bit. Serve warm or at room temperature. You’ve got this!
Caramel Apple Tart Ingredient Notes and Substitutions
Let me walk you through why I pick what I pick for this Caramel Apple Tart. Cold butter is non-negotiable – it creates steam pockets in the oven, giving you that flaky crust we all crave. Granny Smith apples are my go-to because their sharp tartness cuts through the sweet caramel, keeping every bite balanced. For more information on apple varieties and their baking properties, check out this guide to baking apples.
If you’re in a pinch, you can swap the all-purpose flour for whole wheat pastry flour. Just add a splash more water since it soaks up more liquid. Don’t have nutmeg? Allspice works great in its place. For a dairy-free version, use vegan butter and a plant-based milk wash instead of egg. And seriously, store-bought caramel sauce saves the day – I use it all the time and never look back.
Tips for the Best Caramel Apple Tart
- Chill the dough thoroughly. I know it’s tempting to skip this, but that 15-minute rest is what gives you a flaky, non-shrinking crust. I once rushed it, and my tart shell looked more like a mini pie bowl—lesson learned!
- Slice your apples evenly. Use a sharp knife or a mandoline if you have one. Even slices mean they’ll cook at the same rate, so you won’t end up with some mushy bites and some crunchy ones. Trust me, it makes a difference.
- Don’t overbake. Pull the Caramel Apple Tart out when the apples are tender but still hold their shape—nobody wants apple mush. If the crust is browning too fast, just tent it with foil for the last few minutes.
- Let it cool before slicing. I know it’s hard to wait, but that 15-minute rest lets the caramel set so your slices come out clean. My first time? I poured on way too much caramel, thinking “more is better.” It overflowed and made a sticky mess. A generous, even layer is all you need—less really is more here.
Caramel Apple Tart Variations and Serving Suggestions
Once you’ve mastered the basic Caramel Apple Tart, it’s fun to play around. For a little crunch, sprinkle a handful of chopped pecans or walnuts over the caramel layer before you pile on the apples—I love the texture they add. If pears are looking better at the market, swap them in for the apples; they soften beautifully and pair perfectly with the spices. And hey, there’s no rule against drizzling a little extra caramel on top after baking—go for it.
As for serving, a scoop of vanilla ice cream melting into the warm tart is my absolute favorite move. A dollop of whipped cream works too, or keep it simple and enjoy it plain. A light dusting of powdered sugar just before serving makes it look extra pretty with almost zero effort.
Storing and Reheating Leftovers
If you’re lucky enough to have leftovers, pop the tart in an airtight container and stash it in the fridge—it’ll stay good for up to three days. When you’re ready for round two, reheat slices in a 350°F oven for 8–10 minutes to crisp the crust back up. I wouldn’t recommend the microwave; it’ll turn that beautiful buttery crust into a sad, soggy mess. That said, cold slices straight from the fridge are pretty fantastic too—almost like an apple pie icebox situation.
Frequently Asked Questions about Caramel Apple Tart
I get a lot of questions about this Caramel Apple Tart, so let me answer the most common ones right here. Hopefully this saves you a little trial and error!
Can I use a store-bought pie crust instead of making my own?
Absolutely, you can. Just keep an eye on the baking time—store-bought crusts often bake faster, so check for golden edges around 8–10 minutes instead of 12. But honestly, the homemade press-in crust is so easy, it’s almost as quick as unwrapping one.
Can I make this tart gluten-free?
Yep! Swap the all-purpose flour for a good gluten-free flour blend that includes xanthan gum. You might need to add an extra tablespoon of ice water since gluten-free flours tend to absorb more liquid. The texture won’t be quite as flaky, but it’ll still be delicious.
Why did my crust turn out soggy?
Two things usually cause this. Either you didn’t pre-bake the crust long enough (that 12-minute bake is crucial), or your apples released too much liquid. That’s why I’m such a fan of Granny Smith apples—they’re firmer and hold up better than softer varieties like McIntosh. Toss them with the lemon juice too, it helps keep them from weeping in the oven.
How do I stop the apple slices from browning while I prep?
Easy! Just toss them in the lemon juice called for in the recipe. The acid prevents oxidation, so your apples stay pretty and pale until they hit the oven. Plus, it adds a nice little tang.
Nutritional Information
Per slice (1/8 tart): 350 calories, 25g sugar, 150mg sodium, 18g fat (8g saturated, 9g unsaturated, 0g trans fat), 45g carbohydrates, 2g fiber, 4g protein, 40mg cholesterol. Nutrition values are estimates and may vary based on ingredient brands and substitutions.
Print
Flaky Caramel Apple Tart in 30 Minutes
- Total Time: 1 hour 15 minutes
- Yield: 8 servings 1x
- Diet: Vegetarian
Description
This caramel apple tart features a buttery crust, a layer of rich caramel, and tender spiced apples. It is a simple dessert for fall gatherings.
Ingredients
- 1 1/2 cups all-purpose flour
- 1/2 cup unsalted butter, cold and cubed
- 1/4 cup granulated sugar
- 1/4 teaspoon salt
- 3–4 tablespoons ice water
- 4 medium apples, peeled and sliced
- 1/2 cup caramel sauce
- 2 tablespoons brown sugar
- 1 teaspoon cinnamon
- 1/4 teaspoon nutmeg
- 1 tablespoon lemon juice
- 1 egg, beaten (for egg wash)
Instructions
- Preheat your oven to 375°F (190°C).
- In a bowl, mix flour, sugar, and salt. Cut in butter until crumbly.
- Add ice water one tablespoon at a time until dough forms. Press into a 9-inch tart pan.
- Prick the bottom with a fork. Chill for 15 minutes.
- Bake the crust for 12 minutes until lightly golden. Let cool.
- Spread caramel sauce evenly over the cooled crust.
- In a bowl, toss apple slices with brown sugar, cinnamon, nutmeg, and lemon juice.
- Arrange apples over the caramel in a circular pattern.
- Brush the crust edges with beaten egg.
- Bake for 35-40 minutes until apples are tender and edges are golden.
- Cool for 15 minutes before slicing. Serve warm or at room temperature.
Notes
- You can use store-bought caramel sauce to save time.
- Granny Smith apples work best for a tart balance.
- Store leftovers in the refrigerator for up to 3 days.
- Prep Time: 30 minutes
- Cook Time: 45 minutes
- Category: Dessert
- Method: Baking
- Cuisine: American
Nutrition
- Serving Size: 1 slice (1/8 tart)
- Calories: 350
- Sugar: 25g
- Sodium: 150mg
- Fat: 18g
- Saturated Fat: 8g
- Unsaturated Fat: 9g
- Trans Fat: 0g
- Carbohydrates: 45g
- Fiber: 2g
- Protein: 4g
- Cholesterol: 40mg