Let me tell you about my absolute favorite way to roast chicken – cider brined chicken that comes out impossibly juicy every single time. I discovered brining years ago when my Thanksgiving turkey turned out dry (we’ve all been there!), and wow, what a difference it makes. The apple cider brine in this recipe does double duty – it keeps the meat succulent while adding this subtle sweetness that pairs perfectly with crispy golden skin. Trust me, once you try this method, you’ll never go back to plain roasted chicken again. It’s become my go-to for Sunday dinners when I want something special but not fussy – just pure, flavorful comfort food that makes everyone ask for seconds.
Why You’ll Love This Cider Brined Chicken
This isn’t just any roasted chicken—it’s a game-changer. Here’s why it’ll become your new favorite:
- Juicy perfection: The cider brine works magic, keeping every bite moist even if you accidentally overcook it (we’ve all done it!)
- Flavor that wows: Apple cider adds subtle sweetness while the garlic and thyme give it that “what’s your secret?” depth
- Foolproof method: Brining does most of the work for you—just mix, soak, and roast
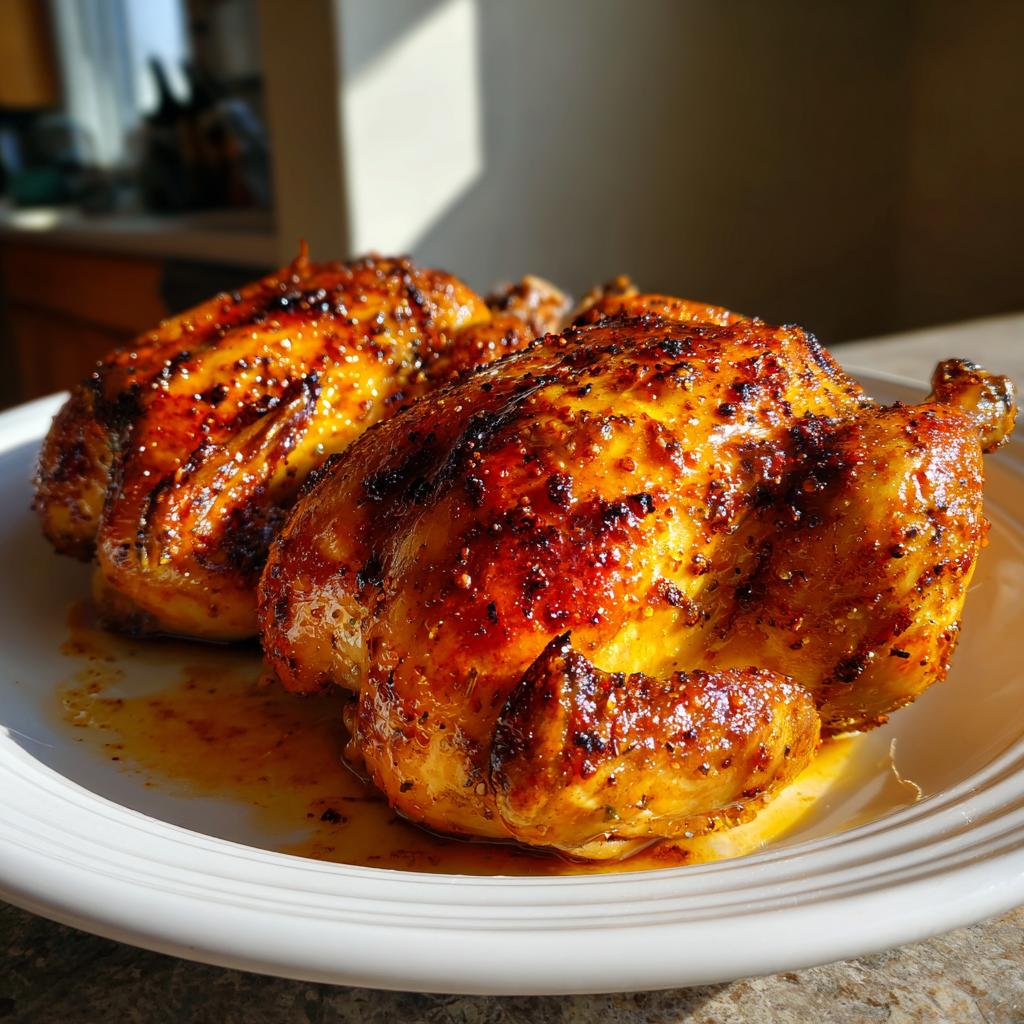
- Crispy golden skin: That satisfying crunch contrasts beautifully with the tender meat
- Sunday dinner hero: Impressive enough for guests, easy enough for weeknights
Ingredients for Cider Brined Chicken
Gather these simple ingredients to create magic:
- 1 whole chicken (3-4 lbs) – look for plump, fresh chicken with no tears in the skin
- 4 cups apple cider – the good stuff, not juice! Cloudy, unfiltered works best
- 1/4 cup kosher salt – Diamond Crystal is my go-to
- 2 tbsp brown sugar – light or dark both work
- 1 tbsp black peppercorns – whole, not ground
- 2 cloves garlic, crushed – just smash them with your knife
- 2 sprigs fresh thyme – stems and all
- 1 bay leaf – the secret flavor booster
- 2 cups cold water – to cool everything down
Ingredient Notes & Substitutions
No fresh thyme? Use 1 tsp dried. Out of brown sugar? Maple syrup works in a pinch. If you only have table salt, use just 3 tbsp – it’s saltier than kosher! And please, whatever you do, don’t skip the apple cider – it’s the star here. The unfiltered kind gives the best flavor, but regular will work if that’s all you’ve got.
Equipment You’ll Need
Here’s what you’ll want to grab before starting:
- A large pot (big enough to fully submerge your chicken)
- Roasting pan with rack (but a baking sheet works in a pinch)
- Meat thermometer – non-negotiable for perfect doneness!
- Mixing spoon and measuring cups
- Paper towels for patting dry
That’s it! No fancy gadgets needed – just good old reliable kitchen basics.
How to Make Cider Brined Chicken
This process breaks down into two simple phases – the brine (where all the magic happens) and the roast (where the magic becomes edible). Don’t let the timing scare you – most of it’s hands-off while the flavors work their way into every juicy bite.
Brining the Chicken
First, grab your big pot and combine the cider, salt, sugar, peppercorns, garlic, thyme, and bay leaf. Heat it just until the salt and sugar dissolve – you’re not boiling it, just warming enough to melt those crystals. Take it off the heat and stir in the cold water to cool it down. Now gently plop in your chicken (make sure it’s fully submerged!) and let it soak up all that goodness in the fridge. 12 hours is perfect, but if you forget and leave it up to 24, that’s fine too. Just don’t go longer or it’ll get too salty!
Roasting the Chicken
When you’re ready to cook, pull that chicken out of the brine (toss the brine – its job is done!) and pat it super dry with paper towels. This step is crucial for crispy skin! Let it sit on the counter for about 30 minutes – this helps it cook evenly. While it rests, preheat your oven to 375°F. Roast for about 60-75 minutes, but here’s the important part – check that internal temp in the thickest part of the thigh. When it hits 165°F, you’re golden (literally and figuratively). Let it rest for 10 minutes before carving – I know it’s tempting to dig in, but this keeps all those juices where they belong!

Tips for Perfect Cider Brined Chicken
After making this cider brined chicken more times than I can count, here are my can’t-miss tips:
- Pat that skin dry! Seriously, take the time to blot every inch with paper towels before roasting – this is your crispy skin secret.
- Brine disposal: Once you remove the chicken, dump the brine immediately – it’s done its job and you don’t want to accidentally reuse it.
- Thermometer trust: I don’t care how golden it looks, always check that internal temp reaches 165°F in the thickest part.
- Rest time matters: Those 10 minutes after roasting let juices redistribute – cutting early means dry chicken, no matter how good your brine was!
- Size check: If your chicken is over 4 lbs, add about 15 extra minutes roasting time.
Serving Suggestions
Oh, the possibilities! This cider brined chicken shines alongside roasted carrots and Brussels sprouts – their caramelized edges love the cider notes. Creamy mashed potatoes soak up those delicious juices beautifully. For something lighter, try a crisp apple and fennel salad. And don’t even get me started on the gravy you can make with the pan drippings – just deglaze with a splash of cider and whisk in some butter and flour. Heaven!

Storing and Reheating
Leftovers? Lucky you! Store cooled chicken in an airtight container for up to 3 days. When reheating, skip the microwave (soggy skin alert!) and use a 350°F oven instead – just until it hits 165°F internally. The skin won’t be quite as crisp as fresh, but it’ll still taste amazing. Pro tip: Save those bones for incredible cider-infused stock later!
Cider Brined Chicken FAQs
I get asked about this recipe all the time – here are the answers to the questions that pop up most often:
Can I use bottled apple cider?
Absolutely! Just make sure it’s real cider, not juice. The unfiltered, cloudy kind works best for maximum flavor, but regular bottled cider will still give you great results. I’ve even used homemade cider when I had extra from the farmers market.
Is brining really necessary?
Well, necessary? No. Life-changing? YES! Brining is what transforms good chicken into “oh my goodness what did you do to this chicken?!” Honestly, that extra 12 hours of soaking makes all the difference between just okay and absolutely incredible.
Can I brine for longer than 24 hours?
Please don’t! I learned this the hard way when I forgot about a batch in the fridge. After 24 hours, the meat can get too salty and the texture turns mushy. Set a reminder on your phone if you’re worried – 12-18 hours is the sweet spot.
What if I don’t have a roasting rack?
No worries! Just prop the chicken up on some roughly chopped onions, carrots, or potatoes in your pan. They’ll keep it out of the drippings and bonus – you get delicious roasted veggies as a side!

Nutritional Information
Just so you know, these numbers are estimates – your actual counts might vary slightly depending on your chicken’s size and exact ingredients used. Per serving (about 1/4 chicken): 320 calories, 32g protein, 14g fat, and 980mg sodium. The cider adds about 12g natural sugar per portion. Not bad for something this delicious!
Share Your Results
Made this cider brined chicken? I’d love to hear how it turned out! Snap a photo or leave a rating – your kitchen adventures make my day.
Print
Juicy Cider Brined Chicken Recipe in Just 12 Hours
- Total Time: 24 hours 30 minutes
- Yield: 4 servings 1x
- Diet: Low Lactose
Description
A flavorful chicken dish brined in cider for juiciness and taste.
Ingredients
- 1 whole chicken (3–4 lbs)
- 4 cups apple cider
- 1/4 cup kosher salt
- 2 tbsp brown sugar
- 1 tbsp black peppercorns
- 2 cloves garlic, crushed
- 2 sprigs fresh thyme
- 1 bay leaf
- 2 cups cold water
Instructions
- Combine cider, salt, sugar, peppercorns, garlic, thyme, and bay leaf in a large pot.
- Heat until salt and sugar dissolve, then remove from heat and add cold water.
- Submerge chicken in brine, cover, and refrigerate for 12-24 hours.
- Remove chicken from brine, pat dry, and let sit at room temperature for 30 minutes.
- Preheat oven to 375°F (190°C).
- Roast chicken for 60-75 minutes until internal temperature reaches 165°F (74°C).
- Rest for 10 minutes before carving.
Notes
- Do not brine for more than 24 hours.
- Discard brine after use.
- Use a meat thermometer for accuracy.
- Prep Time: 15 minutes
- Cook Time: 75 minutes
- Category: Main Dish
- Method: Roasting
- Cuisine: American
Nutrition
- Serving Size: 1/4 chicken
- Calories: 320
- Sugar: 12g
- Sodium: 980mg
- Fat: 14g
- Saturated Fat: 4g
- Unsaturated Fat: 8g
- Trans Fat: 0g
- Carbohydrates: 15g
- Fiber: 0g
- Protein: 32g
- Cholesterol: 110mg