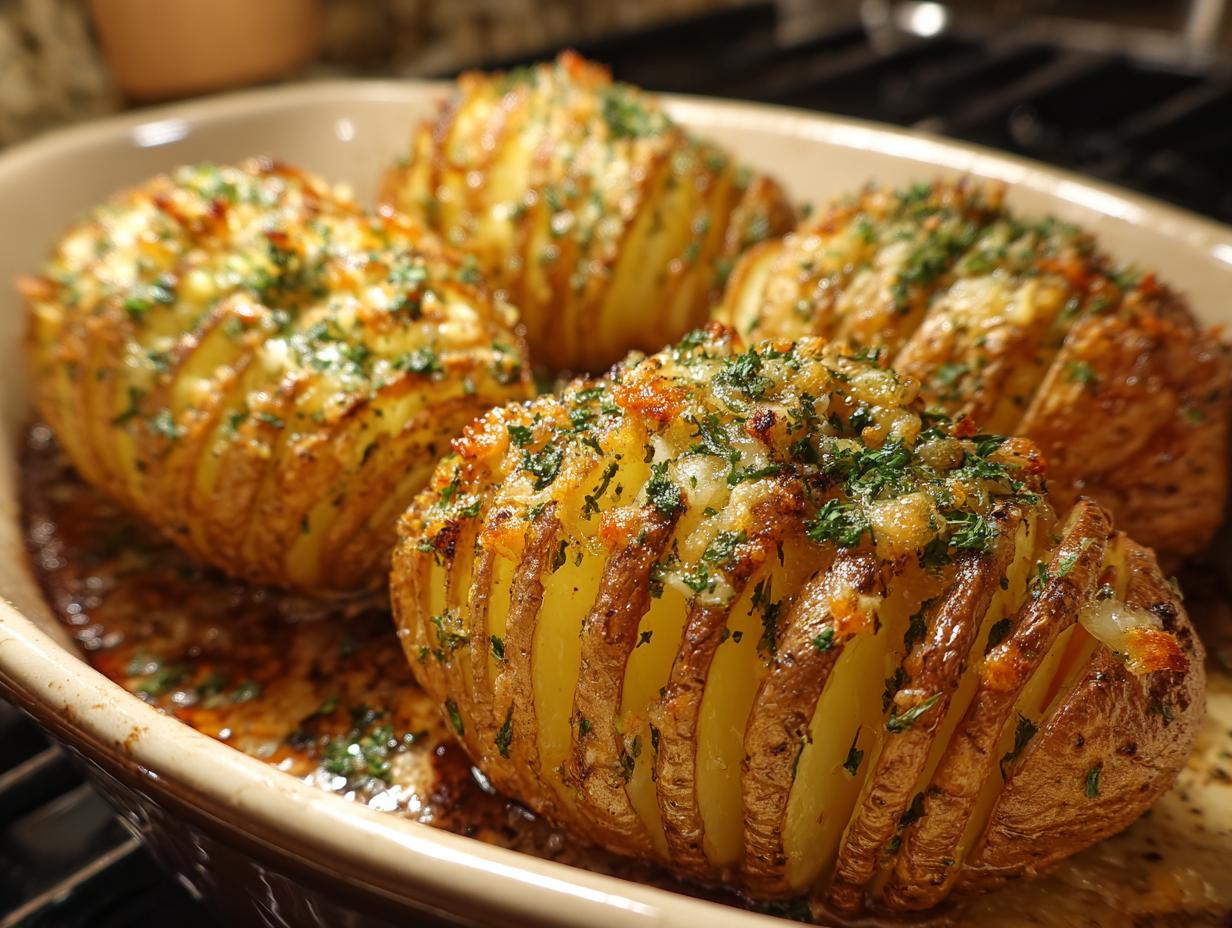
Oh my gosh, do I have a potato game-changer for you! Picture this: It was a chilly Sunday afternoon, and I was staring at a bag of russet potatoes, totally bored with my usual roasted potato routine. Then I remembered these gorgeous Hasselback Potatoes I’d seen ages ago at a Swedish restaurant – all crispy and golden, sliced thin so they fan out like little edible accordions. One bite and I was hooked!
Now here’s the thing – these aren’t just pretty potatoes. That clever slicing technique lets every little ridge get perfectly crispy while staying tender inside. It creates all these nooks for butter and seasonings to sneak into, making each bite explode with flavor. Trust me, once you try making Hasselback Potatoes at home, you’ll never look at baked potatoes the same way again!

Why You’ll Love These Hasselback Potatoes
- Crispy perfection: Every slice gets golden and crunchy while staying tender inside.
- Flavor explosion: The fan-like cuts let butter and seasonings seep into every nook.
- Super easy: Just slice, season, and bake – no fancy skills required.
- Total showstopper: They look as impressive as they taste, perfect for dinner parties.
- Endless customization: Add your favorite herbs, spices, or cheeses for a personal touch.
Hasselback Potatoes Ingredients
- 4 medium russet potatoes – scrubbed clean and thoroughly dried (size matters – too small and they’ll overcook, too big and they won’t fan properly)
- 2 tbsp olive oil – the good stuff! This helps achieve that gorgeous golden crust
- 1 tsp salt – I use kosher salt for better distribution
- 1/2 tsp black pepper – freshly ground makes all the difference
- 1 tsp garlic powder – trust me, this is the secret flavor booster
- 1 tsp paprika – for that beautiful color and subtle smokiness
- 2 tbsp melted butter – brushed on at the end for extra richness
- 2 tbsp grated Parmesan cheese (optional) – my favorite finishing touch when I’m feeling fancy
- Fresh parsley for garnish – makes everything look restaurant-worthy
Ingredient Notes & Substitutions
Okay, let’s talk swaps! First, the potatoes – russets are ideal for their starchy texture, but sweet potatoes work beautifully too (just watch the baking time). No olive oil? Melted butter works in a pinch. For my vegan friends, swap the butter for vegan butter or coconut oil – it’ll still taste amazing.
The seasoning blend is totally customizable. Sometimes I’ll use smoked paprika instead of regular, or add a pinch of cayenne for heat. Rosemary or thyme sprinkled between the slices? Divine! And if you’re out of Parmesan, try sharp cheddar or skip it altogether – these potatoes shine either way.
Equipment You’ll Need for Hasselback Potatoes
Alright, let’s talk tools! The beauty of Hasselback Potatoes is you don’t need fancy gadgets – just a few basic kitchen essentials you probably already have. Here’s what I always grab:
- A super sharp chef’s knife – this is non-negotiable! You need clean, precise slices without hacking through the potatoes. Dull knives will just mash them.
- A sturdy baking sheet – I like rimmed ones to catch any drips (because butter happens). No need to line it – we want that direct heat for crispiness!
- A wooden spoon – my secret weapon! Place it under the potato as you slice to stop your knife from going all the way through. Genius, right?
- A pastry brush – for basting with that glorious melted butter halfway through. A spoon works too, but the brush gets into all those nooks.
- Small bowl – for mixing your oil and spices. I use the same one to melt butter later – less dishes!
See? Nothing fancy. Just grab these five simple things, and you’re ready to make potato magic happen.
How to Make Hasselback Potatoes
Alright, let’s get slicing! I promise it’s easier than it looks – just follow these steps and you’ll have perfect Hasselback Potatoes every time:
- Preheat your oven to 425°F (220°C). This high heat is key for getting those crispy edges!
- Prep your potatoes: Give them a good scrub (we’re keeping the skins on for texture) and pat them completely dry. Wet potatoes = soggy results.
- The slicing secret: Place a potato on your cutting board with a wooden spoon running lengthwise underneath it. Slice across the potato every 1/8-inch – the spoon handle stops your knife from cutting all the way through. Magic!
- Season generously: Arrange potatoes on your baking sheet. Drizzle with olive oil, making sure it gets between the slices. Then sprinkle with salt, pepper, garlic powder, and paprika – rub it in with your fingers for maximum coverage.
- First bake: Pop them in the oven for 30 minutes. You’ll start to see the slices fanning out beautifully!
- Butter baste: Carefully brush melted butter between the slices – this is when they really start to crisp up and turn golden.
- Final bake: Return to oven for 15-20 more minutes until crispy outside and tender inside. If using Parmesan, sprinkle it on during the last 5 minutes.
- Garnish and serve: Fresh parsley adds that perfect finishing touch. Serve immediately while they’re piping hot!

Tips for Perfect Hasselback Potatoes
After making these dozens of times (okay, maybe hundreds – I’m obsessed!), here are my foolproof tips:
- Slice thickness matters: Too thick (over 1/4-inch) and they won’t fan properly. Too thin (under 1/8-inch) and they might break. Aim for credit card thickness.
- Watch that wooden spoon trick: Seriously, this is the game-changer that prevents potato disasters. No spoon? Chopsticks work too!
- Don’t skimp on oil: Make sure it gets between every slice – I use my fingers to gently separate them while drizzling.
- Halfway check-in: At the 30-minute mark, if slices aren’t fanning nicely, gently separate them with a fork.
- Crispiness test: The edges should be golden brown and crispy, while a knife slides easily into the center.
- Serve immediately: These are best right out of the oven when they’re at their crispiest!
Remember – even if your slices aren’t perfectly even (mine never are!), they’ll still taste incredible. The beauty is in the imperfections!
Serving Suggestions for Hasselback Potatoes
Now for the best part – serving these golden beauties! Hasselback Potatoes are the ultimate versatile side, pairing perfectly with almost anything. Here’s how I love to serve them:
For a classic dinner, I’ll pair them with a juicy grilled steak or roast chicken. The crispy potatoes balance so well with rich meats. Sunday roast? These are a must! And don’t get me started about how amazing they are alongside pan-seared salmon – the textures are just magical together.
Vegetarian night? No problem! They’re fantastic with roasted vegetables like Brussels sprouts or carrots. I sometimes make a complete meal by topping them with sautéed mushrooms and a fried egg – breakfast for dinner at its finest!
Presentation tip: Always sprinkle with that fresh parsley right before serving – it makes the dish pop visually and adds a bright flavor contrast. For special occasions, I’ll add a dollop of sour cream or garlic aioli on the side for dipping those crispy edges. Trust me, your guests will go crazy for these!
Storing and Reheating Hasselback Potatoes
Okay, let’s be real – these potatoes are usually gone before they even hit the fridge! But if you somehow have leftovers (or want to prep ahead), here’s how to keep that crispy magic alive.
First, storage: Let your Hasselback Potatoes cool completely, then pop them in an airtight container. They’ll keep in the fridge for about 3 days – any longer and they start to lose their texture. Pro tip: Separate the slices slightly before storing so they don’t stick together.
Now for reheating – and this is crucial! Never, ever microwave them unless you want sad, soggy potatoes. Instead, spread them on a baking sheet and crisp them up in a 375°F (190°C) oven for about 10-15 minutes. I like to brush them with a little extra butter or oil before reheating to revive that golden crispness. If you’re in a hurry, an air fryer works wonders too – just 5-7 minutes at 375°F and they’ll be almost as good as fresh!
One last secret: If I know I’ll have leftovers, I’ll underbake them slightly the first time. That way when I reheat, they come out perfect instead of overdone. Genius, right?

Hasselback Potatoes Nutritional Information
Okay, let’s talk numbers – but remember, these are just estimates! Your exact nutritional values will vary depending on the size of your potatoes and how much of that delicious butter and oil actually makes it into the dish (versus, you know, ending up on your fingers when you can’t resist tasting).
Per serving (that’s one glorious Hasselback Potato with all the toppings):
- Calories: About 220 – totally worth every one!
- Fat: 8g (3g saturated) – mostly from that glorious butter and olive oil
- Carbs: 35g – hey, it’s a potato after all
- Fiber: 4g – keeping things moving, thanks to those nutritious skins
- Protein: 4g – a little boost if you add that Parmesan
- Sugar: Just 2g naturally occurring – nothing added here
- Sodium: 400mg – easy to adjust if you’re watching salt intake
Now here’s my nutritionist-approved take: These are way better for you than fries or loaded baked potatoes! You’re getting all that potato goodness with way less fat than deep-fried options. Plus, leaving the skins on means more fiber and nutrients. And honestly? Sometimes food should just be delicious – and these crispy, buttery beauties definitely qualify!
Remember: If you make subs like vegan butter or skip the cheese, your numbers will change. But who’s counting when something tastes this good?
Hasselback Potatoes FAQs
I get asked about these gorgeous potatoes all the time! Here are answers to the questions that pop up most often in my kitchen (and my DMs):
Can I make Hasselback Potatoes ahead of time?
Absolutely! Prep them up to the baking point, then cover and refrigerate for a few hours before roasting. Just add 5-10 minutes to the baking time since they’ll be cold. Perfect for dinner parties when you want to impress without stress!
How thin should the slices be?
Think “credit card thickness” – about 1/8-inch apart. Too thick and they won’t fan nicely, too thin and they might break. But here’s a secret: uneven slices still taste amazing! My first attempts looked more like abstract art than perfect fans, but they disappeared just as fast.
Why won’t my potato slices fan out?
Don’t panic! Sometimes they need a little encouragement. After the first 30 minutes of baking, gently separate the slices with a fork or butter knife. And make sure you’re using enough oil/butter – that helps them separate naturally as they cook. For more tips on potato preparation, check out this guide on how to choose potatoes.
Can I use sweet potatoes instead?
You bet! Sweet potato Hasselbacks are delicious – just watch your baking time as they cook faster than russets. I like to add a sprinkle of brown sugar and cinnamon for a sweet twist. The slices might be more delicate, so handle them gently.
What’s the best way to reheat leftovers?
Skip the microwave unless you love soggy potatoes! Instead, pop them back in a 375°F oven for 10-15 minutes until crispy again. An air fryer works wonders too – just 5-7 minutes at the same temp. Pro tip: Brush with a little extra butter or oil before reheating for maximum crispness.
Still have questions? Drop them in the comments – I’m happy to help troubleshoot your potato adventures!

Share Your Hasselback Potatoes Experience
Nothing makes me happier than hearing about your potato adventures! Did your Hasselback Potatoes turn out golden and crispy? Maybe you tried a fun twist with different seasonings or cheeses? I want to hear all about it!
Leave a comment below and let me know how it went – your tips might help other readers too! And if you snapped a photo of your beautiful potato creation (because let’s be honest, these are Insta-worthy), tag me so I can admire your handiwork. Happy slicing, and I can’t wait to hear your stories!
Print
Crispy Hasselback Potatoes: 4 Simple Steps to Potato Perfection
- Total Time: 65 mins
- Yield: 4 servings 1x
- Diet: Vegetarian
Description
Crispy roasted potatoes sliced thinly, fanning out for maximum flavor and texture.
Ingredients
- 4 medium russet potatoes
- 2 tbsp olive oil
- 1 tsp salt
- 1/2 tsp black pepper
- 1 tsp garlic powder
- 1 tsp paprika
- 2 tbsp melted butter
- 2 tbsp grated Parmesan cheese (optional)
- Fresh parsley for garnish
Instructions
- Preheat oven to 425°F (220°C).
- Wash and dry the potatoes.
- Slice each potato thinly without cutting all the way through.
- Place potatoes on a baking sheet.
- Drizzle with olive oil and season with salt, pepper, garlic powder, and paprika.
- Bake for 45-50 minutes until crispy and tender.
- Brush with melted butter and sprinkle Parmesan cheese if using.
- Garnish with fresh parsley before serving.
Notes
- Use a wooden spoon to help guide your knife and prevent cutting through the potato.
- For extra crispiness, baste with butter halfway through baking.
- Customize with your favorite herbs or spices.
- Prep Time: 15 mins
- Cook Time: 50 mins
- Category: Side Dish
- Method: Roasting
- Cuisine: Swedish
Nutrition
- Serving Size: 1 potato
- Calories: 220
- Sugar: 2g
- Sodium: 400mg
- Fat: 8g
- Saturated Fat: 3g
- Unsaturated Fat: 5g
- Trans Fat: 0g
- Carbohydrates: 35g
- Fiber: 4g
- Protein: 4g
- Cholesterol: 10mg