I’ll never forget the look on my best friend’s face when I handed her one of my DIY cookie mix in a jar creations last Christmas. Her eyes lit up like I’d given her pure gold! That’s the magic of these little layered gifts – they’re so simple to make, yet they feel incredibly special to receive. Just imagine – all the dry ingredients for perfect chocolate chip cookies, artfully layered in a mason jar, ready to become someone’s happy little baking project.
These cookie mix jars have saved me more times than I can count when I need a last-minute hostess gift or want to show someone I’m thinking of them. The best part? You probably have everything you need in your pantry right now. In about 10 minutes, you can create a gift that’s way more thoughtful than anything store-bought and smells like pure nostalgia when it bakes up.

Why You’ll Love This DIY Cookie Mix in a Jar
Oh my goodness, where do I even start with why these little jars are absolutely genius? First off, they’re crazy quick to put together – we’re talking under 10 minutes from pantry to pretty gift. But here’s what really makes them special:
- Customizable magic: Swap in white chocolate chips, add butterscotch, or toss in some festive sprinkles – it’s your flavor playground!
- Gift-giving gold: Teachers, neighbors, and coworkers go nuts for these (pun intended). I’ve seen grown adults squeal with delight.
- Baking made foolproof: All the measuring’s done – just dump, mix, and bake for instant cookie perfection.
Trust me, once you make your first jar, you’ll be hooked. The only problem? You’ll want to keep them all for yourself!
Ingredients for DIY Cookie Mix in a Jar
Okay, let’s gather our cookie magic! Here’s everything you’ll need for one gorgeous jar (makes about 2 dozen cookies):
- 1 3/4 cups all-purpose flour (spoon and level it – no packing!)
- 3/4 teaspoon baking soda
- 1/2 teaspoon salt (I use kosher – it distributes better)
- 3/4 cup granulated sugar
- 3/4 cup packed brown sugar (really press it down with your fingers)
- 1 cup chocolate chips (I use semi-sweet, but milk chocolate works too)
- 1/2 cup chopped nuts (optional) – walnuts or pecans are my faves
That’s it! See? Nothing fancy – just pantry staples transformed into something extraordinary. Now let’s layer this beauty up!

Equipment You’ll Need
Grab these basics from your kitchen, and you’re halfway to cookie jar magic:
- 1-quart mason jar (make sure it’s clean and bone-dry – moisture is the enemy!)
- Measuring cups (the dry kind for flour, the liquid one for packing sugar)
Something to pack with (I use the back of a spoon – my grandma swore by her wooden tamper)
Feeling fancy? Raid your craft stash for:
- Ribbon or twine (for that picture-perfect bow)
- Fabric scraps (cute jar toppers in seconds)
- Chalkboard tags (perfect for handwritten notes)
Honestly? A plain jar with a spoon sticking out looks adorable too – no pressure to go full Pinterest!
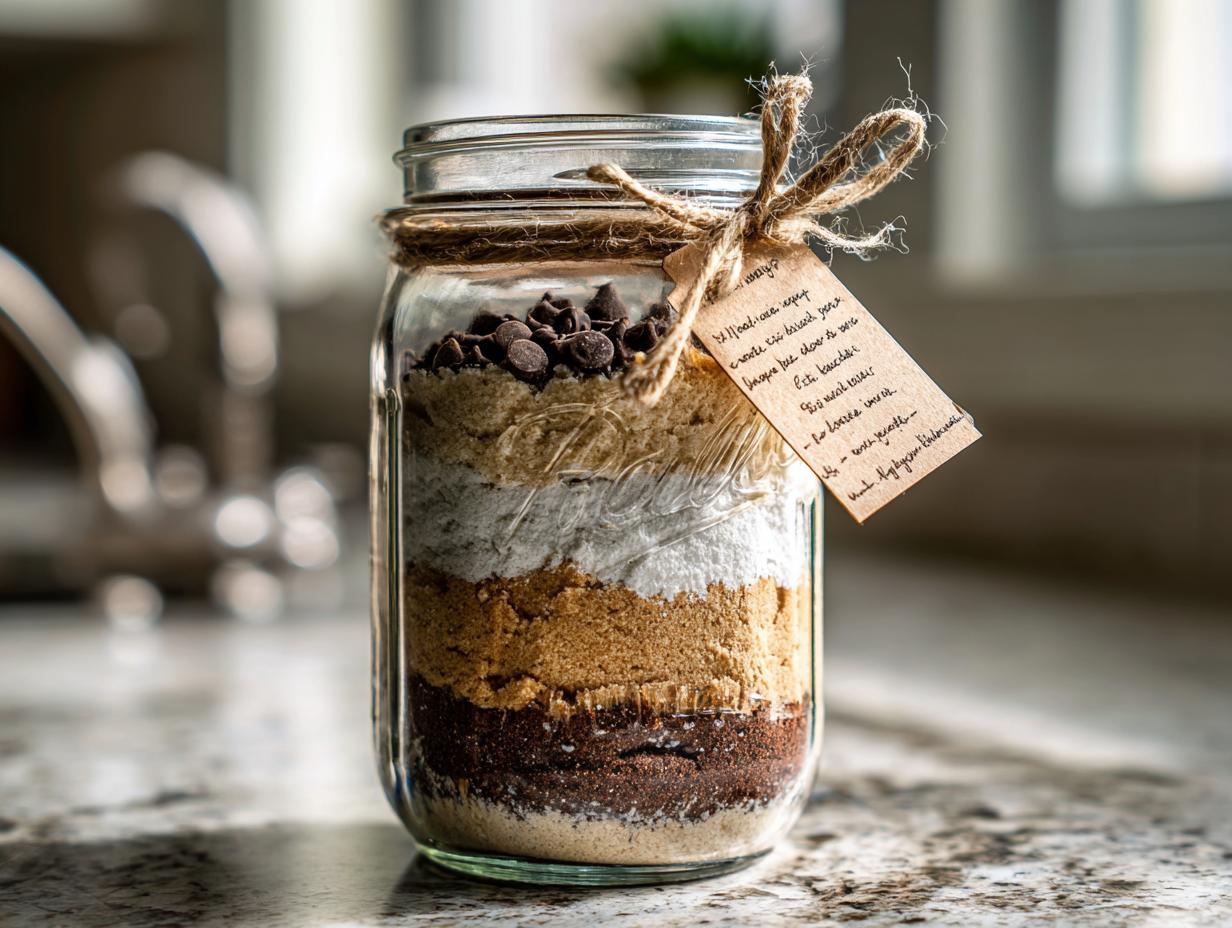
How to Layer Your DIY Cookie Mix in a Jar
Alright, let’s get layering! The secret to these beauties is the order – we’re building from the bottom up so everything stays picture-perfect. Grab your jar and let’s create some edible art!
Step 1: Dry Ingredients
First things first – the foundation! I always start by whisking together the flour, baking soda, and salt in a bowl (this prevents clumps). Then, pour it into your jar and really press it down with the back of a spoon. You want it packed firm enough that the next layer won’t sink in, but don’t go Hulk-mode – just nice and even.
Step 2: Sugars
Here comes the sweet stuff! Pour in the granulated sugar first – it’ll form a pretty white layer. Now for the brown sugar: this is where you’ll need some muscle. Spoon it in small amounts and press firmly with clean fingers or a tamper. We’re aiming for compact layers that’ll hold their shape when the jar gets flipped and shaken.
Step 3: Chocolate Chips and Nuts
The grand finale! Toss those chocolate chips in first – they’ll create a gorgeous chocolatey blanket. If you’re using nuts, sprinkle them on top like edible confetti. Don’t pack this layer; let everything stay loose and tempting. Screw the lid on tight, and voila – instant cookie happiness in a jar!
Pro tip: Tape the baking instructions to the lid or tie them with ribbon (“Just add 1/2 cup butter, 1 egg, and 1 tsp vanilla!”). Watching someone’s face light up when they realize how easy it is? Priceless.

Baking Instructions for DIY Cookie Mix in a Jar
Okay, cookie time! Here’s the beautiful part – all the hard work’s already done. Just dump your gorgeous jar mix into a big bowl (trust me, you’ll want to admire those perfect layers one last time before stirring). Add 1/2 cup softened butter (not melted!), 1 egg, and 1 teaspoon vanilla extract. Mix until everything comes together in a dreamy cookie dough – it’ll smell like childhood happiness.
Drop spoonfuls onto a baking sheet (I use my trusty #40 scoop for perfect cookies every time) and pop them in a 375°F oven for 10-12 minutes. You’ll know they’re done when the edges turn golden but the centers still look slightly underbaked. Let them cool for a hot minute on the sheet – resisting the urge to eat them immediately is the hardest part!
Tips for Perfect DIY Cookie Mix in a Jar
After making dozens of these jarred cookie mixes (okay, maybe hundreds – I have a problem!), I’ve picked up some foolproof tricks:
- Bone-dry jars only – Any moisture turns your beautiful layers into one sad clump. I run mine through the dishwasher right before assembling.
- Pack it like you mean it – Really press those sugar layers down with your fingers. A loose pack means ingredients mix during transport (disaster!).
- Shake test – Before decorating, give the sealed jar a gentle shake. If layers stay put, you nailed it!
Bonus tip: Tie the baking instructions to the jar with baker’s twine – it looks adorable and ensures they don’t get lost!
Variations for Your DIY Cookie Mix in a Jar
Oh, the possibilities! This basic recipe is just the starting point for your cookie jar adventures. Swap those chocolate chips for white chocolate and dried cranberries for a festive twist (my holiday go-to). Not a nut person? Skip ’em or replace with pretzel pieces for salty-sweet magic. Feeling fancy? A teaspoon of instant espresso powder takes these to gourmet territory. The jar’s your canvas – have fun with it!
Storing and Gifting Your DIY Cookie Mix in a Jar
These cookie jars are practically magic – they’ll keep fresh in your pantry for up to 3 months (if they last that long before getting baked!). For gifting, I always add a handwritten tag with the baking instructions and a sweet note like “Bake when you need a little joy”. Tuck it under some twine with a wooden spoon tied to the jar, and you’ve got instant heart-melting gift perfection!

DIY Cookie Mix in a Jar FAQ
I get asked these questions all the time when I gift my cookie jars – so let’s tackle the big ones!
Can I use gluten-free flour? Absolutely! Swap in your favorite 1:1 gluten-free blend (I like Bob’s Red Mill). Just whisk it with the other dry ingredients first to prevent clumping.
How long does the mix last? Stored in a cool, dry place with the lid tight, your jar will stay fresh for 3 months. Pro tip: Write the “made on” date on the lid!
Can I skip the nuts? Of course! The recipe works perfectly without them. Try adding extra chocolate chips or even some toffee bits instead.
What if my layers mix together? Don’t panic! It’ll still bake up delicious – just might not look as pretty. Next time, pack those sugar layers extra firm.
Can I double the recipe? You bet! Just use two jars (they make great matching gifts) or one big half-gallon jar for a showstopper presentation.
Nutritional Information for DIY Cookie Mix in a Jar
Here’s the scoop on what’s in each delicious cookie (based on using all ingredients listed):
- Calories: 150
- Fat: 6g
- Carbs: 22g
- Sugar: 12g
- Protein: 2g
Of course, these numbers might dance around a bit depending on your chocolate chip choices or whether you add those optional nuts. But let’s be real – nobody eats just one of these cookies anyway!
Print
10-Minute DIY Cookie Mix in a Jar: A Heartwarming Gift
- Total Time: 22 mins
- Yield: 24 cookies 1x
- Diet: Vegetarian
Description
A simple DIY cookie mix in a jar that makes a great gift. Just add butter, eggs, and vanilla to bake delicious cookies.
Ingredients
- 1 3/4 cups all-purpose flour
- 3/4 teaspoon baking soda
- 1/2 teaspoon salt
- 3/4 cup granulated sugar
- 3/4 cup packed brown sugar
- 1 cup chocolate chips
- 1/2 cup chopped nuts (optional)
Instructions
- Layer the flour, baking soda, and salt in the jar first.
- Add the granulated sugar and brown sugar next, packing them down.
- Top with chocolate chips and nuts if using.
- Seal the jar tightly and attach a tag with baking instructions.
- When ready to bake, mix the jar contents with 1/2 cup softened butter, 1 egg, and 1 teaspoon vanilla extract.
- Drop by spoonfuls onto a baking sheet and bake at 375°F for 10-12 minutes.
Notes
- Use a clean, dry 1-quart mason jar.
- Pack each layer firmly to fit all ingredients.
- Decorate the jar with ribbon or fabric for a festive touch.
- Prep Time: 10 mins
- Cook Time: 12 mins
- Category: Dessert
- Method: Baking
- Cuisine: American
Nutrition
- Serving Size: 1 cookie
- Calories: 150
- Sugar: 12g
- Sodium: 85mg
- Fat: 6g
- Saturated Fat: 3g
- Unsaturated Fat: 2g
- Trans Fat: 0g
- Carbohydrates: 22g
- Fiber: 1g
- Protein: 2g
- Cholesterol: 15mg