
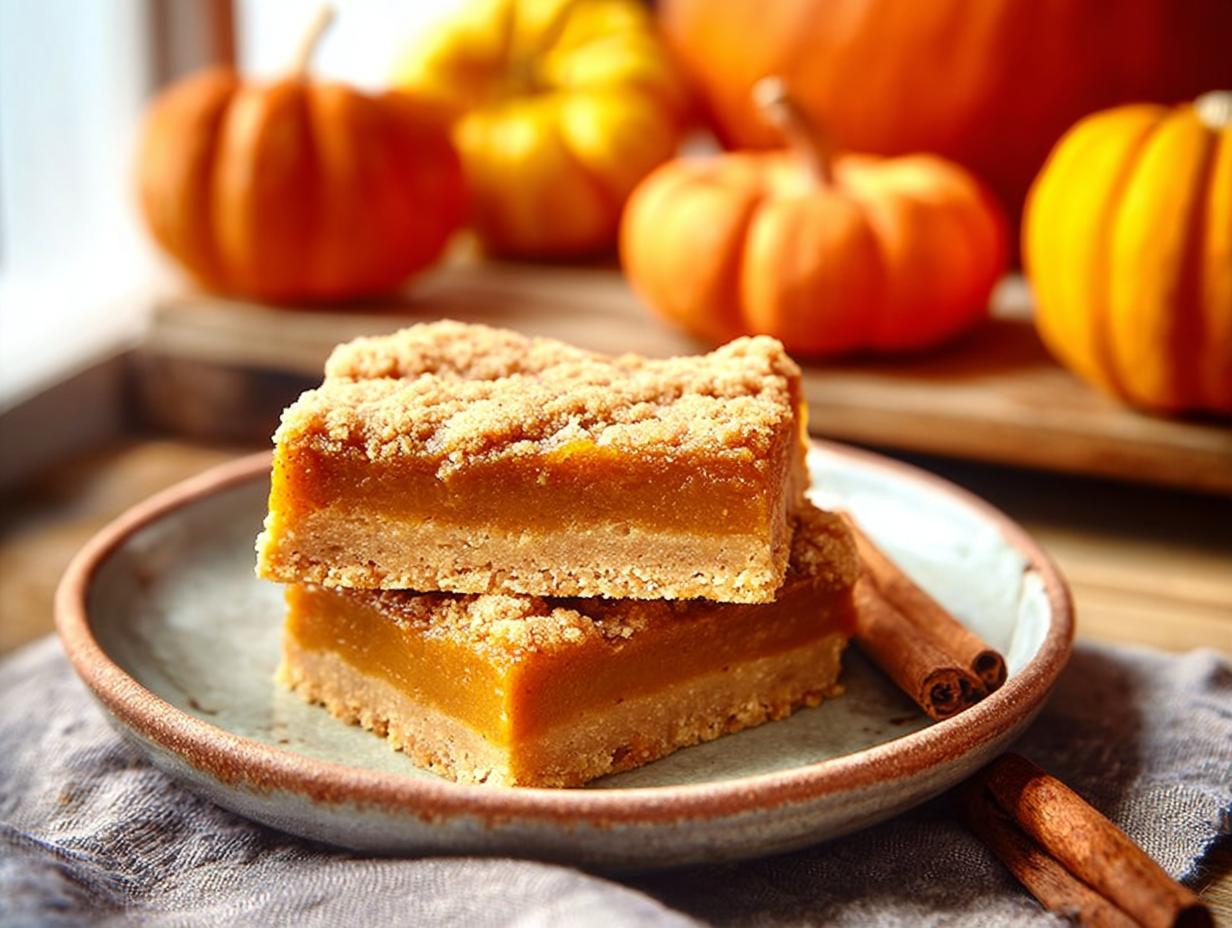
I’ll never forget the first time I made pumpkin pie for a big Thanksgiving dinner—only to watch it crack right down the center. Total heartbreak. That’s when I started tinkering with these pumpkin pie bars, and honestly, I haven’t looked back since. They give you that same creamy, spiced pumpkin filling and buttery crust, but without any of the pie fuss—no rolling dough, no blind baking, no worrying about a soggy bottom. I’ve tested this recipe at least six times (my family was happy to be taste-testers), and I can promise you: the crust stays perfectly crisp, the filling sets like a dream, and they’re so much easier to share. One bite and you’ll be hooked.
Why You’ll Love These Pumpkin Pie Bars
These bars are my go-to when I want all the cozy fall flavor without the pie drama. No rolling dough, no fussy crimping—just press a simple crust into the pan and pour the filling right over. They’re perfect for crowds (hello, Thanksgiving potluck), super portable, and they store beautifully in the fridge for days. Plus, you can cut them into neat squares, so everyone gets a perfect slice with that buttery crust intact. Trust me, once you make them, you’ll never stress over pie again.
Ingredients and Substitutions for Pumpkin Pie Bars
Let’s walk through what you’ll need—nothing fancy, just the usual suspects you probably already have around. For the crust you’ll grab 1½ cups all-purpose flour and ½ cup granulated sugar. The star here is ½ cup cold butter, cubed—and yes, it has to be cold. I’ve tried it with softened butter and the crust turned into a greasy mess. So keep that butter fridge-cold. For the filling, you’ll need a 15-ounce can of pumpkin puree (not pumpkin pie filling—they’re different), one 12-ounce can of evaporated milk, and 3 large eggs. The sweetness comes from ¾ cup packed brown sugar (dark or light both work, but dark gives more depth). Season it with 2 teaspoons pumpkin pie spice, 1 teaspoon vanilla extract, and ½ teaspoon salt. That’s it—simple, straightforward, and no weird ingredients.
Substitutions for Pumpkin Pie Bars
I get it—sometimes you need to swap things. For a gluten-free version, use a good-quality gluten-free flour blend (the one with xanthan gum works best—I’ve tested it with Bob’s Red Mill and it turned out great). Dairy-free? Substitute the butter with a vegan butter stick (cold, cubed) and use canned coconut milk instead of evaporated milk—just shake the can first. For the eggs, I haven’t tried an egg replacer here, but if you experiment, let me know how it goes. Just keep in mind that substitutions can change the texture a bit, but these swaps are my go-tos and they’ve worked beautifully.
Ingredients and Substitutions for Pumpkin Pie Bars
Let’s walk through what you’ll need—nothing fancy, just the usual suspects you probably already have around. For the crust you’ll grab 1½ cups all-purpose flour and ½ cup granulated sugar. The star here is ½ cup cold butter, cubed—and yes, it has to be cold. I’ve tried it with softened butter and the crust turned into a greasy mess. So keep that butter fridge-cold. For the filling, you’ll need a 15‑ounce can of pumpkin puree (not pumpkin pie filling—they’re different), one 12‑ounce can of evaporated milk, and 3 large eggs. The sweetness comes from ¾ cup packed brown sugar (dark or light both work, but dark gives more depth). Season it with 2 teaspoons pumpkin pie spice, 1 teaspoon vanilla extract, and ½ teaspoon salt. That’s it—simple, straightforward, and no weird ingredients.
Substitutions for Pumpkin Pie Bars
I get it—sometimes you need to swap things. For a gluten‑free version, use a good‑quality gluten‑free flour blend (the one with xanthan gum works best—I’ve tested it with Bob’s Red Mill and it turned out great). Dairy‑free? Substitute the butter with a vegan butter stick (cold, cubed) and use canned coconut milk instead of evaporated milk—just shake the can first. For the eggs, I haven’t tried an egg replacer here, but if you experiment, let me know how it goes. Just keep in mind that substitutions can change the texture a bit, but these swaps are my go‑tos and they’ve worked beautifully.
How to Make Pumpkin Pie Bars
Alright, let’s get to the fun part. First things first: preheat your oven to 350°F and grease a 9×13-inch baking pan. I like to use butter or non-stick spray—whatever you’ve got.
Start with the crust. In a bowl, whisk together the flour and granulated sugar. Drop in those cold, cubed pieces of butter, and use a pastry cutter (or your fingertips) to work it all together until it looks like coarse crumbs—kind of like wet sand. Then dump it into the pan and press it down firmly. I use the bottom of a measuring cup or a flat glass to really pack it in. Pop it in the oven for 15 minutes, until it’s just lightly golden around the edges.
While the crust bakes, whisk up the filling. In a large bowl, combine the pumpkin puree, evaporated milk, eggs, packed brown sugar, pumpkin pie spice, vanilla, and salt. Whisk until it’s smooth and fully combined—no streaks of egg white, please.
As soon as that crust comes out of the oven, pour the filling right over the hot crust. Don’t let it cool first—that’s the secret to a crust that stays crisp! Bake for 40 to 45 minutes. How do you know it’s done? The edges should be set, and the center should be just slightly jiggly. A knife inserted near the center should come out clean—if it’s still wet, give it another 5 minutes. Let it cool completely on a wire rack, then refrigerate for at least 2 hours before cutting. I know it’s hard to wait, but cold bars slice so much cleaner. Trust me on that.
Tips for Perfect Pumpkin Pie Bars
I’ll be honest—my first batch of these bars was a bit of a mess. I got impatient and sliced them while they were still warm, and the filling just oozed everywhere. Lesson learned! So let me save you the trouble with a few hard-won tips.
First, press that crust down evenly. I use the flat bottom of a metal spatula or a measuring cup to really pack it into the pan. If it’s thicker in some spots, it’ll bake unevenly and you might end up with a soggy patch. Second, don’t overbake the filling. You want the edges set and the center just barely jiggly—like a gentle wobble, not a wave. A knife inserted near the center should come out clean, but if it’s still wet, give it a few more minutes. Overbaking leads to cracks and a dry, spongy texture.
And here’s the most important one: refrigerate before slicing. I know it’s tempting to dig in right away, but letting the bars chill for at least 2 hours makes the filling firm up so you get those clean, sharp edges. Trust me—your patience will be rewarded with perfect squares every time.
Storage and Reheating Pumpkin Pie Bars
These bars are seriously great for making ahead. Just cover the pan tightly with foil or plastic wrap and pop them in the fridge—they’ll stay perfect for up to 5 days. If you’ve got leftovers (lucky you), I like to freeze individual bars for later. Wrap each one tightly in plastic wrap, then foil, and they’ll keep for up to 3 months. Thaw them overnight in the fridge when you’re ready.
As for reheating, I actually love them cold straight from the fridge—that firm, creamy texture is so satisfying. But if you want that warm, just-baked feel, microwave a single bar for about 15 to 20 seconds. Don’t go longer or the crust might get soggy. A quick zap brings back the cozy flavors without ruining the texture.
Frequently Asked Questions About Pumpkin Pie Bars
I get a lot of questions about these bars, so let me answer the most common ones before you even have to ask.
Can I use fresh pumpkin puree? You sure can, but you’ll need to roast and puree a sugar pumpkin, then drain off any extra liquid. Fresh pumpkin tends to be more watery than canned, so I recommend letting it sit in a cheesecloth-lined sieve for about 30 minutes to remove excess moisture. Otherwise, your filling might turn out runny.
Why is my filling watery? That usually happens if the pumpkin puree is too wet or if you didn’t bake it long enough. Make sure your filling is set around the edges and just slightly jiggly in the center. Also, don’t skip the refrigerating step—chilling helps the filling firm up. If you’re using fresh pumpkin, drain it well as I mentioned above.
Can I make these ahead? Absolutely! These pumpkin dessert bars are actually better the next day. You can bake them a day or two in advance, keep them covered in the fridge, and slice just before serving. They also freeze beautifully—just wrap individual bars tightly and thaw overnight in the fridge when you’re ready.
How do I prevent the crust from getting soggy? The trick is to pour the filling onto the hot crust right out of the oven. That quick heat sets the bottom of the crust and creates a barrier. Also, make sure you press the crust firmly and evenly—thin spots can get soggy. And don’t overbake the filling, because a too-wet filling can seep into the crust as it cools.
Can I skip the evaporated milk? I wouldn’t recommend it—the evaporated milk gives the filling that rich, creamy texture without being too thin. If you’re dairy-free, you can use full-fat coconut milk (from a can, not the carton) as a substitute. Just shake it well before measuring.
Serving Suggestions for Pumpkin Pie Bars
Honestly, these bars are perfect just as they are—but a little topping never hurts, right? I love adding a generous dollop of whipped cream right before serving. Or, if I’m feeling fancy, a drizzle of caramel sauce and a light dusting of cinnamon makes them look bakery-worthy. For fall gatherings, I’ll sometimes serve them warm with a scoop of vanilla ice cream—the cold and creamy contrast is pure magic. They’re a huge hit at Thanksgiving and potlucks because they’re already cut into neat squares, so no messy slicing at the party. Just grab and go!
Nutritional Information for Pumpkin Pie Bars
I’ve crunched the numbers for you so you know exactly what you’re getting in each square. Here’s the breakdown per bar (based on the recipe as written):
| Calories | 230 |
| Total Fat | 9g |
| Saturated Fat | 5g |
| Unsaturated Fat | 3g |
| Trans Fat | 0g |
| Cholesterol | 55mg |
| Sodium | 200mg |
| Carbohydrates | 33g |
| Fiber | 2g |
| Sugar | 18g |
| Protein | 5g |
Keep in mind these are estimates—exact numbers depend on the brands you use and any swaps you make. But it’s a solid ballpark so you can plan your plate (or your guilt-free second helping!).
Share Your Thoughts on These Pumpkin Pie Bars
I’d love to hear how these turned out for you! Drop a comment below with your rating or any tweaks you made—I’m always curious what you guys come up with. And if you’re feeling generous, snap a photo and share it on social media (tag me so I can see!). Happy baking, friends.
Print
Pumpkin Pie Bars: 4 Foolproof Steps
- Total Time: 1 hour 5 minutes
- Yield: 16 bars 1x
- Diet: Vegetarian
Description
These pumpkin pie bars combine a buttery crust with a creamy pumpkin filling. They are easy to make and perfect for fall gatherings.
Ingredients
- 1 1/2 cups all-purpose flour
- 1/2 cup granulated sugar
- 1/2 cup cold butter, cubed
- 1 can (15 oz) pumpkin puree
- 1 can (12 oz) evaporated milk
- 3 large eggs
- 3/4 cup packed brown sugar
- 2 teaspoons pumpkin pie spice
- 1 teaspoon vanilla extract
- 1/2 teaspoon salt
Instructions
- Preheat your oven to 350°F (175°C). Grease a 9×13-inch baking pan.
- Mix flour and 1/2 cup granulated sugar in a bowl. Cut in cold butter until mixture resembles coarse crumbs. Press firmly into the bottom of the prepared pan.
- Bake the crust for 15 minutes or until lightly golden. Remove from oven.
- In a large bowl, whisk together pumpkin puree, evaporated milk, eggs, brown sugar, pumpkin pie spice, vanilla, and salt until smooth.
- Pour the pumpkin mixture over the hot crust.
- Bake for 40 to 45 minutes or until the filling is set and a knife inserted near the center comes out clean.
- Cool completely on a wire rack. Refrigerate for at least 2 hours before cutting into bars.
Notes
- For a gluten-free version, use a gluten-free flour blend.
- Store leftovers in the refrigerator for up to 5 days.
- Prep Time: 20 minutes
- Cook Time: 45 minutes
- Category: Dessert
- Method: Baking
- Cuisine: American
Nutrition
- Serving Size: 1 bar
- Calories: 230
- Sugar: 18 g
- Sodium: 200 mg
- Fat: 9 g
- Saturated Fat: 5 g
- Unsaturated Fat: 3 g
- Trans Fat: 0 g
- Carbohydrates: 33 g
- Fiber: 2 g
- Protein: 5 g
- Cholesterol: 55 mg